This is a tale in three parts. It starts with a tree, has an interlude with bacon and smoked chile and ends with Christmas present woodworking. I’m sure it will all come together. Let us start with the tree.

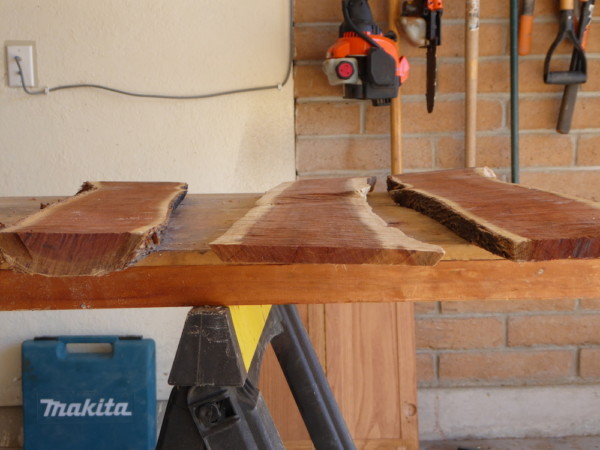
The remnants of the tree from hell
There’s a 40’ mesquite tree in the front yard. It’s a nice tree, but is unfortunately heavily compromised by a desert mistletoe infestation. I’ve tried to keep up with it, pruning back branches, removing clusters; but this is not a nice tree. It is peppered with 2 inch surgical needles. Every time I try to clean it up, I lose ½ of my total blood volume. So over the years, I’ve neglected the upkeep and the infestation worsened. It was not long for this world.
So over the course of a many weekends, each with the requisite blood sacrifice, across a couple of months, the behemoth is slowly dismantled – I’ll spare the details; I didn’t take any pictures during the demolition, this is really a job for a montage. In the end, it was reduced to a stump, a couple of large trunk sections, and the firewood in the background – the firewood will make another appearance in the bacon and chile section of our presentation.
Oh, and several relatively straight limbs that could, with the help of a chainsaw mill, be converted into boards for an aspiring woodworker; said planks will make an appearance in our Christmas present woodworking section. Note, when picking up the limbs and trunk sections to cut the planks, be careful where you grab. Interrupted this little fella’s dinner when retrieving straight logs from my pile for processing.

Selections of relatively straight limb recovered from tree of hell.
Logs after crude processing with the chainsaw mill.

Always watch what you grab…
Now to the smoking. In the culinary sense, you degenerates. Every couple of months, I make bacon. Not as in cook up some bacon on the stove (that happens significantly more frequently), but turn a couple of pork bellies into something resembling bacon. The essential process is to acquire 1 or 2 slabs of pork belly, brine or dry rub for a week or so and then smoke for somewhere around 12 hours. I don’t use any cure, just salt and spice, so it’s not the normal sort of thing you think about when when you think bacon. It’s smoked pork belly.
While sometimes I’ll buy some pecan or apple chunks, in the vast majority of cases, I’ve not planned ahead and end up using mesquite chunks from one of the several mesquites in the yard. With the aforementioned demise of the large mesquite, for the last several sessions, I’ve exclusively used the mesquite harvested from that adventure.
Now the homemade “bacon” thing has been going on for several years; somewhere along the way, I realized, “hey, I like chiles, why not make some chipotles while I’m at it?” So now with every bacon session, I usually throw 20-30 jalapenos on the smoker and after smoking set them out on the window sill to fully dry and then grind them up – and presto! homemade chipotle powder.
Over the course of several sessions, I added poblanos (ancho powder) and a random selection of New Mexico, anaheim, etc and made chile powder. Basically, whatever chiles looked good at the store the day before the smoking session. Maybe one day I’ll grow my own chiles and can then have a completely homegrown product, but I seem to have misplaced my green thumb somewhere along the way.
Since I like all sorts of chiles even those that might not be amenable to the smoking treatment, I’ll often add a bunch of habaneros or thai chiles to the window sill drying session. Here are some pictures of the latest chile roundup that inspired this post. Thai, Habanero, chipotle and ancho and the final powders. I only hope that the mask is better at stopping virus particles than chile powder or we’re all being forced to live a lie. I assure you it doesn’t stop one from getting a snootful of habanero powder up your nose.

Thai

Habanero

Chipotle

Ancho
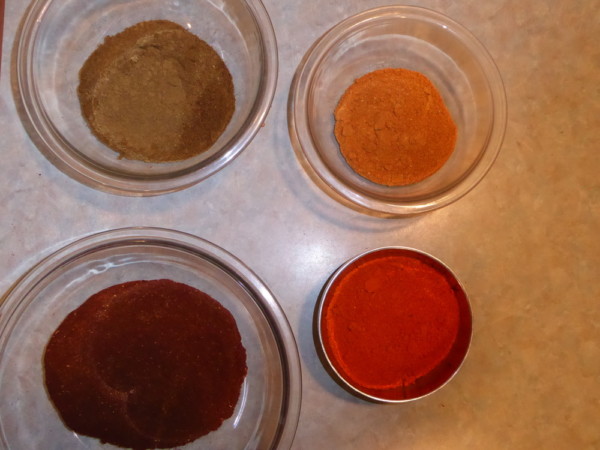
And in powder form
Now, at this point, you may be wondering, what the hell does this all have to do with woodworking and Christmas? Well, it goes like this. I mentioned in passing to an acquaintance that I made chipotle powder and they were of the opinion that this was ‘neat’ and I volunteered that I’d bring some next time I saw them, never intending to follow through. However, now Christmas time was approaching and I’m in my usual quandary brought on by lack of imagination. What to get people for Christmas?
Well the less-Putrid member of Chez Putrid suggested spice mixes. Well that sounds good – easy, minimal investment of time, inexpensive… Perfect! But then it occurs to me that it’s kind of weird to just get a plastic jar of spice. Well, less-Putrid has another suggestion – why not make a spice rack and give a sample of spices in a home made spice rack? As is the norm, she comes up with ideas and the only thing I have to figure out is the implementation and execution.
But it is a great idea – chiles smoked with mesquite from the Putrid Estate, dried in the beating sun filtering through the dusty windows of the Estate, and presented in spice racks built from wood recovered from the Estate grounds? Modulo the lack of a green thumb, that’s kind of a neat home grown story. Plus I only have three friends, so I only have to make three samplers. Well, two friends really and an annoying brother. Thus begins the final, Christmas woodworking portion of the presentation.
The first task was to design the racks and build a crude mock up out of plywood to make sure it will work. Figured I would include 4 spice bottles, so ordered an 18 pack of 2 oz glass jars. Jars in hand, I have the dimensions, so can lay out the design and build the “template”. Seems to work – but I sure hope the final product looks better!

A crude design and a more crude template.
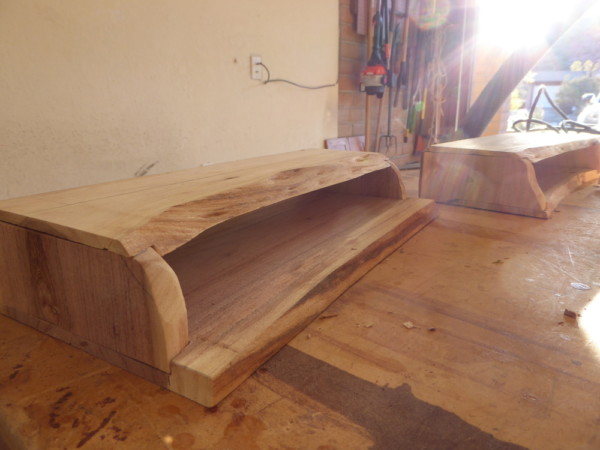
Next step is to pick the best boards out of my stock of processed mesquite limbs. At this point, the chainsaw mill has been used, with very little expertise, to generate moderately flat boards with lots of rough imperfections. So these will need to be planned and squared off. Normally, you’d run these through a jointer to flatten one side and edge to have a good reference to square up the board. However, I want to keep rough, rustic edges. And I don’t have a jointer.
I do have a planer. Now conventional wisdom is that the rollers on the planer will flatten the board temporarily while it cuts the stock and leave you with a cupped board, while a jointer has a hard flat surface. I haven’t had that experience; a planer can, if inefficiently, flatten a board. I help it along by building a stiff plywood base to run through with the board. So anyway, I flattened the boards with the planer.
Next they need to be squared off – which is no simple task with no straight reference edge. So I roughly drew a straight line following the grain and referenced edges perpendicular to that line and trimmed with the chop saw.

Going through the planner to about 5/8 for bottoms and side, 3/8 for the top

Squaring off
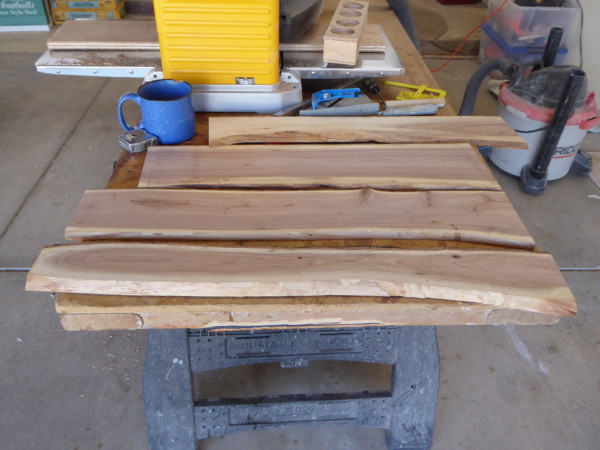
Boards are ready
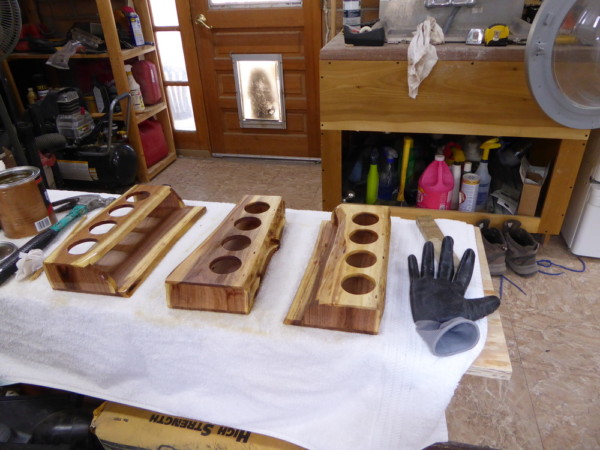
From here, we extract 3 tops, 3 bottoms and the corresponding sides. Since the edges are staying ‘rustic’, the sides and tops and bottoms don’t really line up, so need to pull out the scroll saw and rough cut the edges to line up and blend with the tops and bottoms. The joints will be cleaned up later with sanding. For the joinery, I decided on half lap glue joints re-enforced with very small brad nails. Don’t like mechanical fasteners, but I don’t have time (or skill) to do good dovetails. The nail marks can be filled pretty well with a mixture of wood glue and sawdust.
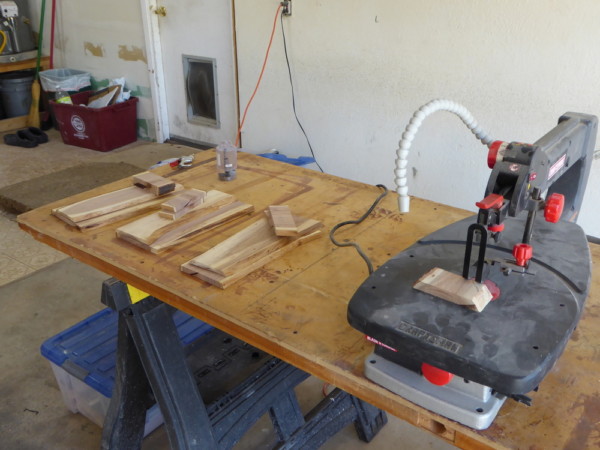
Scroll saw to get intial fitting of sides to top and bottom

Half lap joints routed
Close up of coarse finish
Now we take a 2 inch Forstner bit to cut the 4 holes in the tops where the spice containers will eventually fit. Prior to glue up, I went through a series of sanding rounds, up to 800 grit. Smooth as a babies bottom. Not that I’ve ever felt a babies bottom. But alone, in the dark, when I imagine what a babies bottom feels like, this is it.
After the sanding, glued them up and tacked with the brad nailer. Once everything sets up, there’s a new round of sanding – to blend the sides into the tops and bottoms – that required a fairly aggressive grit at 150. Once everything is blended as best I can, went back through with a series up to 800 again with the random orbit sander followed by a final pass by hand with a 1600 grit. The final passes need to be by hand since the inside parts can’t be reached with the tool. We are now ready for the finish.

Rough sanded.

Fine sanded. I know you can’t tell the difference, but I can… so smooth. I, uh, rubbed these for a long time, reveling in the smoothness.
For the finish, I elected to go with two coats of ‘natural’ stain – doesn’t change the color, just darkens and accentuates the grain. Often times on wood with a beautiful grain structure like this, I’ll just go straight to the finish coat, but decided to try and make the grain pop a bit more. For the finish coat, 3 layers of polyurethane with a light sand with 1600 between each coat.
Final finish, waiting for one more pass of 1600 grit.

Filled spice containers, left to right: ancho, chipotle, thai, habanero.
Fill up each spice container, label, insert into finished rack and vio-la, all done. Now to pack them up in a manner that will ensure they survive UPS – or at least minimize the chances for damage.

The final product – this one was my favorite, I like the rustic edge on the top. I wish I only had one friend so I could keep one for myself…

Nice work
Yes!
Very cool!
I’m a fan of a nice wood grain.
I’m not a fan of rustic style though.
Still, that’s pretty wood.
Sorry to insult you uncivil, but I suspect my brother is similar vis-a-vis rustic style. That’s why he’s getting the one on the far left in the final sanded picture. It has much straighter lines and a more finished/angular look.
In the end, I like both straight clean lines and the rustic. I went in with the intention of making nice squared up pieces – I just couldn’t bear to remove some of the beautiful edges from these boards.
I wasn’t insulted. Why would you think that?
I was comparing you to my brother. That’s an insult to you. I apologize. Profusely.
Nice work,
Those are beautiful peppers. Nicely presented. Strangely tuned on.
Good thing a few folks still learn the old craftsman ways. We’re going to need those skills and experience for The Restoration.
Great project PM. I am amazed at your creativity and skill (and generosity). A lot of work to give away. Thanks for embarrassing me and people like me.
Always enjoy seeing things like this, even if it’s a spectator sport for me
Lucky friends to receive such gifts, aren’t they?
I am a spice freak and would love a beautiful way to house all of them. Excellent work!
Would.
The finished spice rack looks good.
Very cool. Dove tails are easy with a jig and a router. I have the cheapest of cheapest from Harbor Freight and it works fine. Probably not good for daily use but I wouldn’t know. I have used it once.
I am envious of the readily available supply of mesquite.
The problem with harvesting mesquite, at least from the trees around here, is the paucity of finding straight enough limbs to get decent sizes out of. Limits the sorts of projects one can tackle without lots of edge joinery.
Nice woodworking! I always enjoyed Woodshop class more than Home Ec in junior high when we alternated between the two. Sadly, don’t have quite enough space now for a decent workshop setup, not to mention that the startup cost of sewing is more within reach for me.
I should have bought a miter saw instead of a table saw.
Oh well, don’t have the spare cash to spend on power tools.
With he right jig, you can do anything a miter saw can do on a table saw. The reverse isn’t true.
I have no jigs. And what the table saw seems best at is throwing wood at the wall when it finally separates the pieces.
To much power tool.
(damn nice work, said by a guy with way too many hand planes that he is always attempting to sharpen)
I’ve planed boards by hand in the past. It is some effort; hats off if that’s your normal approach!
I don’t know whether you have heard about him, but there is an English kid up in coastal Washington who is rebuilding a 110-year-old wooden boat. He’s filming it and putting up the videos on Youtube to pay for the whole thing, and watching his woodworking, along with helpers, is wonderful. He uses both power tools and hand tools to make wooden beams, 12×18 or so half the time to fit perfectly.
Here he is talking about the state of the boat and the Ship of Theseus. https://sampsonboat.co.uk/ep58/
In other words, both methods have their place.
Thanks all for the kind words. I find the process strangely cathartic, including the hard labor parts. And when is works out, it’s very satisfying. Much much less so when things get screwed up! But that’s why it’s such a great present – I get to pretend I’m generous while selfishly enjoying the hell out to the process.
Wtf is happening?
Our embassy in Baghdad got hit Sunday by several rockets. Three rockets failed to launch. Guess where they were from: IRAN. Now we hear chatter of additional attacks against Americans in Iraq…
…Some friendly health advice to Iran: If one American is killed, I will hold Iran responsible. Think it over.
Israeli Subs transiting the Suez canal, with Egypt’s blessing, one of ours in the Persian Gulf already, What is happening?
Finally.
HEY YUFUS!
Sup Tres!
Natty Daddy in the House!
These ladies would love to work some wood on Ass Wednesday.
https://archive.li/Ff0CR
No face diapers. Good.
I think, judging by her picture here and in her iChive gallery, #7 squats.
I like #10.
#26 is tricksy about showing off her butt. I like it.
#36 is cute and has a nice iChive gallery.
Hopefully those are bruises on #39’s butt.
#44 reminds me of someone that used to work out at my gym.
#71 reminds me of an ex-girlfriend.
Good overall.
Very nice.
He who controls the Spicerack, controls the WOOD!
🙂
Real nice. Extra bragging rights making your lumber.
WALMART TO GIVE GUN RECORDS TO ATF
Luckily I have only bought a bit of .30-30 and 9mm at Walmart.
The only gun stuff I’ve bought from Wal-Mart is Hoppe’s and a cleaning kit.
I got the Hoppe’s cleaning kit as well.
That is beautiful. I would really like to be on your list of friends. I have smoked chilis before. I like that there’s both flavor and heat.
More heartwarming news from PA
Deluxe Diner on Lancaster Pike in Cumru Township is one of 10 restaurants in Berks County ordered to shut down after continuing to let people to dine-in, despite Pennsylvania Gov. Tom Wolf’s mandate earlier this month.
“I refuse to go by his rules,” said Anna Burkman, who owns the restaurant with her brother.
Burkman said too many people depend on their restaurant for it to close now.
“We have a lot of elderly people that come here. [They] cannot cook for themselves,” said Burkman. “They depend on us to be open.”
She also said she can’t fathom letting her employees go right before Christmas. On top of that, Burkman said it’s her right to remain open.
My dad definitely went to one of those places in Berks that didn’t shut down, and refused to name names.
Good.
If I were in back in PA, I’d visit as many of these place as I could.
Iowa 2nd district. The Sec of State certified the Republican winning by 6 votes. The Democrat says, fuck you.
https://www.kcrg.com/2020/12/22/iowas-2nd-district-may-have-no-representative-for-months-due-to-challenge/
Using a similar case from 1985 as an example, Iowa’s Second District may not be represented in Congress for months as Democrat Rita Hart challenges her 6-vote deficit to Republican Mariannette Miller-Meeks.
It will be up to the Democrat-controlled House of Representatives to decide if Miller-Meeks or anyone is sworn-in to replace retiring Rep. Dave Loebsack on January 3rd. Iowa certified Miller-Meeks as the winner of that contest but, in a filing on Tuesday, Hart issued a challenge to that result to the U.S. House of Representatives citing several specific instances of uncounted, legal votes.
A similar challenge to an Indiana House race in 1985 provides a glimpse of what might come next. THat race faced a similar challenge to the U.S. House of Representatives and ultimately flipped the outcome of the election.
Several Republicans, including Miller-Meeks, protested Hart’s move as “ignoring Iowa law”. Rep.-Elect Ashley Hinson argued “the Constitution provides a clear path for addressing any concerns: the courts.”
I expect Pelosi and the narrow Dem majority in the House will overturn the certified election results in Iowa in contravention of Iowa law.
Hart issued a challenge to that result to the U.S. House of Representatives citing several specific instances of uncounted, legal votes.
She only needs to find a manila envelope full of
votesballots to “correct” this.She already has them. 22 ballots excluded by poll workers on election night that could not be included in the formal recount by Iowa law.
She is asking the House of Representatives to void the certified election results and add 22 ballots that will put her in the lead.
Gorgeous work. I love that you used wood from your own place. That really adds another beautiful layer of meaning to the gift, along with the time and creativity.
Thanks for sharing with us!
In Russia covid jabs you.
Police found a Russian scientist working on a vaccine for the Chinese coronavirus dead this weekend, concluding that he fell out of a building in St. Petersburg, local media have confirmed.
Alexander “Sasha” Kagansky died with stab wounds on his body, reports stated.
According to the Russian newspaper Moskovsky Komsomolets (MK), Kagansky fell from the 14th floor of a building in St. Petersburg in just his underwear. Russian police are reportedly investigating the incident as a homicide and have questioned another man about the incident.
At least they are looking at it as a homocide. That’s more than usually happens when someone falls out of a window in Russia.
Im off to work, kids. Dont tear the place apart while Im gone.
I’ll just exit stage right and leave you with this little stinkburger.
/moons @ Zoom call
I see PM’s bio is a reference to what Santa’s Little Helper from the Simpsons hears. Probably the same thing a lot of people hear when I go down a rabbit hole of etymology.
Homer is jealous of your spice rack: https://i.imgur.com/kF0sCyM.jpg
metal song from 9 years ago featuring people in N95 masks breaking laws:
https://www.youtube.com/watch?v=e_S9VvJM1PI
actually a reference to this
OK, that made me like Rush.
A little.
“But but but they had a song where they changed the time signature 3 times!”
[does not look up from Thucydides History of the Peloponnesian War]
Christmas comes early
https://www.atf.gov/firearms/docs/general-notice/sb-criteria-withdrawal-notice-12-23-20pdf?fbclid=IwAR1Sa6QgU9MQCBTrUOxp5mi4g5cZRv0bBqK-eYHdB-OpUz0tjW2_qtiGV0M
If you want to keep one, perhaps your brother should be getting a really personal gift card to someplace.
the unlikely beginnings of a woodworking legend
***
Roy Underhill (born December 22, 1950)[1] is an American woodworker and television show host. Born and raised in Washington, D.C., he was the first master housewright at the Colonial Williamsburg reconstruction. Since 1979, he has been the host of the PBS series The Woodwright’s Shop. Along with This Old House, which debuted the same year, it is the longest running PBS “how-to” show.
Underhill was introduced to traditional woodworking by a sister who worked at the Smithsonian Institution. He attended the University of North Carolina at Chapel Hill and earned a degree in Theater. In the early 1970s, Underhill and his wife moved to Colorado to form Homestead Arts to pursue a career in acting. When that failed, the Underhills moved to a remote area of New Mexico where traditional woodworking was one of the few means of survival.[2]
***
Never. Get. A. Degree. In. Theater.
Very nice, PM.
*Thinks about the stack of 16″ red pine slabs that have been “curing” in the garage for 7 years*
So far I have only made a desk and a patio table.
Also I think I need to ask Santa for a spice grinder for next Christmas.
The Stache has made a list and checked it twice.
Want to see what you guys think. Unlike E. Warren, I have reservations on the context of some apparent positions. But I haven’t seen anything from Stossel in a long while, so I don’t know what kind of evolution he has had.
He pandered a bit, but overall a good list, I’m watching Stossel interview Snowden, long form, pretty good,
https://www.youtube.com/watch?v=ZSu4rCizyUM
Where do you put the cumin?
Why, in one of the holes of course.
Acceptable. On the rack also acceptable.
I skipped third grade when I was young. Fortunately you two are re-creating the experience for me. I approve.
Short bus took you back to first?
Yeah, I started talking about Austrian economics and the problems with the Federal Reserve and they demoted me…
Hayek’s The Road to Kindergarten
I skipped seventh grade.
Can’t cook, batin.
On the split can be fun at times. Be careful of stains.
Just to subject some other people to this. German metalcore band on a Japanese label. Let the insanity wash over you.
I laffed. I gives the music the attitude it deserves.
Gave me a headache.
Not the Bee?
https://babylonbee.com/news/to-celebrate-covid-relief-mcdonalds-introduces-the-600-mcstimulus-burger
After eating McD’s, you get the runs.
Damn, pretty sweet PM. Nice to have the materials on your own property. You live in Arizona?
Almost done with toxic company. 2 days in January and contract is up. Bitch boss greeted nme with her fake ass “Ohayo Gozaimasu” (Good Morning) and it creeped the fuck out of me. If I don’t like someone, I can’t fake it like that. Very rarely run across people like this and my only desire is to get as far away as possible. Just gonna do the job and ignore her when possible.
But Shogun taught me that the Japanese have 6 faces and 3 hearts. What’s the surprise?
Psychopathy knows no borders.
“Look at that subtle off-white coloring. The tasteful thickness of it. Oh, my God. It even has a watermark.”
Almost done with toxic company.
Good to hear.
+1 work from home
toxic company
Natto producer?
-1 Bad Company
And I can’t deny.
Nice stuff.
Also, nice snek!
I love the combo of the two projects! I wish I had the space for woodworking. It appeals to me – planning & drafting & measuring twice & &cutting once.
Measure once, cut twice and it’s STILL too short!
That’s what the moyle said.
/I’ll see myself out
Nice rack.
^ wins post
Too obvious.
I guess Zoom is closed for the night. *sigh*
I finally get rid of OMWC so I can talk and, nope.
No zoomin’ for me on a school night.
Everyone in the Civilized World is off tomorrow. Even the Household Token Jew.
Shame, I was about to join and continue my tradition of not speaking (much).
Australian wagyu picanha. Will be cooking tomorrow.
I hardly ever see that cut. It’s the most prized one in Brazil. I think it’s usually called culotte steak here if I remember correctly.
We had traditional Swiss fondue tonight. Equal parts Emmenthaler cheese, Equal parts Gruyere cheese, crushed garlic, White wine, A little corn starch to thicken it. Crusty French Bread for the non-low carb, Blanched Broccoli, Blanched Cauliflower – for the low carb. So very good. The only cheese better than Gruyere is Raclette.
My wife spent her middle school years in Switzerland (naked swimming lessons!). My roots are Holland and Britain – both known for cheese.
“I love cheese, Grommit!”
naked swimming lessons!
Go on…
Apparently, in the late 1970’s, swimming lessons in Switzerland were conducted without swim suits.
I have heard from the father-in-law that saunas were also coed and in the nude.
Apparently he had a HARD time keeping his composure.
Naked swimming lessons were not limited to Switzerland
I like that movie. Underrated. Yeardley Smith and original Audrey Griswold.
In the early 80s we backpacking around Europe and spent a couple days staying with my friend from med school and her boyfriend at their place in Germany. They took us to the local swim spot, a lake, and everyone there was completely naked, from kids to elderly.
Cheese is one of those things where I understand why other cultures may be disgusted by the idea – “rotten milk!” – but is so goddamn delicious.
I do, vaguely, get pushed near the “disgusting valley” with some bleu cheeses, once they _really_ start tasting like ammonia.
To brie or not to brie
Baked brie
*rolls eyeballs to back of head in ecstasy*
Mmmmmmmm fondue!
Raclette is so awesome.
The best fondue I have ever had (or made), however was using the Alpage gruyere. Hard to get and only available in a tiny window this time of year, but sooooooooo good! (#notvegan)
the best place I have found for raclette stateside has been here:
https://www.leelanaucheese.com/cheese.html
One final cup of holiday cheer for my Glibz and Gliberinaz before spending the rest of the week with my parents!
https://imgur.com/5BtA5Ih
https://imgur.com/FBjwZm4
NSFW.
I wish you all this kind of top quality pussy (or sausage if that’s what you’re into).
My hat is off to you, Q – a man who knows what he likes and went out and got it.
Enjoy the week and best to you, Mrs. Q and impending baby Q.
Thank you sir. Merry Christmas to you and yours.
Mrs. Q is really getting her time in the spotlight this week.
Well, let’s see if anyone is still around since I still have some wine.
Maybe this Zoom link will work
I’m trying but it never likes the password.
The church by my house just rung their bells at midnight. That’s a bit ballsy. I would understand if it was tomorrow night.
I thought tomorrow night midnight was the birthday of the big J, not tonight.
I’m seeing about 4 different euphemisms here.
I’m trying to put you all in a state of euphephoria?
Well, ACKSHUALLY he was born in April or May.
Damn Romans! always messing with the calendar!
Did they get the day of his death right or is Easter some pagan holiday repurposed by the Christers.
Pagan Fertility Ritual day…..
Easter was easier to pin down because it happened during passover.
This carol describes pretty much everyone on this site.
Haven’t seen you around much recently. Everything good?
I am free of the shackles of work for 4 days. Woo-hoo! The proposal is in final draft.
I casually mentioned to my spouse t he at I haven’t seen Elf snd was immediately ordered to sit on the couch and watch. It was cute. Why they bleached Zooey Deschenel’s hair for her role is beyond me though.
I hadn’t either until the other day. She has a lovely singing voice.
e.g.: https://m.youtube.com/watch?v=Ni75mYuwvlg
Yes she does!
I love her New Years Eve duet with Joseph Gordon Levitt.
https://m.youtube.com/watch?v=HesHYL2Wcg8
Also cute.
Lefties!
Yeah, she hits all of my weak points. It’s the bangs that kill me.
Me too. The four days, I mean.
I almost forgot to input my time today. That is now done, out of office message in place, and phone is turned off.
I like Elf. It’s one of my annual watch movies. Christmas in Connecticut is done. Can’t remember if I did Blackadder but going to skip Love, Actually this year. Maybe Die Hard tomorrow morning.
It was cute. I’m not a fan of whatshisname, but Zooey is great.
Morning Glibs.
Morning UnC. I’m ready to start my staycation.
Morning, TARDy!
Merry Christmas Eve, GlibRed!
Morning, UCS. Do you have to work today? I’m on for just under half – any employee who clocks in at their usual time and stays until we close at noon will get paid for a full day.
I have work today, but I’m also the ranking member of my team, possibly of the whole group.
*ranking member working
It was cold in my house this mroning.
Turns out the thermostat batteries had died. I wish this thing were wired for power instead of just data.
Lacking that, it’s too bad it doesn’t beep the way a smoke alarm does when the batteries start to run low.
Well, I changed the batteries, the furnace is running.
Did you get far in the latest story?
Page 15 of 67. He’s just meeting the other test pilots. I like our hero. He loves what he does, but he’s…quirky.
Well, that’s one way to put it.
Well, sheet.
I already ordered the new phone and all of a sudden my familiar phone stopped misbehaving. :/
What model did you settle on?
I’m desperately keeping my outdated and all-but-obsolete phone alive because it’s a horizontal slider with a physical keypad for my clubbed thumbs. I know I’ll have to get another phone at some point and would like to minimize the surveillance features.
Samsung Galaxy A21 – because it’s A: not that expensive and B: renown for battery life.
I’ll have to spend some time killing the unwanted surveillance elements as I always do.
I don’t know how successful I’ll be, but I do have the advantage that I’m willing to break ‘features’ other people will want to keep working.
And no big surprise – Verizon no longer supports my current phone. I guess I’m on my own.
Time to go get ready for work. Merry Christmas Eve, all!
Have fun.
If you’re worried about surveillance stay away from Android phones, they can’t be trusted even with all of the data collection features set to off. Then again you can only halfway trust Apple so…
It’s all out there already. This is just putting fingers in dikes and not the ones that snap them off at the second knuckle.
Mornin’ Glibbies! On my refractory period from 19 days worked. Have discovered that Yoga Pants Parcel Girl is a cool chick and not just eye candy for for my surreptitious male gaze. Now I feel the shame and go to box. Of course that doesn’t mean that I’ll stop checking out her bum at work but I’ll do it more respectfully. Baby steps to wokeness, I suppose. Two free days of debauchery await!
Yoga Pants Parcel Girl should be the name of a song by some shoe-gaze band. “I’ve always loved you from afar, Yoga Pants Parcel Girl. Why can’t you understand who I am, Yoga Pants Parcel Girl”
What a lovely gift. You friends are lucky