Welcome to Building a Suspension Rig. The article itself will be relatively SFW, but will touch on one of the ahh, more salacious hobbies for which I am known.
Shibari, or alternately Kinbaku, is a Japanese influenced style of rope bondage. An important aspect of which is suspension; or using ropes to both bind and lift a model into the air while she is bound.
Rope suspensions are a big draw. Seeing one is often what gets people interested. It’s what caught my eye years ago when I first started learning. I thought, “Shit, tying chicks up in the air looks fun. I need to learn how to do that.” Little did I know this would lead to learning about (rudimentary) structural engineering, working load limits, and other such arcane and perverse arts.
If you read the Movin’ On Out article you may recall a throw-away mention of using one of the rooms in the house as a dedicated rope room. In order to do that, I needed a hard point from which to do suspensions. Which sounds easy enough.
A hardpoint is an attachment point connected to a structure that will (hopefully) support the weight and dyna
mic forces of a body being suspended and put in motion in the air. This can be as simple as throwing a climbing strap over a large branch of a tree, and using various equipment stolen from rock climbing and wilderness rescue to create a place to suspend from. Other outside applications include using wooden swing-set kits with 4×6 lumber for the beam and 4×4 lumber for the legs. Indoors, most applications involve tying into rafters/beams in one fashion or another. Partly depending on if one has access to the attic space above a ceiling. Either way, the goal is to distribute the weight and force so that the person being suspended doesn’t fall on her head or shoulder because the hardpoint comes out of the ceiling.
Most folks only want a single point. Usually this involves a 4×6 beam spanning at least 3 rafters, with a forged, shouldered eyebolt through the center of it. The eyebolt is then below the ceiling. Often folks will put an empty light fixture box in place so that the eyebolt is inside it. A blank cover with a magnet glued in the middle can then be used to disguise the eyebolt. However, if you either can’t get into the attic above the ceiling or want more than one point, folks will often to with unistrut (or superstrut). Unistrut is 12 gauge (at least for this application) steel or aluminium product generally used in commercial construction for hanging race ways, ducting, wiring, etc. It’s easy to bolt to things, and so the common approach is to get a 10′ length and bolt it to the ceiling joists through the drywall. Then use forged eyebolts with shoulders as the hardpoint. This is one of the simplest ways to do things; most forged eyebolts are rated specifically for rigging and have easy to determine WLL (working load limits.)
A digression, Working Load Limit is really important with this. WLL is determined by taking the Minimum Breaking Load and dividing it by a Safety Factor. Because we are dealing with humans and the risk of catastrophic injury or death is there, the normal WLL for rope suspension is MBL * .10. In other words, a 10 to 1 factor. Concientious riggers then add in an additional safety factor as many suspensions are dynamic (IE: the person being suspended doesn’t go straight up and down, they may be moved about in multiple directions). Generally the thinking goes, if you’re tying someone that weighs up to 200lbs you want to have a WLL of at least 1000lbs or greater. Unistrut bolted to 6-8 joists/rafters are going to meet that requirement. An eyebolt rated at 2000lbs+ WLL is less than $10, so over-engineering is easy to accomplish.
What if you can’t bolt to the ceiling joists? Either because you are in a rental, or because you have plaster & lathe ceilings, or (as I discovered) your home has wooden ibeams for joists? Well, you can build a free-standing structure. There are tons of designs for these out there where you buy some lumber and bolt together a stable structure. The aforementioned swingset sets can also be adapted. And there are some various “portable” hardpoints made for people who do silks, or for cleaning deer, or any number of other applications. None of these are that great. You have a really limited working area where the structure is stable. Or you can only tie in one place.
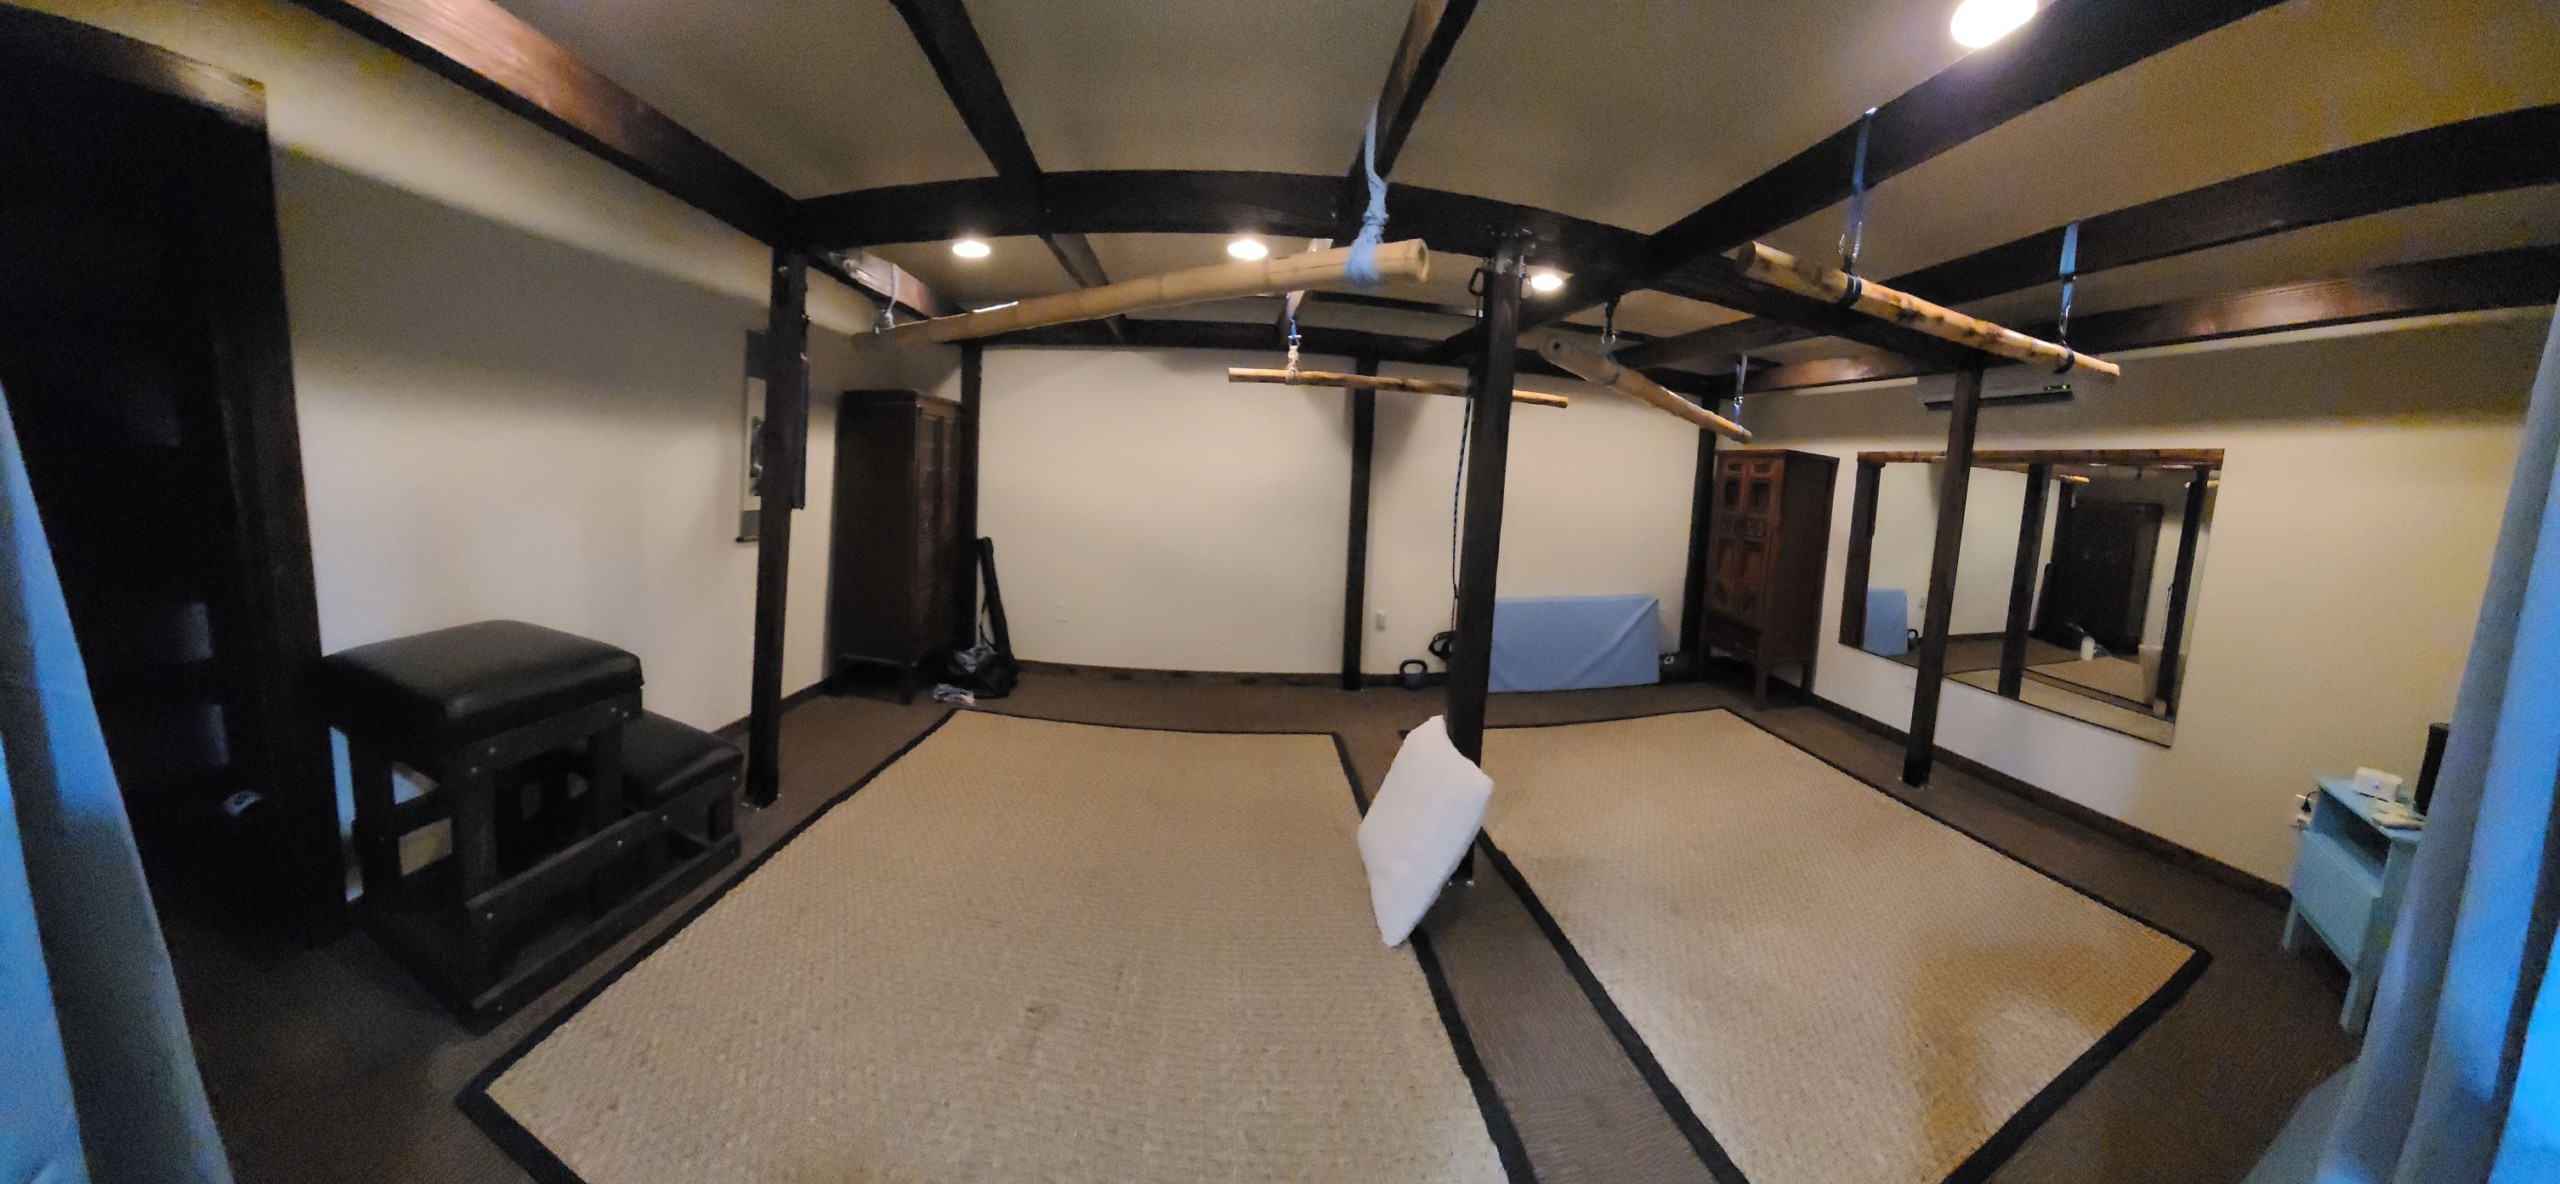
I like to do a style of suspenion that involves using lengths of architectural grade bamboo. By having multiple lengths, you can move the person being suspended in multiple dimensions. You can manipulate pitch, yaw, and roll as well. As mentioned though, my original plan of buying $100 worth of unistrut was out the window. You can’t bolt anything to the bottom of I-Joists. This sent me on an odyssey. I spent months measuring, designing, reviewing documentation for Simpson’s StrongTie products, measuring again, re-designing, and etc.
The rope room is on the lower floor. The back wall is a foundational wall, the floors are concrete, and the ceiling is just over 8′ and has dimensions of 17.5′ x 14′. I settled on a design that is 14’x16′ using wood and various Simpson Strong-Tie connectors. If you’ve any interest in building structural shit, I highly encourage you to take a look at their catalogue. They make some cool hardware.
The design itself went through a half-dozen revisions, changing as I learned more about how to calculate WLL and about the products I wanted to use. Once I had the final version it was time to buy materials and start the physical labor.
The lumber I purchased is as follows. I had to sell like 3 orphans to afford it. Normally this would be less than an orphan.
4x4x8: 9
4x6x8: 10
2x6x8: 8
The hardware connectors weren’t much cheaper. The following Simpson Strong-Tie connectors were purchased:
Corner Caps: 4
Mid Point Caps: 6
4×6 Joist Hangers: 2
Post Bases: 9
2×6 Joist hangers: 16
With materials purchased the next step was preperation.
I thoroughly sanded each of the beams and posts and joists. I rounded the corners and edges slightly on all of it. Went from rough to fine grit in three stages to make everything smooth. Then stained all 27 pieces of wood. All of the hardware was spray-painted a mat black and given two coats. I left the fasteners the default stainless.
Installing it required a little help from my friends. We used the post caps to bolt the beams to the tops of the beams for the north side, then attached the post bases, raised things into position, and bolted the bases to the concrete floor. We did the same for the south side. Then put in the middle row of posts and the east, west, and central beams. And finally added in the middle joists using joist hangers. To finish it off and to keep it square I then custom cut some wedges to get in the corners.
Lastly, I needed to hang the bamboo. I still need a few more lengths of it, and I’ve taken to learning to flame treat them. I also added smart lights so I can control the color and intensity of the lighting. A few other bits of furniture and some jute rugs to complete the look and it is ready for rope shenanigans
All in all, it took about 8 hours to assemble it. And I probably put in a good 20-40 hours cutting, sanding, and staining.
But here is the end result:
Ready to hang around.
working load limits,
huhuhuhuhuh.
But here is the end result:
That is a very cool room. Thanks.
Thank you. I’m really pleased with how it turned out.
Tatami on the floor of a shibari room.
I wish I had given 10% as much though to when I tried to build a pullup rig for my fledgling CrossFit gym ca. 2007-08. I just bought a bunch of 1″ steel pipe and started putting shit together until I had something that I thought would work.
Narrator: “It didn’t work.”
I hadn’t factored in all of the swinging and the rocking and rolling that thing would do, so then I had to try to find a way to brace it. I can’t remember where I bought all of the connecters, but a fellow gym owner had recommended an online company that made various kinds of aluminum fittings. In the end, I had a giant erectors set that would support about 3-4 folks doing pullups on it, but had to be re-tightened every week.
I plan to do annual PMs on the various bolts and inspect for undue wear. But I think this will last quite a long time.
Not my bag, but very impressive.
No, just no, but you do you,
I love that Elon consistently eats Bezos’s and Branson’s lunches. I always have a soft spot for successful immigrants.
(sorry for OT this early – meant to comment in the ded thread)
“You can manipulate pitch, yaw, and roll as well.”
It’s like flight school, but with lube.
So Navy flight school?
*chuckle *
+1 Tailhook
When I went to flight school all the rentals were “wet rates.”
Is it truly curved or is that a fish-eye effect?
Regardless, it looks great.
I’m 100% if I ended up at some rope demonstration I’d instantly transform into one of the Progressive “you turn into your parents” ads: “boy, that hard-point doesn’t look like it’s got sufficient strength to deal with lateral shear.”
It’s the camera, using the widescreen mode. And thank you.
Also, any decent rope person is doing exactly that any time they go to a rope thing.
“boy, that hard-point doesn’t look like it’s got sufficient strength to deal with lateral shear.”
That’s what she said?
The lumber I purchased is as follows. I had to sell like 3 orphans to afford it. Normally this would be less than an orphan
I think that’s a good deal for these days.
The setup looks both elaborate and simple at the same time.
Nice work!
Not my jam, but the room is pretty and I appreciate the DIYness of it all.
Careful with that kind of talk, you *do* live in Oregon, don’t you?
Interesting post, and very nice work!
He said he was learning about it, not using it. Guessing he didn’t actually calculate the member capacities, but was going off the catolog.
OT–on the spacex livestream wtf is with this “send bitcoin or ether to this address and we’ll immediately send you double the amount back?” Is this someone rebroadcasting a legit interview stream?
Yes, SpaceX doesn’t need our money,
Nigerian Princes are standing by?
It’s enraging. Youtube can shit all over you if you talk about covid or elections wrong, but can’t block one of the oldest crypto scams there is.
the future,
https://www.youtube.com/watch?v=yO9VRtrTJwc
OT: About an hour ago I went out to my car to grab a pack of smokes only to discover both of my driver side tires slashed. Understandably furious, I go back inside to smoke a bowl before I inflict even more damage on my property. A few minutes later I see a cop role up and park a bit up the road. Apparently somebody in a white van went through the area and slashed mine and two of my neighbors’ tires in a random act of vandalism. A neighbor managed to catch them on camera but I’m not confident anything will come of it. So now I get to miss work tomorrow and spend money on unexpected bullshit.
/rant over
Now, on to this disturbing yet fascinating article.
Sorry.
Ugh, that sucks! I hope you get to take it out of the perp’s ass. My mailbox was vandalized by some kids years ago, along with about 20 or 30 other homes. They caught the kids who did it, and over the course of about 5 years, they paid back all our expenses. Make sure you report the costs of repair to the police, in case they do catch, convict, and fine+restitution the jerks.
Neil Armstrong, is that you?
Bang! Zoom!
One of these days Alice, one of these days…
That just sucks man,
People are assholes. Sorry to read that.
That’s terrible. I’d be enraged.
If I had my druthers, I’d hand them over to you and let you practice your craft…do your worst.
Great article, by the way…my only response is the Mal Speechless Gif.
I bet you were a helluva Boy Scout.
Thank you.
I was a mediocre scout at best.
Sorry to hear that. Random bullshit just sucks.
That sucks. Sorry, dude.
Assholes. Sorry for your troubles.
Well, crap! I’m so sorry that happened to you. The only tiny comfort is that it wasn’t directed at you personally. If it had been me and I hadn’t found out about the other nearby incidents, I’d be terrified that someone was after me.
Hope you can find a good deal on tires and that they DO catch the perps.
Sounds like your car is owning you, man.
Like, wow.
*hits bowl*
I’ll say it backwards…wow.
This scares me.
However, what about a Power Rack or two?
That could work. I know someone that uses a power rack, but you’d have a fairly limited working area. Plus it is a different aesthetic.
One of the things people do when they travel is to use the luggage cart as a hard point. So a power rack would definitely work.
I’m just thinking if you had a couple, you could reconfigure them. Strong as hell, even freestanding.
Great article, as usual. I hope you are enjoying the new digs!
Thank you. I finally finish the kitchen remodel next week. A few more pieces of furniture in the next month and the inside will be done. I’m thinking about a follow-up article once everything is in place.
That’s a good idea. They are strong. Though I use mine for actual weights out in the shop. There hard to find too in the pandemic world.
How does that work? Don’t the wheels make the whole thing unstable? Also, how is the luggage cart tall enough to suspend someone?
This must be a good article because your avocation is well outside my experience m
I chock a wheel and the rest is good management of your uplines. Normally I tie an agura (think someone sitting Indian style with rope binding their legs and waist all together) and a takata kote (the classic arms behind chest harness) and lift her straight upwards, then rotate it so she’s facing up with her back parallel to the floor of the cart. It’s tricky.
And I learned new Japanese too. Didn’t expect that.
Kinbaku
きんばく【緊縛】
noun, suru verb
1. binding tightly, tight binding
2. (sexual) bondage
緊
キン, しめる, しまる
tense, solid, hard, reliable, tight
縛
バク, しばる
truss, arrest, bind, tie, restrain
I feel I have a accomplished something.
I’m utterly unsurprised the Japanese have a word for it.
https://torontosun.com/news/provincial/furey-durham-region-mandates-contact-tracing-for-gatherings-in-peoples-homes/wcm/ab7d1d45-a0cf-4ec0-a135-b751f98ac636/amp/?__twitter_impression=true
Now that Newsome is back I guess it is time to take off the gloves…
You put a lot of effort into that room and it shows. Well done.
https://mobile.twitter.com/brianlilley/status/143828101322703251
Who is worse, Republicans, Canadian Conservatives or British Conservatives?
I’m getting a “That page doesn’t exist message, so I’m gonna say “Your Mom”.
She is definitely the worst.
That’s on you, buddy.
Bobarian is still right.
https://mobile.twitter.com/brianlilley/status/1438281013227032581
Nikki is Winston’s Mom?
That explains so much.
“Who is worse, Republicans, Canadian Conservatives or British Conservatives?”
There isn’t any such thing as Canadian or British Conservatives. those are commie lites. Maybe we should start there.
But the actual answer is every one of them.
They are all the worst.
I have some thoughts on a suspension bridge. When I was a kid, we had these bridges across creeks called ‘swinging bridges’. They called them that because when you walked across them, they would naturally swing back and forth. The key was to go carefully so that they didn’t swing too violently.
One time, I think I was around 19-20 years old, me and my cousin decided to go fishing that afternoon. So we set out for a spot on the creek/river we had picked out. We had to cross one of those swinging bridges to get across so we could get to the spot. MY cousin being a total jackass and idiot decided to play a game on the bridge to make it swing some more. I remember him laughing and the next thing I remember the world was upside down. I fell about 20 ft down to the rocks below all the while cussing out that dumb fucker. The ‘Stop it you dumb motherfucker’ started a few seconds before the fall. I saw that dumbfuck land on the rocks right down from me still laughing like a retarded hyena.
The fall didn’t hurt me too much, but I had some nasty abrasions on my arms from the braided steel cables that you held on to while crossing the bridge.
We broke the bridge and the land owner was mad and we spent the next couple of days helping fix it.
Moral of the story, don’t act like a damn fool when crossing a simple suspension bridge.
That’s just good childhood fun, and surviving a Darwin test.
I wasn’t amused. One or both of us could have been seriously injured and it ruined our fishing trip. I remember getting back home and telling my ex GF, we fell off the bridge. She didn’t believe me at first. We were lucky because if we had made it another 10-20 ft, the fall would have been more like 35 feet, although we may have landed in water. I was pissed at that moron for weeks, I wouldn’t have anything to do with him.
I’d have beat the shit out of him. Doesn’t change the above.
When you pick these women up for the date do they know they will be hanging from your ceiling soon or do you use chlorophorm?
They know what they are in for. No chloroform needed.
https://brownstone.org/articles/how-quickly-our-freedoms-were-taken-away/
It Happened Here…
It goes slowly until it doesn’t. Such is the way of tyranny.
The ratchet is moving up rapidly as it accelerates…
The real sadistic torture is the nonfunctional up/down buttons which I keep pressing even though I know they don’t work.
The Whole thing is a Conspiracy,
https://www.youtube.com/watch?v=bGUZeQ9_R6o
OT: My home province, Alberta, just went 90% fascist as of 12:01 AM tomorrow:
https://www.alberta.ca/covid-19-public-health-actions.aspx
I wonder when they’re going to schedule the Albertan equivalent of Kristallnacht?
Jason Kenney, our supposedly rock-ribbed conservative Premier, has truly demonstrated himself to be a spineless bag of goo.
I think Canadian Conservatives are even more spineless than the British ones which is saying something…
Do I get this correctly that even grocery stores will be requiring proof of vaccination or a negative test unless they restrict capacity to 1/3 from September 20?
I guess not.
https://brownstone.org/articles/these-travel-restrictions-must-end/
Too bad, it spreads disease, destroys the earth and the Wrights were White Men so obviously it is racist.
I doubt that, I think the Biden Administration actually supports travel ban. If he were to remove it and that any opposition was racist and anti-science the media would eat it up…
Also he makes it sound like travel bans are mostly an American thing when they are happening everywhere. I guess that is his residual TDS talking.
How’d I know it was a Jeff Tucker piece before I clicked? Oh yeah, the condescending city mouse schtick.
Ironic considering how his fellow city mice are behaving. I mean compare his writings about NYC from Christmas 2019 to now.
Yes. One of the first acts of the Biden administration was to roll back eased restrictions and implement new ones.
How long until the unvaxxed get sent to the Killing Fields?
My 590M may have something to say first, I suppose you could hunt with it if you had to…
God Bless Ozy!
Ya know, it be refreshing if every once in awhile you offered a solution to the failures of classical liberalism to resist the rising authoritarian world. Instead, you relentlessly harp on the subject but only offer “Questions”.
Look, I’m not trying to contend that I’m as well read or intelligent as you. I’m just saying Glen Beck tried this years ago and it quickly wore thin.
To indulge in a bit of collectivism: I’m willing to bet the majority of the people here have begun to just roll their eyes and scroll on.
Or just bail out until tomorrow, peace out TH,
Later, bud.
I post out of despair not gloating. I had a feeling from 2008 or so that some sort of undeniable calamity would happen sometime in the future. I don’t know when or what it would be but it seems to have arrived.
I honestly I have no answer. That is what I have been looking for over here. The closest I have seen is mass civil disobedience in the future but that hasn’t yet materialized. Or more…erm kinetic responses which would get ugly very quickly.
I have lost everything, so i have nothing to lose, that makes this Glib Dangerous, really IDGAF,
This may be the most ernest response you have ever given me. I thank you for that.
err,..earnest.
The Importance of Being…ha!
The reports from CA/AU/NZ/UK leave me kind of speechless because I know that is where the US is headed.
I saw a stat that a poll showed 72% of unvaxxed willing to quit their jobs rather than get the shot. If even half of those people have bite behind that bark, we’re in for interesting times when the US catches up with those places.
Coincidentally, I picked up Beck’s 2010 book, Overton Window, at the library today. What he describes looks a lot like 2021 situation. His “Founders Keepers” organization, in whatever guise, may have resulted in Trump’s victory, but not enough of the population is of any mind to read the handwriting on the wall.
Consensual sexual torture bores me.
heh-heh
There was pegging in the last thread, might be more up your alley?
Bro is more of a “put mommy’s larynx down the garbage disposal after having his way with her severed head” kind of pervert.
Kinky
Wait, whut?
Relevant
https://www.aier.org/article/identity-politics-and-systemic-racism-theory-as-the-new-marxo-nazism/
Is it too late? This liberal power doesn’t seem particularly noticeable…
Marxo-Nazism
doesn’t quite roll off the tongue like prog-fascism. It’s also more stalinist than marxist anymore. It’s less “pay your fair share” and more “wreckers and kulaks to the wall”
well, that looks like it was worth an extra orphan! Nice work, CA.
Thank you!
OT: ***SIGH!!!*** Here we go again. Fortunately, I neither live nor work in the city. The only place within the city limits I regularly frequent is the ATM at the CU branch on my way home, but I have other options for that. Shouldn’t be too hard to avoid patronizing any business affected by this crap.
I just hope it isn’t coming back to too many of the ‘burbs, too.
It will come back…
Yep. The Morlocks will wear the badge just like all the help at the MetGala. Know your place. Wear the mask.
Many have said the MetGala looks a lot like the Capitol in the Hunger Games (and I wouldn’t be surprised if that was one of Collins’ inspirations, tbh), but it just occurred to me that the lowest in the books were those who had their tongues cut out for rebellion and were made into slaves of the ruling class.
Can I get the Demolition Man dystopia instead? at least we get Three Seashells and Wesley Snipes being a badass mfer
You’ll get 1984 and you’ll like it!
Just say no.
Accept that you are bound, gagged and blindfolded as you spend your brief existence hurtling through space. I already feel this way, so I’m not sure how kinky that would feel to me. In fact, hanging me up there would be redundant.
Glenn Greenwald points out that in 2015-2020, according to the crazies “the deep state is a cooky conspiracy theory but as of today it’s “thank God for the deep state!”
Ahahahahaha. Won’t change a damn thing tbough
Meh, we have generals openly bypassing presidential authority at the behest of members of the legislature with what’s going to be zero repercussions whatsoever.
We. Are. Fucked.
suh’ fam
yo whats goody
Good morning, homey!
Didja hear? Dave’s building a comedy club in The Springs.
Ive met Dave 2X. Once walking down the street in YS, and the 2nd time was with my ex-GF (OG-2X-OG) since she bought her weed from the same guy Dave used.
We met in a Taco Bell near there (Im sure you know the one) and Dave was higher than bird pussy. The 1st thing he said as we walked up- “Oh shit! Caucasians!”
https://6abc.com/pats-king-of-steaks-south-philadelphia-assault-fatal-fight-soccer-fans/11024324/
“Soccer hooligans.”.
🙄
Ouch! That’s why I always got my beloved regional sammiches at Jim’s. Nothing bad ever happens on South Street.
“however, once in a while you get a fight that escalates into violence”
I prefer peaceful fights.
“From my personal observations, there’s a lot of people that’s not from here that’s coming here trying to do things that are not the norm. Then, people get drunk, go to the bars and then all this commotion happens”
They’re not sending us their best.
Jeez. South Philly had enough problems, who thought it was a good idea to inflict soccer on them?
“From New York”
As if the match wasn’t enough of a shitshow. (The actual score was 4-0 – this was the 2nd leg.)
https://www.thegatewaypundit.com/2021/09/nicki-minaj-gets-locked-twitter-shortly-sharing-tucker-carlson-clip-records-rant-comparing-us-censorship-china-video/
Based.
She’s smarter than 99% of “celebrities” out there. Of course they hate her.
And their answer to her accusation of censorship is censorship. It’s just so pathetic.
On topic: good article, but not relevant to my interests.
https://www.autoblog.com/2021/09/15/chevy-bolt-garage-fire/
EVs for everyone!
Ages ago, someone (may have been TOS) linked an article to a Tesla catching fire.
One of the comments was “finally- a docking station for my Samsung phone!”
https://www.wfmz.com/news/area/lehighvalley/all-civilian-crew-led-by-easton-billionaire-blasts-off-into-space-2-former-wfmz-employees/article_e4b4d9b2-1671-11ec-bf8f-cf8d834dd5dd.html
Channel 69!
Also in local news:
https://wmmr.com/2021/09/14/adam-sandler-filming-hustle/
Norm Macdonald: Dead; Adam Sandler: Filming movie in Manayunk
The fates have a piss poor sense of humor.
I’m still not convinced these “Adam Sandler movies” actually exist.
Not necessarily an admirer of this particular hobby, but I appreciate the craftsmanship. Looks nice.
Creosote, that room is amazingly beautiful. Great job. I’m more of a Harvey Garret Smith type rope-work enthusiast – “A sailor by his knots is known.” and “Worm and parcel with the lay; turn and serve the other way.” but the Japanese style of bondage sure is pretty.
Thank you for the article.
Something that i have been theoretically interested in seeing, watching demo in person.
Gibs have a lot of interested idea/hobbies/tastes etc…
Well Done.
So, do articles now tend to have fewer comments?
Maybe this just dropped too late but I was expecting to see lots more comments. Maybe because CA didn’t really get into the fun parts…
Comment counts do seem to be down lately. People have announced they were taking mental health breaks.
I think we all have gotten depressed by the stupidity lately. Spouse is worn down by it, family is tired of it all.
I hope some of the lurkers start bringing in fresh snark.
The sun is going to rise, the chickens need their food. Sheep are ok, need to move more gravel.
Its going to be a good day.
Nah, it’s because the buttons don’t work.
I blame the Zooms.
And China, of course.
Yeah, there was a Zoomy last night. I even joined for a few minutes, if only because I have (((today))) off and I was kind of drunk.
Lastly, do people pay attention to covid numbers anymore?
I’ve gotten to the couldn’t give a shit, give me liberty or give me death arena now.
CNN viewers do.
Yeah, I was wondering last night if the increasing tyranny is actually based on any numbers, but not enough to bother to find out.
Okay, last last one
Do people use chains at all, particularly in contact with the skin, or just ropes?
Good Morning, Lt. Columbo!
+1 more thing
Morning, Glibs.
Mornin’ UCS.
How goes things in your corner?
Did you get out of Dodge?
That’s on the itenery later today.
Let’s see… Still working remotely, $employer has postponed RTO until Q1 2022, #2 son starts new Job Monday. Pretty good, as long as I ignore the fascists. Which I somehow cannot do.
#metoo and I’m not saying anything if my boss doesn’t.
Good morning, U – and ‘patzie, Lacky, robo, l0, Stinky, and Sean.
Mornin’ Red!
Good morning, Fes!
Good Morning GT!
Hope its going well for you and everyone else up way to early, or up to late.
Hey! It’s almost 7:30 eastern time.
suh’ brah
Well, the return to lower altitudes has had several interesting effects.
First, the pressure differential sealed our cooler shut for several hours until infiltration managed to equalize air pressure.
Second, I slept a lot better than I did at altitude.
Third, the world flattened out. There’s nary a hill in sight.
I was in Vail, CO with someone I was dating for a weekend getaway. She wanted dinner at the restaurant atop the mountain, which I think is around 13K ft. I warned her about the effects of alcohol at altitude (greatly enhanced). She was completely smashed from 2 glasses of wine.
85 Octane gas in CO always threw me off, too.
You know what’s sad?
The highest elevation in New York is Mount Marcy at 5,344 ft. The town of Tusayan (just outside the gates of the grand canyon) is at an elevation of 6,600 feet, and Cripple Creek is at 9,494 feet. So I just spent the whole first half of this week above the highest point in new york.
For all their talk, the Adirondaks are short mountains.
They have their own charms. Hardwood forest is much more spectacular come the Fall.
The highest point in Ohio, according to Wiki, is a whopping 1,549 ft.
Mornin’ all. Tired of COVID hysteria? Try this on for size.
https://www.upi.com/Science_News/2021/09/16/petstore-puppies-spread-bacteria-to-people/2861631728098/
Mask up, puppies!
So is this going to turn out like the California Newcastle disease chicken cull except with puppies? Or maybe the Danish mink farms covidian holocaust of 2020?
Good morning, very wise and beautiful people.
Hey, what about me? Mornin’
And Ghostpatzer!
Good Morning to the undead as well.
On topic – It’s not my thing but I appreciate the fine details and craftsmanship that went into CA’s hobby room. Different chokes for different folks, I suppose.
My thing is more along the way of furtive leering. Fine-assed Supervisor was back last night and her bum was fine. What a sad, pathetic shell of my former self I’ve become… That was the high point of my day. Ogling a woman half my age. Sad.
Well, it’s either a fine bum or it isn’t.
It’s spectacular but I feel like one of those old hunting dogs watching bird videos on a loop while the owners are away.
At least I don’t work in a college or high-school…
Or a nursing home.
The Great Elijah Mohammed was a big proponent of “half your age +7” rule.
The highlight of my day was using a raincheck to bring a 5lb. flat cut corned beef brisket down from $40 to $3. I don’t have any women to ogle at work. We used to have a cranked-up prostitute who would do her late night shopping; she was always nice, and easy on the eyes in that dirty-hottie kinda way. She hasn’t been in for a couple years. I prefer to imagine she went to live on a farm upstate.
Looks alluring but don’t get too close. The scent may be a little off-putting for the uninitiated. Wonder how Bob’s walleye rigs are working.
They have a farm for hookers? Free-range sluts ?
I may have to re-think how I feel about the “Empire State”.
Jugsy returns this weekend, and due to her severe distaste for corporate travel, may only be making another appearance in NYC a couple more times. Im tempted to take time off work (no invoicing!) and drop by, since at least the accommodations are covered. If I do, you’ll be the 1st to hear “Tres Cool has invaded Far Rockaway”.
I’m George Kennedy eyeing up “Lucille” and I feel bad because I should feel bad.
Yes I suppose that’s a fair assessment. It’s one of those kinks that is so far removed from actual sexytimes that as a “normie” I wouldn’t necessarily even recognize it as sexual unless it was explicitly described as such. Each to their own.
Imagine fleeing to Pakistan to escape for real toxic masculinity.
https://www.upi.com/Top_News/World-News/2021/09/15/afghanistan-taliban-girls-soccer-team/5691631716677/
Everything’s relative, being a social outcast beats getting married off and raped or shot any day. They’re clamping down on music and performers as well, not nice guys at all.
Oh yeah, this is a case of being forced to choose between bad and worse. Glad they got out.
I’m just glad that they didn’t choose America. I hear it’s really oppressive to women and minorities. I’m sure Pakistan will be a Utopia for them.
Good morning to the American based Glibs, good afternoon to the Euros, and whatever to the Japan based peeps.
Or evening to those of us that work 3rd shift.
Tall cans!
Konbanwa, Shōn-san 。.:☆:・'(⌒―⌒*)))
GAA! SPARKLES! Kill it!
*blam**blam**blam**blam*
?