Congratulations! You’ve completed your magnum opus du jour, a Glibs article explaining your not-at-all obsessive interest in sharks and championing similar appreciation in others. You know the title and subtitle you’ve chosen (“I like sharks!” “You should too!”) will attract hoards of eager readers. All you need now is the perfect featured image.
WordPress makes it easy to botch the featured image because there’s no preview method. The only way to insure that what-you-want is what-you-get is to format your featured image into exactly the form that WordPress displays them. This is currently 400 pixels wide and 250 pixels tall. The steps to do this are:
- Choose
- Crop
- Resize
The unbearable burden of choice
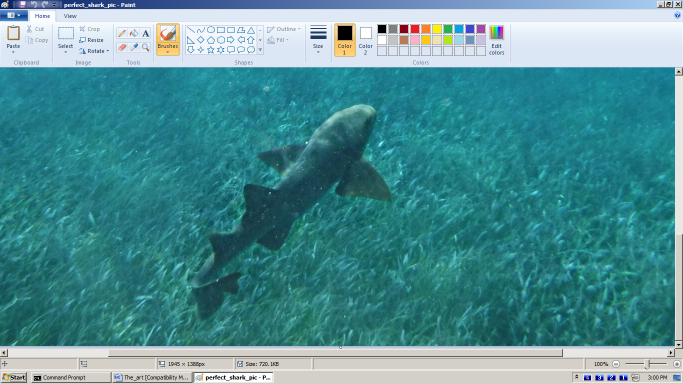
Because image editing will be involved you have greater latitude in choosing an original image. It doesn’t matter if there’s something in the image irrelevant to your article because it’ll be removed in the next step. So after typing “sharks” into DuckDuckGo and clicking on “Images” you find one that matches your definitive mental image:

When choosing an original image it’s best to get the biggest one possible to maximize the final image quality. The example above is 1945 pixels wide and 1388 pixels tall. Of course it has some superfluous content but that will be dealt with shortly.
I was told there would be no math
“Cropping” is specifying an area on an image and then removing everything outside it. Most cropping involves a simple rectangular area but in this application there’s a complication because the rectangular area must have the same width-to-height ratio as the way WordPress renders featured images: 400 pixels wide and 250 pixels tall. The width-to-height ratio is called the aspect ratio and in this case is 1.6 (400/250).
So what you want to do is draw a rectangle with an aspect ratio of 1.6 centered over the important part of the image. Some image editors make this trivially easy, others make it frustratingly difficult. For this example I’m going to use the most primitive image editor I have which is the ancient version of Microsoft Paint on my ancient Windows 7 computer.
The original image is too large to render full-scale on my ancient monitor so I’ve scrolled down to the important bit:
The “Select” tool works by moving the mouse arrow to one corner of an imaginary rectangle, click-and-hold, drag to the opposite corner, and release. The select area is shown with a black and white dashed outline:
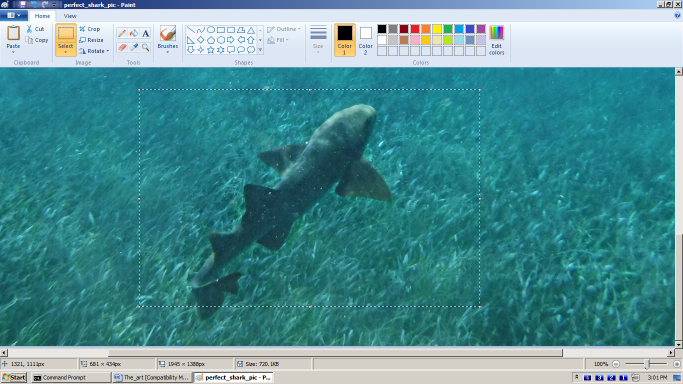
But now the frustrating part: What’s the aspect ratio of the select area? Paint displays the select area’s width and height at the bottom of the screen, in this case 681 and 434. Dividing width by height produces an aspect ratio of 1.57 which is close but not perfect. When dealing with an application as dumb as Paint I would draw and re-draw select areas until I got one that was close to the size and aspect ratio (1.6) I want. Then I would calculate the height and width of an ideal rectangle with the correct aspect ratio.
Assume the select area in the last screenshot is good enough:
If the select area’s height seems better than the width then calculate a new width as:
original height of 434 * 1.6 = 694 new width (rounded down)
If the select area’s width seems better than the height then calculate a new height as:
original width of 681 / 1.6 = 426 new height (rounded up)
In this case I judge the height is better so the perfect select area is (new) 694 pixels wide by (original) 434 pixels tall. Move the mouse arrow to your best-guess corner and select an area of that size. If it’s not centered then repeat the process until it is.

Once you have an acceptable select area, click the “Crop” button. Only the select area will remain.
Really, I was told there would be no math
In addition to the the width and height most image editors show a select area’s aspect ratio as it’s being drawn so it’s not necessary to do any calculations. Just drag the opposite corner until the select area is a good size and the aspect ratio is 1.6. Some image editors even let you reposition a select area after it’s drawn. This makes the whole process trivial.
That’s easy!
All image editors have a Resize function. Invoke it and resize the cropped area to 400 pixels wide by 250 pixels tall.


This is your perfect featured image. Save it to a file and upload it to WordPress. This article’s featured image is the one from this example so you can see what it looks like.
Postscript
I have magnanimously[1] granted Tonio’s request to mention his favored quick-and-dirty technique for framing featured images. I warn you however, the resulting image will be flawed and imperfect and (IMHO) should be corrected by sterilization.[2]
Recent versions of Microsoft Windows come with an app called Photos the crop function of which has a choice of fixed aspect ratios including one called “Widescreen”. In the video editing business aspect ratios are commonly specified by two numbers of the ratio. The current WordPress featured image ratio is 16:10. “Widescreen” is a common movie aspect ratio 16:9 which is a little wider than 16:10.
If you open your chosen original image in Photos, invoke the crop/rotate function, and select “Widescreen” a select area of 16:9 will be drawn over the image. This can be resized by dragging a corner. You can then drag the original image “under” the select area to frame the content you want. Click on “Save a copy” to save a copy. This is your featured image. No resizing step is necessary.
How will WordPress render it? Currently I think it’ll automatically crop the image back to 16:10 by cutting off slices of the left and right sides. You might to try to include a little extra of the original image to compensate.
Footnotes
[1] The fact that Tonio is one of TPTB and could sic STEVE SMITH on me has nothing to do with it.
[2] Bonus nerd points if you get this reference.
I think we found the last remaining user of Windows Me in the world.
No, my Microsoft computer is Windows 7 but I still use Paint Shop Pro 4.15 dated 1998.
R.J. Appears in the background, holding up a Raspberry Pi with Libreoffice.
*Music swells
https://m.youtube.com/watch?v=evN6DIGPIJM
I still use PSP for simple stuff because that’s what I’m used to. For anything complex I invoke the GIMP.
STEVE SMITH TELL ZED TO BRING OUT GIMP. COUSIN STEPHAN SMYTHE FROM WESTCHESTER COMING FOR VISIT.
I can only assume that the brilliance of my article has rendered the Gliberati speechless.
Or there’s something totally awesome going on in the Zoom.
That’s what you get for removing certain “superfluous content”.
There is a good sea anemone in the grass isn’t there? But it’s too far away from the shark.
You tell them, and tell them…
I thought that conversation was private.
I did home construction all past week, just too tired to snark. I was using a 4×3 ratio, or just 640×480 pixels for my art.
Next week WordPress may be rendering featured images as 4:3. I only noticed the change from 16:9 to 16:10 when a hand-crafted image got squashed. Damn you WordPress!
These photos look shopped. I can tell from looking at the pixels and having seen a lot of shops in my time.
Sir, your powers of discernment are amazing.
My recursive SQL query actually worked, now I must rest.
No! Details are required. Is there a stack space limit on the number of recursions in SQL?
Dude, it’s like the seventh day for me. I must rest after creating my data paradise.
Just remember what happened after the original paradise was created. You’re going to be awfully busy. Have a good data model for the Flood yet?
It’ll be fine, I’ve got it all planned out.
Just so long as nobody messes with the data tree…
I’ll send someone to help. You’ll like him. Just don’t say anything about his lack of appendages. He’s kind of sensitive about it.
Some days I fucking hate SQL. My coworker comes up with gibberish that is impossible to debug.
Been on a .NET project the last month. A joy in comparison.
Thanks, I normally let the WP resize the thing at will and deal with the distortion.
Now that this is solved maybe we can all help Boeing out.
https://www.space.com/boeing-starliner-first-astronaut-flight-delay-february-2023
If I wasn’t paying for this it would be much more funny. They basically stacked the RFP against SpaceX and still got spanked by them.
I don’t see that there’s anything we can do to help Boeing. It’s simply to big to fail.
Glibs no longer resizes (distorts) the images; the current WP template auto-crops.
Wonderful. Any logic to it or does it just grab the center of the image?
I’m wonder if there wasn’t some discussion at Glibs HQ. Riven’s links article has the subtitle (or excerpt) of :
“Who owns this image? Is it free to use? Who knows! But the weekend beckons in the distance.”
Maybe I cropped out everything except the shark because I didn’t want to sued for copyright infringement.
OTOH if thong-babe sued me at least I’d get her name and address.
That wasn’t supposed to be a reply. Damn you WordPress!
Some library and legal Glibs may know the specifics, but low res images of certain size can be used under fair use.
Many of the small images in Wiki of copyrighted entertainment characters fall into that.
Of course it has some superfluous content but that will be dealt with shortly.
?!?!?!?!?!?!
I see nothing superfluous with the original picture.
One must maintain a razor-sharp focus when writing Glibs articles. Otherwise we’ll all turn into Q.
Listen to DEG. Sometimes it’s the detour that makes the trip.
Sage advice.
Yeah, I was waiting for him to crop it on something else.
I’m not into BDSM.
Pervert.
There was a shark in it.
Well, here’s some interesting news: cobalt-blue Broward County has its school board flipped to Republican, but not by the voters.
Gov. Ron DeSantis of Florida suspended four elected members of the Broward County school board on Friday, following the recommendation of a grand jury impaneled to look into school safety and other issues after the mass school shooting in Parkland that left 17 people dead in 2018.
In its report, which was released last week, the grand jury found that the four school board members — and a fifth one who no longer holds that position — had “engaged in acts of incompetence and neglect of duty,” in part for what the grand jury described as mismanagement of an $800 million bond issue approved by voters in 2014 that was intended to renovate schools and make them safer.
That grand jury report ought to be interesting.
HES A DICTATOR! /idiots
Can they be held civilly liable for their misuse of funds now? Maybe they could go after someone actually somewhat responsible rather than Jones.
Not at all surprising. My old school district raised like 300 million for school upgrades, including like 100 million for security upgrades, and then promptly locked every kid out of the schools. Strangely I didn’t get any refunds on my taxes.
The new one just had a referendum on raising taxes, but it is a razor thin margin on the ‘no’ side, so they’re recounting. I’m skeerd.
100 million for security upgrades, and then promptly locked every kid out of the schools
Schools are more secure when they are empty.
The true aspect ratios are Academy (11:8) and Cinemascope (2.35:1).
I had to look up Academy. Never heard of it before:
https://en.wikipedia.org/wiki/Academy_ratio
I must now make my egress. My computer’s battery draineth. I thank you for your kind attention.
Good night!
Thanks for the article, Richard!
Thank you! Great article.
Your signoff reminds me of the end of this song:
Always laugh when nothing funny happens. (he-he-he)
Many other pointers we could mention.
Never let your ice cream melt.
Loosen two holes in your belt.
Thank you for your very kind attention!
Article in the queue. A table didn’t transfer from Word, don’t know how to deal with that.
Interestingly, 1.6 is the pixel aspect ratio of the Atari 7800’s 160×240 pixel mode.
*clears throat*
Neeeeeeeeeerrrrrrrdddd!
(We only had a 2600, looong after it was the hot thing. Although I did have an 800XL)
Aw man, 800XLs are neat!
My neighbor had an Atari 800, with an acoustic-coupler modem. I was so jealous.
The 800XL was a sweet upgrade over my Radio Shack CoCo, but tying up the phone line with a modem was out of the question.
FFFFFFFFFFFFFFFFFFFFFFIIIIIIIIIIIIIIIIIIIIIIIIIIIIIIIIIIIIIIIIIIRRRRRRRRRRRRRRRRRRRRRRRRRRRRSSSSSSSSSSSSSSSSSSSSSSTTTTTTTTTTTTTTTTTTTTTTTTTTTT
This seems right.
https://i0.wp.com/www.powerlineblog.com/ed-assets/2022/08/300073102_633612561457031_3069045154832369293_n.jpg?ssl=1
Proof
https://www.youtube.com/watch?v=lucXbsbRpw4
+1 kill the wabbit
Is anyone under 40 or so actually familiar with any Looney Tunes? (The real ones, not any of the shitty modern ones.)
https://www.youtube.com/watch?v=TJI_gygXsfs
I might have left 40 behind me last century.
I assume not. And it’s a damn shame.
They’re on Boomerang channel, and MeTV every morning but Sunday.
Yeah, but do people under 40 watch Boomerang or MeTV?
Yes.
People under 30? Mostly not, but I could be wrong. My son likes them, but he’s an outlier.
I only skimmed the article. Was there any math?
Yes and the test is 8 am tomorrow.
An article on the perfect image without
image title attributionalt text? WTF?Next time we let Q pick the images and Richard writes the article.
Nothing perfect about Q’s images…poor girls are going to have back problems.
Good article.
My image editing software of choice is the open-source GNU Image Manipulation Program (GIMP). It’s not as good as Photoshop, but it’s free which makes it better than Photoshop to me. Best part, relevant to this article, is that the select tool offers an aspect ratio input and the scale tool offers a locked aspect ratio option, so no math needed.
I used to use GIMP for some simple modifications like this and mild editing, I liked it.
It seemed to have a pretty severe learning curve. The one time I tried it, it took me forever to figure out how to crop a .jpg and save it as a .jpg file.
That is a good point. The GUI is not that intuitive, partly because there is a lot you can do with it, and I’m sure in some respects things could be more intuitively laid out. Once you’ve used it a bit it gets a lot better- but not having used it in awhile, I have probably forgotten how to do most things.
Good Morning?
Woke up way to early. I should go back to sleep but haven’t been able to.
Just a shout out to this crazy crew that has kept me sane. Thank you all.
Morning.
Dog sitting.
Guest hound is an early riser.
This is going to be a long week.
Morning. Same here, I was even up ‘late’. Like 11 PM almost.
It was a wild night.
Wild good or wild “this is how i got a scar”?
It was wild /s
We had dinner on the water at a place with live (if mediocre) music. A couple other couples joined us while our son ran around playing with the shells on the ground. It was nice but besides the Amish I don’t think anyone would find it out of the ordinary. I will say that it reinforced how difficult my son was as a baby- this kid was 4 months and no problem with loud music and everything else going on to eat, drink and sleep.
i work 6-2:30, so I’m up early even on weekends.
My sleeping-in days are over. Nowadays on weekends I couldn’t get up past my weekday time if I wanted to. And I do.
Gettin old
Go get a decent breakfast on weekends with good coffee. That’s my solution
I’ve had my Saturday morning toast. Later, after a quick trip to Office Depot for next year’s planner calendar refill, it’s off to the nearby local coffee-&-chocolates chain for the limited-time-only Iced Summer Nights Mocha, which is flavored with chocolate, hazelnut, and cinnamon. ***swoons***
Some bacon and eggs would be wonderful, too, but probably not in the cards this morning.
Excellent idea. I can’t sleep
In late either.
“The unbearable burden of choice”
I think Q would not have found this to be a burden, and would have easily cropped this picture differently.
Want to see something dumb?
https://archive.ph/2Cl9T
‘Trump and close allies have argued that the multiple investigations he’s facing, and in particular the search of his Mar-a-Lago property, are something out of a “banana republic.” But former leaders have been jailed or charged all over the world.’
*insert map*
You have to click to see the map, but it is hilarious.
That’s one for the history books
There appears to be a market for “journalists” who do nothing but analyze and rebut every single statement Trump makes.
Trump: “I took a wonderful dump last night. It was beautiful, the best.”
Journalist: “We spoke to experts and they agree that dumps can’t actually be beautiful. “
LOL.
It’s like arguing with a toddler.
https://www.wfla.com/news/florida/florida-man-arrested-for-trying-to-buy-child-report-says/
The orphan market is really inflated. Who hasn’t posted lately?
Somebody saw the Blues Brothers and thought it was a documentary.
That scene came to mind immediately.
Good morning, Lack, Scruffy, rhy, Ted’S, ‘bodru, and Slummy!
I went to bed much earlier than usual last night – I often get sleepy sooner on Friday nights, and though the Cardinals’ game was on MLB TV, they were losing badly to the damn Braves. (At least the Brewers lost, too.) So here I am greeting the sunrise at Tranquility Base! 😃🌅
Morning
Good morning GT. I hope we all get some stuff done today.
But not so much you cant move tomorrow. Planning on grape harvesting for neighbor.
I need to whack a little in the front yard and more in the back – especially around the raised garden beds…that didn’t get cultivated this year. 😕
Mornin’.
Yeah, Friday nights I crash hard from what must be all the accumulated sleep debt during the week. For some strange reason I can’t seem to party until 4am any more.
You don’t think that’s connected to you giving up cocaine?
LOL yeah that was one way to do it.
Extra good Powerline, covfefe everyone!
https://www.powerlineblog.com/archives/2022/08/the-week-in-pictures-back-to-school-edition.php
Gowron LOL