I think I was in the garage working on this project when Working Them Angels came up in the rotation. For the next hour I kept humming “working that wood, overtime”. And it’s just too important that a title like that be used that I couldn’t let a triviality like no article stop it.
I may be a little OCD. Maybe not. But maybe. That aside, I do like me some puzzles. Putting together a difficult puzzle calms my brain for a few hours. The downside is you end up with all these half disassembled puzzles laying around in their boxes. Some are just bad, but some are nice or interesting images (e.g. I have a topographic map of Mt. Rainier). Sometimes it seems a shame to just box them up and put them on a shelf. So this project started at a way to use some of the plank harvested from the mesquite tree – not enough to start building cabinets, but plenty to make some picture frames. Kill 2 birds with one stone.
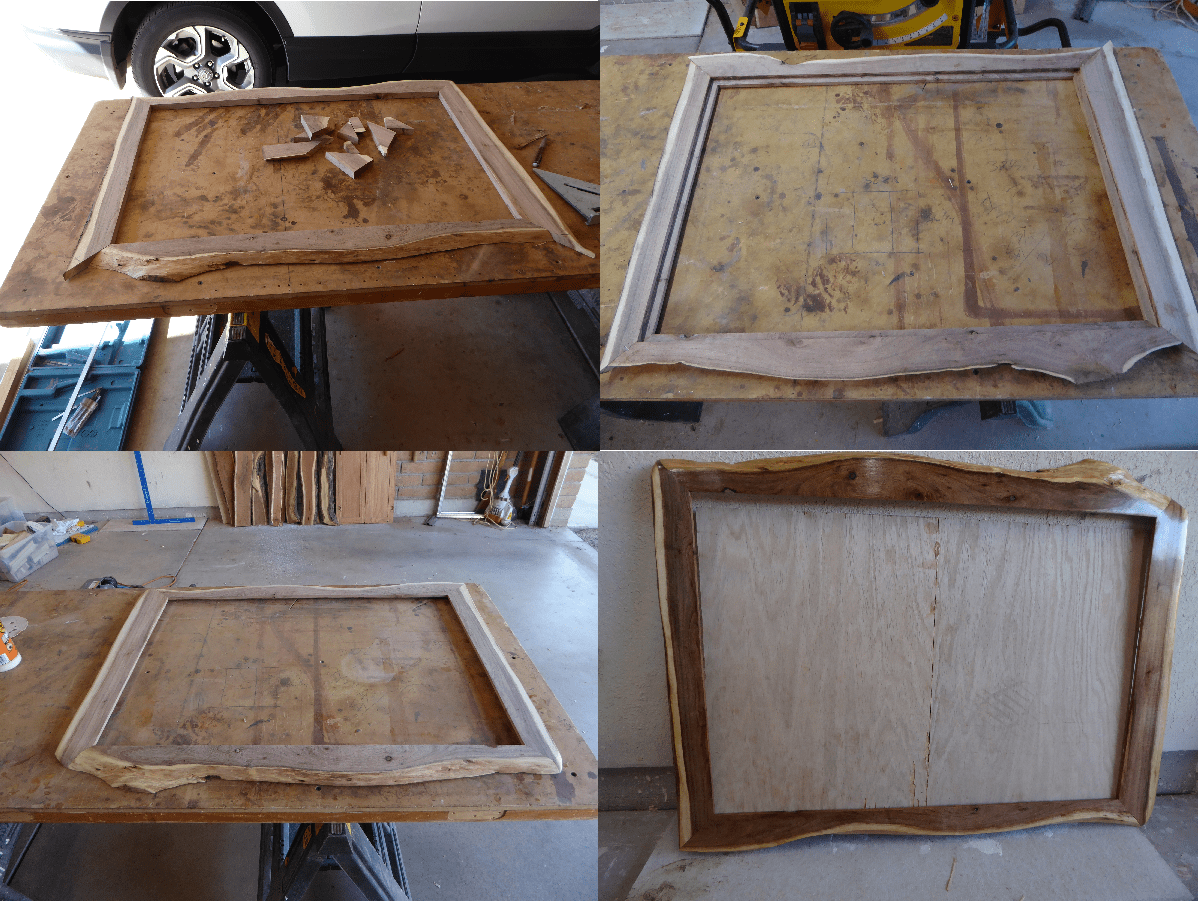
Top Left: Rough cut frame. Top Right: Rabbets cut, glued up, tacked with staples. Bottom Left: Corners merged/smoothed, fully sanded. Bottom Right: Final stain and poly.
So the basic process I used to make a frame: Start with planed planks (see the first time I worked my wood ). I picked two that were roughly the right size for the puzzle I was planning to use, so one about 36″, one about 25″ – You have to make sure that, after 45 degree cuts, the outside edge is long enough to be continuous for the given inside size. From there, you have flattened boards with rough edges. For the rustic look, I wanted to keep the rough edges, so I marked them down the middle length wise and hand cut them as accurately as possible, thereby turning 2 planks into 4 sides of the frame. To square up the cut, inside edges, I clamped all 4 planks together, lining up rough/natural edges so that the are close to parallel. That lines up the cut edges, exposing all the bumps and wiggles. With a hand plane and orbital sander, bring those cut edges into true.
After this process, I ended up with the 4 sides of the frame with natural outside edges and flat, square inside edges. To create the frame, I measured the size of the ‘art’ (or in this case, puzzle) and marked the cut edges to that length and made 45 degree cuts on the chop saw. You could make these inside cuts larger than the final puzzle size and then mat it (so you have a border around the image), but I choose to make the opening in the frame the exact size of the puzzle, so I made sure the length of the inside edge of each side was matched exactly to the final puzzle size. Now one needs rabbets on the back side to frame so the cover (acrylic or glass) and the backing that the puzzle gets mounted on will fit the hole in the frame and be flat on the back. So with a dado blade, I cut rabbets on all 4 sides, 1/2″ wide and depth set to the combined width of the acrylic and mounted puzzle. With the rabbets cut, join the 45 degree angles with wood glue and tack it with a staple gun. Of course, since the outside edges are ‘rustic’ the corners of course don’t line up. So did rough cut and sanded to blend in a hopefully somewhat seamless way. I’d like to match up the wood grain a bit better, but the way I cut the sides from separate pieces didn’t allow that – I might try to plan the next one a bit better. Now for the frame, the only thing to do is sand down to an 800 grit, stain (natural) and polyurethane.
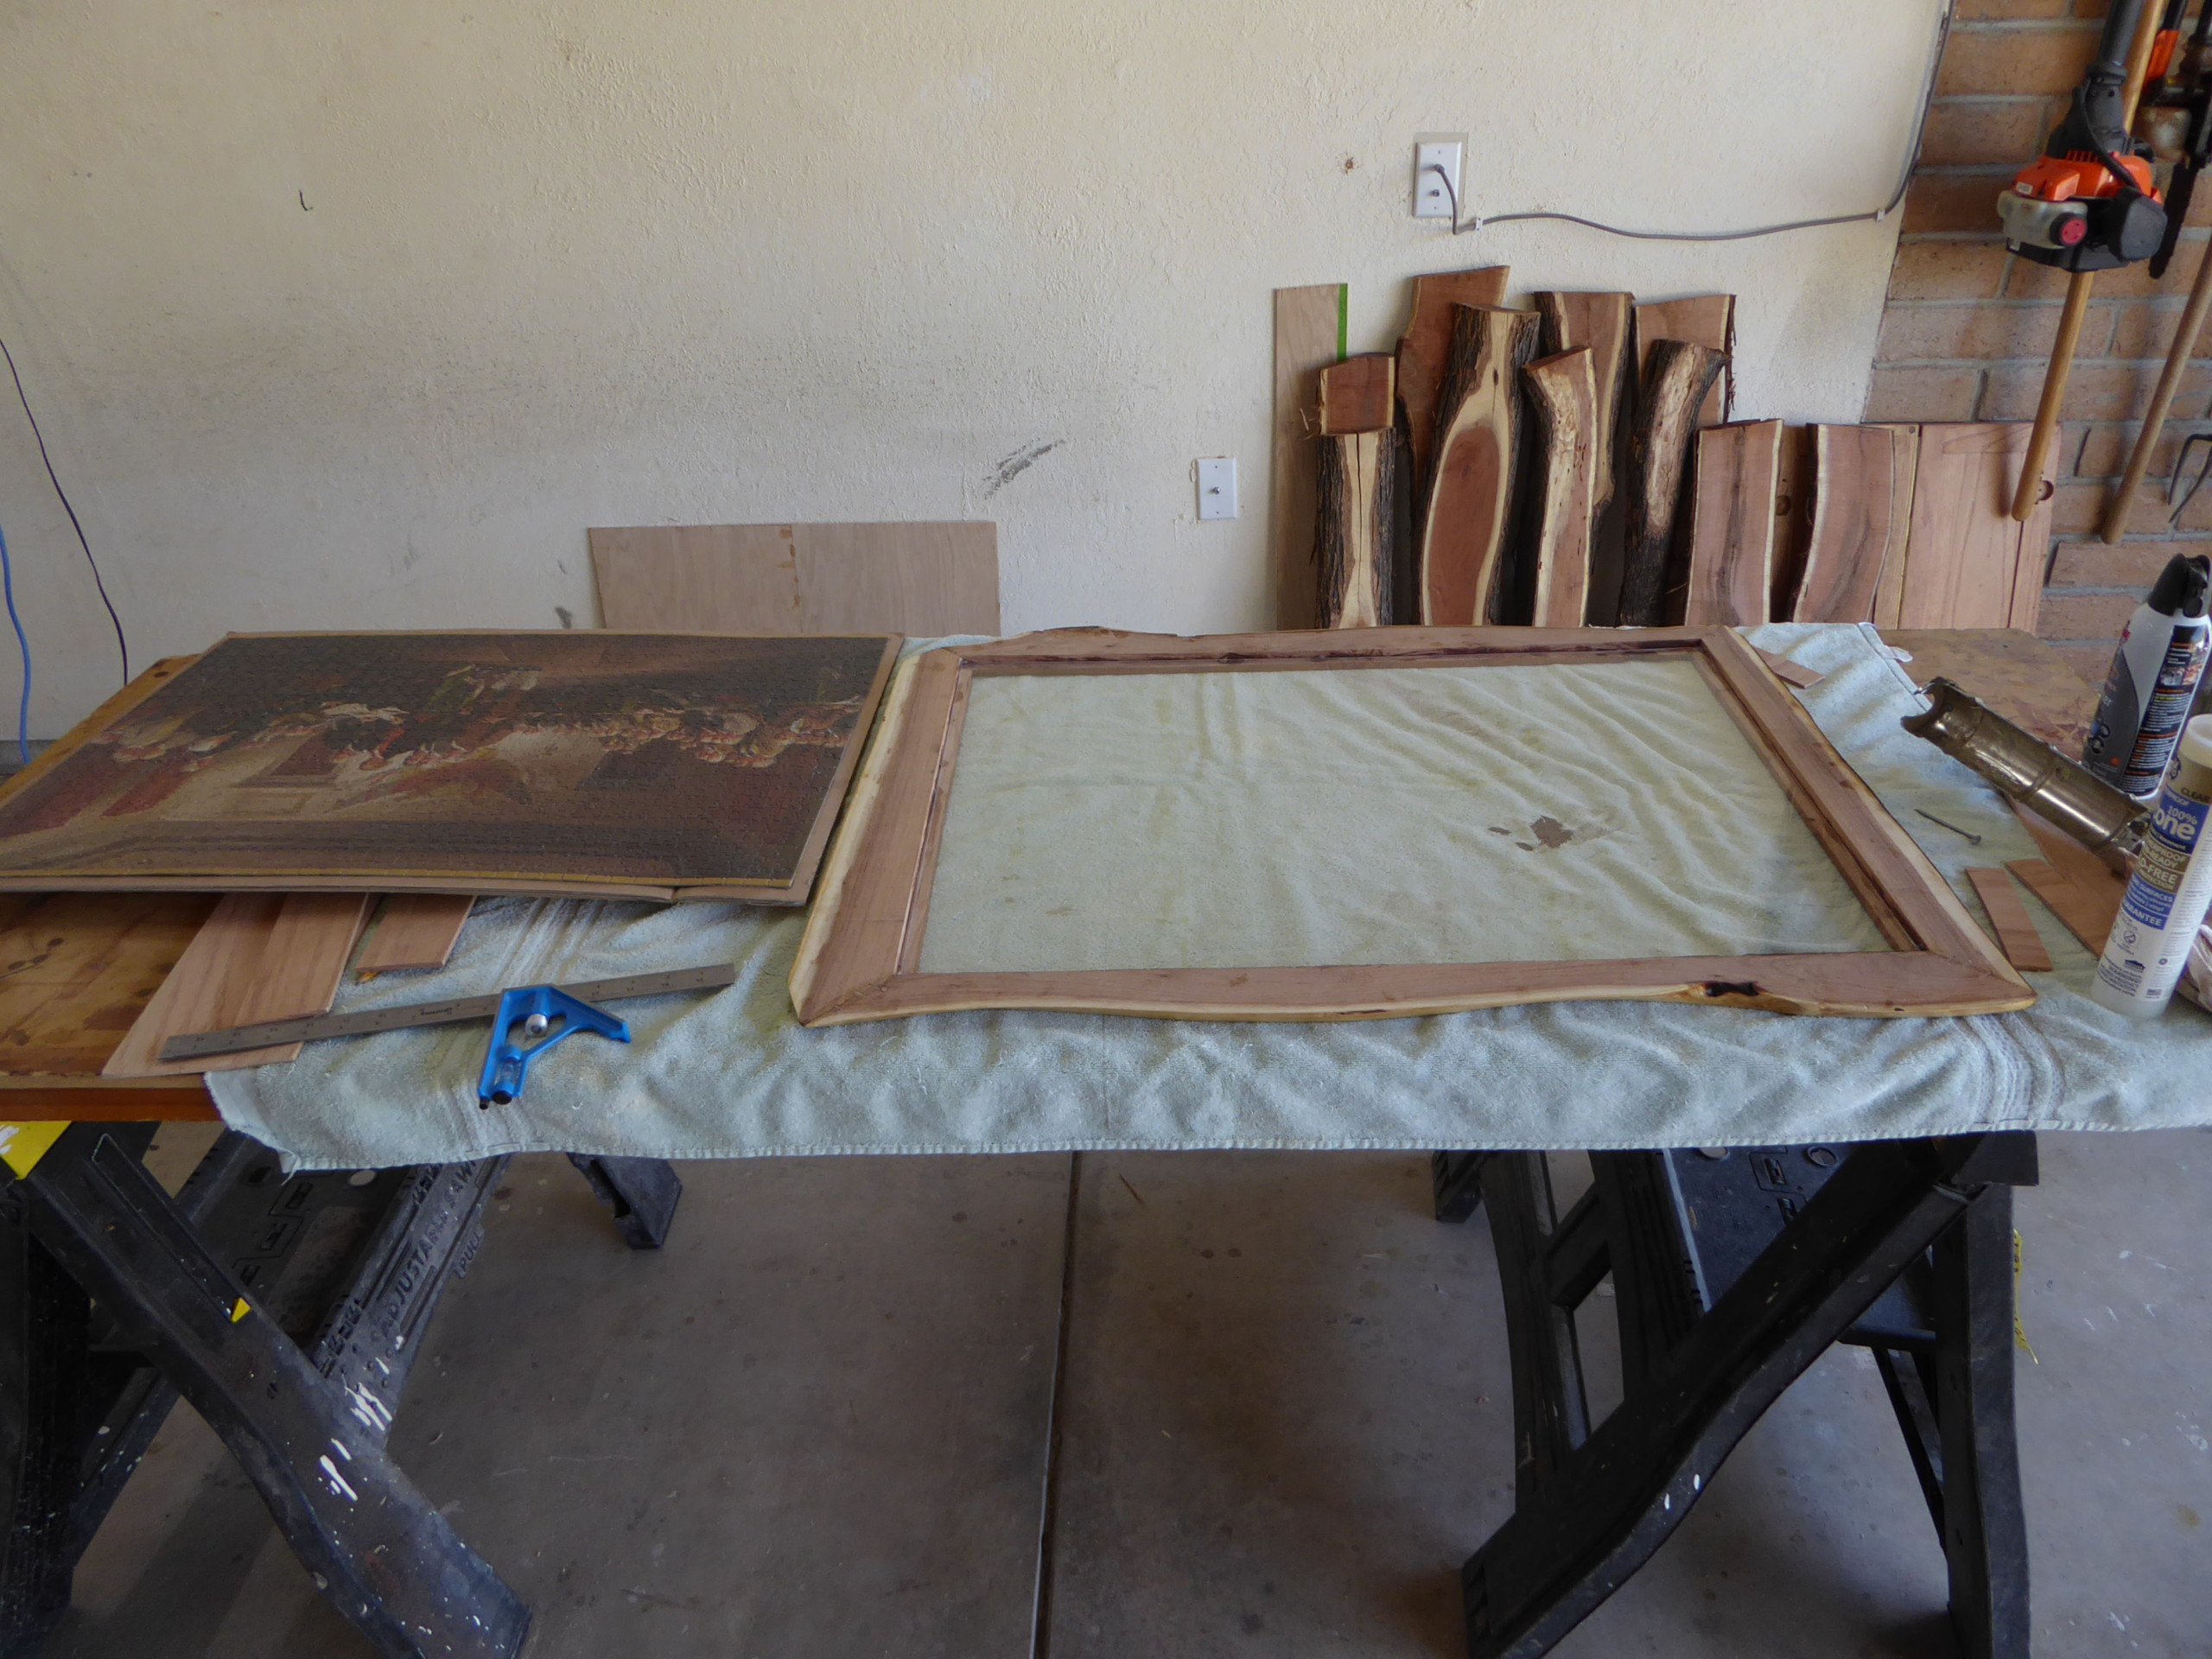
Puzzle mounted on backing board, acrylic tacked in with silicon, pieces of thing stock that will hold the puzzle in.
Now for the puzzle – once it’s complete, use a puzzle glue (I used this) to ‘seal’ it. Usually it only takes one application and then a touch up to hit the places you missed the first time. Once it sets up, you can (carefully) pick up the puzzle as one piece. To mount in the frame, you need to mount the puzzle on backing material. You can buy foam or cardboard backers or use some 1/4″ plywood; but I have a bunch of heavy grade cardboard, so I just used that. I attached the puzzle to the backing material with some spray adhesive, standard Gorilla glue spray adhesive from Lowes (since the local Lowes doesn’t seem to worry about enforcing mask nonsense). Once the puzzle is securely mounted, cut the backing material to extend 1/2″ beyond the puzzle boundary on all side so it fits snugly into the rabbets on the back of the frame. Here’s were you’d adjust the measurements and add a mat if you wanted to get fancier. Cut a piece of acrylic to the same size as the backing material and ready go.
Tacked the acrylic into the frame with a touch of clear silicon caulk at the corners, mounted the cardboard backed puzzle and locked in with short pieces of very thing red oak stock I had left over from a different project. And that finishes the deal.
I’ll probably do a few more of these, certainly this one for the bathroom. And I have this one glued up, so I’ll probably do a frame for it. I suppose how many more I do depends on whether I can think of something more interesting to do with my wood.

Just couldn’t get a good focus with the glare form the acrylic and the shiny frame. But it looks better in person, honest! The puzzle itself is about 30″x20″

Beautiful work! Absolutely stunning. I’m glad you kept the live edge.
Same here. I do like a live edge. Our coffee table is a big slice of a mesquite trunk, with live edges on two sides. As you can see, the contrast between heartwood and sapwood in mesquite is very nice.
On some of those epoxy-river tables, they take off the live edge and for me, it just ruins the piece.
I’m the opposite, the live edge ruins the piece for me.
I like straight and perpendicular lines.
Speaking of, have you ever seen tables made out of bowling alley lanes?
Purdy
I’ve got some fairly large trunk sections left over; I’d love to make some end tables out of rounds, but don’t have a chainsaw big enough to make those cuts. Nevermind that flattening would be a bit of a pain, probably have to put a router jig together. But I love those types of tables, so I might be motivated to try one of these weekends.
There is a graveyard near me, and they just cut down two enormous oaks. Probably 200 years old or so. Not sure why, maybe they were diseased. But for the last 2 weeks big slabs of the trunks have been just sitting next to the road. It would be a shame if those went to waste.
I’m going to go with diseased and/or dying and/or roots pushing up zombies, and didn’t want to risk anything getting damaged in a storm.
I’m gonna go with “somebody was dumb enough to ask a tree service if there was any risk”.
All trees are diseased. All trees will lose limbs sometimes. All of them will eventually die. If you see an old one that’s not on the verge of killing somebody, leave it alone. It’s been there longer than you have. If you ask an arborist (they hate trees, btw) or tree service, the answer to every question is always “cut it down”. And then the idiot who asked feels like they have to for liability reasons.
It’s a cemetery – everybody there’s already dead.
Now I’m sad (again) that we had our beloved tulip poplar cut down. ☹️? Then again, our cars were parked partly underneath it, and we’re quite fond of them, too.
Tulip poplars are large death weeds.
They’re heavy with water weight and quite brittle under wind loads. I’ve removed quite a few from around my house in order to avoid being crushed by one.
It was the twig- and branch-droppinest tree we ever did see, and it was quite hollow before we took it down. (There’s a big hole in the stump.) But I loved it’s blossoms each Spring.
[Note to Ted’S: stupid autocorrect put in that erroneous apostrophe.]
But some of those headstones are mighty pricey.
If you ask an arborist (they hate trees, btw) or tree service, the answer to every question is always “cut it down”.
You might as well ask them if they would like some of your money.
I would love to get rid of my sweet gum trees, but they shade the house from the sun during the day.
I guess I should add one slight modification. The spirit of my comment is about real trees.
It does not apply to Bradford Pears. They are worthy only of destruction, so HAVE AT IT.
Eucalyptus and palms can go to hell. Not mad about your namesake either (sorry).
I am mad about the avatar though. Heterochromatic glowing eyes!
I’ll see about getting these to glow:
https://imgur.com/a/pvR0bDZ
Oh wow. They remind me of marbles. And a spotty nose! Sooo cute.
The Siberian Elm that has popped up the slab on the side of my house (and is threatening my foundation) which the city refuses to remove can die in a fire as well.
Well, maybe not a fire. But I want that thing gone.
necklace it.
Winnie, is that you?
I enjoy my Samoan coconut palms since they stay short and I can deal with them myself. Those tall coconut palms? Worse than living in London in September 1944. They only had to worry about V1 and V2’s. Park under a coconut palm? You better have your insurance company on speed dial. Around here in the “before times” if you saw a car parked under a coconut palm it was mostly white with a rental car bar code on it.
It is the oldest part of the cemetery, dating back to the early 1800’s. The trees were close to the road, probably 10 feet away, so hopefully they had a good reason that involved safety.
It would be a crime if the wood is wasted.
We took down some old white oak trees when we lived in WI. One had been used for target practice – we found a few Civil War era bullets in it. A good friend who makes furniture hauled them off and had them milled.
The planks were stored in his father-in-laws barn. When his wife filed for divorce, she immediately sold all of the wood he had stored in that barn – white oak, black walnut, apple, cherry, etc.
Nasty bitch. I was supposed to get a piece of furniture – we never decided what – made out of the oak from my property.
I had a arborist from a tree service come out an evaluate 3 old silver maples in my yard. His recommendation – cut them all down. He said they were old and in decline. I had 2 of them cut down, one was scrappy looking and the original home owner planted it almost on top of the lateral sewer line. I’ve had to call a drain company to clear out roots may times over the years. Plus silver maples suck, they have roots that break the surface, drop tons of whirly birds each spring and have drab fall colors. Good riddance.
Sometimes the city sends you a letter telling you to cut down the dying tree in your front yard or their gonna start fining you.
Big monster oak that would shade the whole house in the summer.
Died really fast for some unknown reason.
Cost me almost $3K.
With the price of lumber right now, you’d think someone would have hauled those off to a mill.
That looks great! I like the unique look of that frame. One quibble, when I frame I don’t use the caulk, I just let the plexi or the glass float. As long as you secure the back well (which you did), it won’t go anywhere.
I have been painting a lot more lately, and I’d like to try making my own frames. These are oil paintings so no need for glass. This is a good reference for me to get started.
Thats some real nice work there, very pretty wood,
Love the bathroom puzzle, and the Milky Way one is gorgeous (must have been a true booger to assemble!) Framing & hanging the finished puzzles is a wonderful idea if you have the wall space, and your artisanship in creating the frames is remarkable!
Very cool.
My mom and her sister are big puzzle-putter-together-ers, but they just take them apart, put them back in rotation, and do them again. I bought my mom an expensive puzzle (I didn’t know they got that ritzy), and she just went bananas over it, surprising me. “Oh, a Ravensburger!”
They can get really pricey if you want. And if you want an evil puzzle, here’s one.
Huh. I’m going to have to put that on my “I’ll think about it” list. My son sorta likes puzzles. I may get him one to do over the summer.
Have you ever put one of the time travel posters together.
The picture on the box is of the same scene but at an earlier or later date. Sometimes a few seconds, minutes, or 100’s of years.
Lots of fun. Usually they are of city streets or interiors.
Others are mysteries you have to solve and the picture is just a series of clues.
https://www.puzzlewarehouse.com/Wasgij-Destiny-4-Olympic-Odyssey-70-19178.html
Fabulous!
I’ve made a bunch of frames over the years, but nothing remotely that cool.
Thanks for sharing your project!
Zoom has killed effective training.
At least in my field, it was dead well before zoom.
That’s probably true for mine as well really.
Just frustrated over the past 2 hours, much of which has been the presenter navigating through a live system, losing their train of thought, and other meandering. No handout or doc sent out beforehand and no apparent organization to the presenting.
I miss well written memos as well.
At my place you will get a 40 page powerpoint and an invitation for a 30 minute meeting.
If I have to make such a ridiculous deck at it would be 10 slides at most with whatever else the hell attached as an appendix.
Woof. Yeah, I try to live by three rules:
1) only invite who needs to be there
2) stay within your time limit
3) as few slides/pages/whatever as possible
I wish violence on the people who complain the slides don’t have enough on them…they are supposed to serve as an outline to what is SAID. If you want a handbook or a white paper…ask for such.
Hear! Hear!
Yes. I spun up a OneNote notebook that’s shared across my team. That’s where details go. PowerPoint is a visual aid providing complementary information to a discussion or oral presentation. Nothing more.
I cringe seeing the abuse done to ppt slides on the regular. A pet peeve of mine is when ppt slides are used as analytics dashboards. One, the likelihood of that dashboard ever being referenced again is near zero (because the data is immediately out of date). Two, it’s almost exclusively used to measure irrelevant shit and show off irrelevant progress to people who don’t understand the function. It’s show and tell via powerpoint.
I don’t actually own it, but I always loved the cover for Tufte’s book about Powerpoint:
https://www.edwardtufte.com/tufte/powerpoint
I’ve got a update release and support training going on now.
It’s someone with a fairly heavy accent reading from a power point presentation, while clicking through slides. I’d rather be given the presentation and access to a sandbox environment.
Give me an environment and a task to get done, and I’ll learn more than listening to someone with a powerpoint.
All of this.
And because this doesn’t work for some people everyone has to go the powerpoint + lecture way.
To the people who think a PowerPoint and a lecture is getting something done, the existence of the PowerPoint and lecture is proof something got done.
Naturally, as you’ve got the PPT to show something was done.
I used PP for a workshop I gave, but I didn’t read from the PP. I had a presentation and just put the bullet points and/or funny illustrations.
Yeah, PP can be a useful tool if used sparingly/judiciously. I just find many people rely on it overmuch. Good instruction is entirely aside the technology used.
So I was on a panel of writers once and the questions/topic for discussion was utterly nonsensical. The moderator read the question and then read his academic paper on the topic and it was dry as the Sahara.
Then it was my turn.
I started out by saying I was stupid and didn’t understand the question and then took the discussion where I wanted it to go.
Later on, I was ranting at my academic aunts (who were there) that somebody had thought READING his paper and they said that was what one does at academic conferences. My aunts said they lectured their papers, bringing in things they couldn’t in the paper itself, and they were outliers.
Ugh.
I love public speaking. I would perform the fucking thing.
What’s the point of reading your academic paper at people? The only reason you’d have any purpose being there is to discuss aspects not covered in the text.
Well, that’s the question, isn’t it?
I have no idea.
*buries head in stack of papers*
The purpose of reading a paper to a wide audience.
The purpose of reading a paper to a wide audience is to stroke one’s ego in front of peers. Without ego stroking, one wouldn’t know whether anybody read their paper, and that is not acceptable for somebody whose entire corpus is a stack of papers. While there may not be any particular benefit to hearing the paper read versus actually reading the paper, many people use it as an excuse to go to a conference in some tropical area.
/OK, I’m done…it stopped being funny.
And the presenter’s audio went out so some of the group decided to tell jokes. Three of them were Irish jokes… on a recorded meeting.
They weren’t even the good Irish jokes either.
Sheesh.
If someone’s gonna crack jokes about me heritage, I want to laugh.
I was torn between just continuing my trend of saying nothing in these meetings, or just mentioning that I’m part Irish.
You’d think the people would at least have the brains to not say things like that on a recorded meeting that’s going to get e-mailed out to everyone after the fact.
It’s apparently still OK to make fun of the Irish because they’re (so very very) white.
Once upon a time, we weren’t regarded as white.
True. Ironic, given the pallor so often found among us. (Alleged Scots-Irish in my woodpile – does that count?) Too white to be White?
WASPs used to be the only truly white people, but that wasn’t inclusive enough for the diversity crowd.
The dark hair, maybe. I love that Scarlett O’Hara coloring.
It’s killed effective anything. You miss so much not being face-to-face.
And forget effective negotiating.
Zoom is great for drunken laughs with faraway friends.
Was musing to myself how this should’ve been a morning post.
I’m sure Swiss wood knot allow that.
If you have to axe…
Eh, his bark is worse than his bite.
Why is that? I’m stumped.
He’s just branching out.
Stick around. Somebody will likely explain.
Aspen for a friend?
Better leaf it alone. Swiss will come bark at us. That tradition is well rooted.
And tomorrow night you’ll probably get blasted.
You people are knotty.
If you insist on going against the grain.
Yew folks are just aspen for it now…
I just KNEW this would turn into that…
Poor fella, looks like he has a beam in his eye or somethin’.
If we get called out every time we start punning, some of us might be forced to break off into a splinter group.
Well, we wouldn’t keep doing it, but the tradition is just so poplar.
Y’know, if you’d stop lumbering in with your gazes and cow rumps, people would quit trying to get a rise out of you.
That’s pretty cool. Thanks for sharing.
This article makes me want to start using my recently obtained router.
I have an old Craftsman router I got off Craigslist for $40, with all the original bits, box, and instruction booklet.
I have an old Cisco router with a bunch of megabits.
It doesn’t seem to do anything to wood though.
Unplug it and plug it back in. Then try it.
That’s what I have as well. Except mine was from Father Time.
That you weren’t working McGinty’s wood proves how homophobic this place is.
A return to a bit of sanity.
A new law in Iowa bans local entities, including school districts, from requiring face masks. Early Thursday morning the Governor’s office announced Reynolds’ signed House file 847 into law.
The Iowa House and Senate passed the bill Wednesday, the last day of the legislative session. Lawmakers moved the amendment to an education bill. It would ban superintendents, principals, and school board members from implementing mask mandates for students *and employees. The amendment would also ban county and city leaders from making *stricter mask policies than the state’s own policies for private businesses.
From the local chatter here in Ames – “I thought the GOP was in favor of LESS government!”
I’m unclear on how banning local governments from issuing mandates isn’t less government.
Two primary questions affect my perception of “is this more government or is it less?”
– How much more intrusive into my life and the lives of others will the government be after this change
– How much new money will be spent and how many new flunkies will be employed, directly or indirectly, by this change
Fights between government level A and government level B are not very important in and of themselves.
I refer again to state laws prohibiting localities from enacting their own gun control laws. That was a fight between government level A and government level B, and it resulted in less intrusion into your life by government level B. Local gun control laws can only be more restrictive than state gun control laws. Now, if localities had the ability to nullify state laws (which they don’t), this might be more complicated. As it is, though, those prohibitions have unquestionably resulted in less gun control.
I think the prohibition on local masking requirements is analogous, and I don’t see how it doesn’t result in less government. Does it prevent the state from enacting masking requirements? No. Does it prohibit localities from enacting stricter masking requirements? Yes.
Yes, and this is a basic function of the state government in our current system. We don’t have 3 sovereign levels of government. We have 2 sovereign levels of government and the lower level has administrative subgroupings called “local government”. Just like the federal legislature can rein in an administrative subunit through legislation, the state government can rein in local government where they go astray.
The arguments about whether the Bill of Rights are incorporated to apply to the states is also an argument between government level A and government level B.
Many of these fights are likely inconsequential, but some of them are not.
To the extent they result in centralization of power, that can play out as a net reduction in liberty in the long run, I suppose. But prohibiting localities from being more intrusive than the state, or states from being more intrusive than the feds, seems, at least initially, as a win for libertry.
Repeal old laws = Pushing grandma off a cliff
Pass no bills = Obstructionism
Enact new laws = Hypocrisy
So remember, a year ago the Gov says that counties and cities have no legal authority to issue mask mandates. Counties and cities do it anyway. Iowa City actually authorizes city police to issue fines to people not wearing masks.
A year later, the state legislature finally gets around to writing an actual law stating that counties and cities have no legal authority to issue mask mandates not issued by the state.
It’s rather shocking that the system sort of worked this time.
TimCast has become a fully staffed podcast, I’d argue this, not truth, was goal the whole time. I continue to hate everyone.
It’s the old hobby-vs-job distinction. A hobby can afford to be more “pure” because you don’t expect or need it to be remunerative. A job, on the other hand, is something you want to get the most bang for your buck out of. A lot of full-time YouTube/podcast/Twitch/etc. personalities drift away from their original appeal to focus on what gets the most attention and revenue.
I hadn’t seen his stuff since he was converting a Dodge Sprinter into a mobile news van/camper. There was something about his presentation that eventually grew tiresome and I stopped watching. I like his fancy “SMASH THAT LIKE BUTTON!” graphic in the screen corner.
He’s alright but he tries to take center stage too much. I don’t watch Rogan for Rogan, I watch for the guests and Joe is usually way better at getting out of the way. Tim should learn to shut up and let his guests speak but he’s a kajillionaire from his schtick so what do I know?
These are interesting numbers. Not horrifying, but scary enough.
Also, nice wood PM.
Even assuming the covid vax rate of deaths in VAERS is off by 99% compared to other vaccines, it’s still quite concerning. Even if VAERS had nearly 40 deaths entered in over 4 months rather than nearly 4000, it would be worth a major rethink.
The differential response to the J&J vaccine deaths and the mRNA vaccine deaths is what sends up a huge red flag for me.
Paraphrase from a call I’m on where a European pharma patent attorney is talking:
“I’m a bit skeptical of the covid vaccine after seeing the mRNA clinical trials that occurred in the past. The idea that we all of a sudden have a perfectly safe, 98% effective vaccine using this technology is… optimistic.”
IIRC the SARS-1 vaccines were an unmitigated disaster causing a range of effects from liver damage to cytokine storms when exposed to SARS variants. Long term safety is completely unknown for the mRNA vaccines.
I like the end result. Though I enjoy wood-working, my carpentry has largely consisted of minor fixes to problems and one stand for my computers that is quite, um, “functional” in appearance.
Nice! The live edge is a great touch.
Plus, bonus Rush tunes!