I’ve been nudging my wife for some years now about putting in a garden. There are a few reasons I think a garden is prudent:
- Food is expensive. Food we grow is food we don’t need to buy.
- Possibly the time is coming when being a little self sufficient will be very important. Better to have the infrastructure in place now.
She has previously fended off my suggestions with recriminations about my helpfulness, or lack thereof, the last time we tried to grow something1. During one lively engagement on that topic, we stumbled across a point on which we agree: bending over, or kneeling, to work in a garden, sucks. From that, we came to an agreement that we would try a raised bed garden.
Design
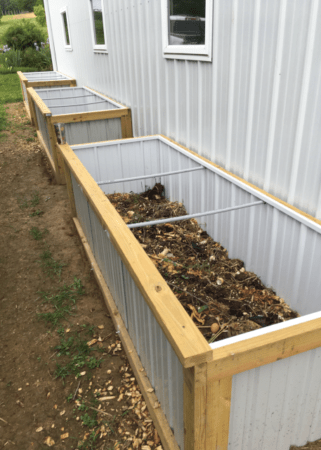
The space we decided on runs along the south end of the garage. It’s about 36’ long, and 7’ wide. In high summer, the whole length gets good sun. It’s also in easy reach of a garden hose. We decided to put in three beds, 9’ long by 3’ wide, right up against the garage wall. Because we are both tall, we set the bed wall height at 32”. We could have made them taller, but we knew we’d have to reach over the width of the bed.
The beds are an up-front capital investment. There are plenty of examples online of people building raised beds out of untreated framing lumber and plywood, but I wanted these to last a while. I decided on a design of treated lumber and steel barn siding. Happily, I started this in March, when materials were inexpensive2. One point was to make sure the treated lumber was rated for contact with the ground. Not all treated lumber is created equally, and the cheaper stuff (*cough* Lowes *cough*) is only rated for exposure to weather, not constant contact with soil.
Assembly
The beds are just a box sitting on the ground. The box doesn’t need a bottom, just walls. Each wall is a wooden frame with the steel siding on the inside face. Just whack together the frames and done, right? Well, kind of.
Nailing or screwing into the end grain of wood is a weak joint for construction that will be exposed to weather. As time passes, the wood fibers shrink. A fastener driven into the end grain is parallel to the wood fibers. As those shrink, they pull away from the fastener, weakening its the grip.
I put my frames together using pocket screws. Or rather, regular screws in pocket screw holes. The “pocket” hole is drilled with a special stepped bit, at a shallow angle to the side of the board. When a screw is inserted into the pocket, the threads protrude out through the end grain, so that they can be driven into the side grain of a perpendicular board. This is a better joint.
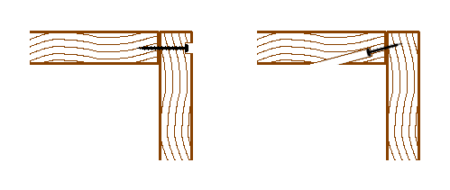
Left: Bad. Right: Better
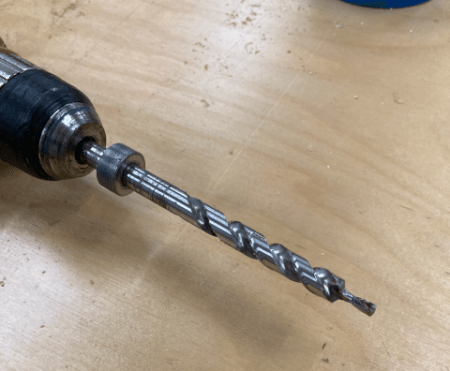
Stepped drill bit for pocket holes.
The frames are screwed to each other through the vertical members, so I was screwing through side grain into side grain.
I had read about concerns that the chemicals in the treated lumber would leach into the soil. I can’t say that those concerns are unfounded, so I took precautions. The whole inside of each bed is covered in the steel siding. The screws that hold the siding on have rubber washers, so the screw holes are sealed up. To the extent possible, the treated lumber will not come in contact with the garden soil.
The steel siding is oriented vertically. The siding is most rigid along the corrugations, so installing it vertically means the strong axis only spans 32”, instead of 9’ if it was oriented horizontally. The siding comes in 3’ x 12’ sheets, so I had to cut it into 32” lengths3. The jagged edges will cut a bitch, so I covered them with some J-channel.
Since the beds are 9’ long, I was also concerned about the sides bowing out under the weight of the dirt and water inside the box. At 3’ in from each end, top and bottom, I ran a piece of ¼” all-thread from side to side, with nuts on the outside, as reinforcement. To prevent the all-thread rusting (particularly the pieces that will be buried at the bottom of the bed) I enclosed the all-thread in ½” PVC conduit.
Installation
Before putting the boxes in place, I leveled out the spots where the beds would go. Really, just the parts where the bed walls would actually sit. Any high spots in the middle were just going to get covered with dirt.
One of the things I came across browsing for videos on raised beds, was the idea of Hugelkultur4. The basic idea is that you put layers of compostable mass at the bottom of the raised beds, and this releases nutrients into the soil over time. I don’t know how realistic that is, but I do know that I had a bunch of twigs and branches that I could dispose of by burying them in the beds. We were also just tossing compostable kitchen waste into the beds for the week or so before the dirt showed up. We filled the beds maybe 1/3 full with compostable material.
Based on some random internet website5, I calculated we would need six tons of topsoil to fill the beds. At the last minute, I panicked and reduced the order to five tons. That was a good call, as it turns out. We had the dirt dumped onto a big tarp at one end of the line of beds. We also picked up a ton of sand, and some unknown quantity of chicken manure from my in-law’s farm. We planned to cut the sand (for better drainage), chicken manure and our own kitchen compost into the dirt as we filled the beds. It took a weekend to fill the beds, shoveling dirt into the wheelbarrow, cutting in the sand and manure, dumping the wheelbarrow in the beds. We had probably two tons of dirt left.
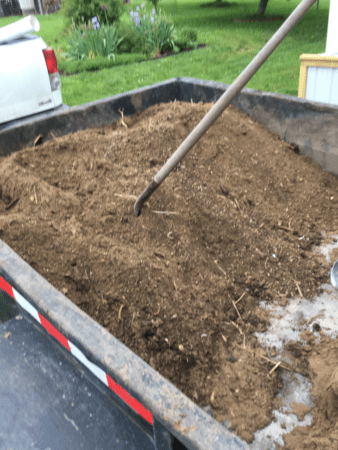
A blurry picture of chicken crap mixed with sand
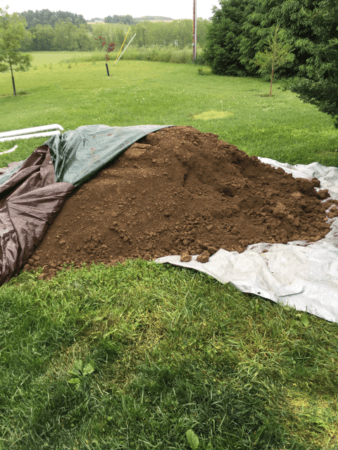
An ass like a dumptruck carrying five tons of … dirt.
Beds with compostable material
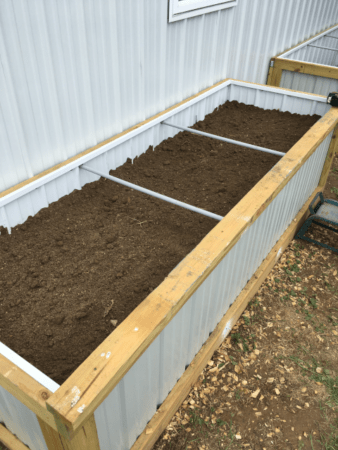
28 wheelbarrow loads per bed later
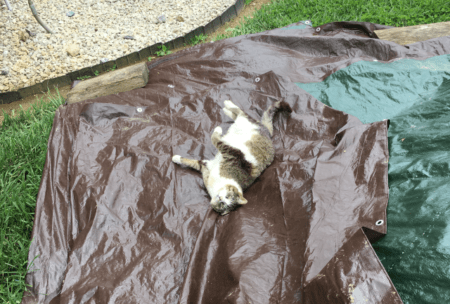
If you’re done working on my litterboxes, I’m going to go cut one off now.
Planting
We ran out to the wife’s preferred nursery and bought a bunch of stuff: cucumbers, tomatoes (cherry and normal), sweet peppers (mini and normal), green beans, melons, cabbage, broccoli, and cauliflower. Peas and carrots we planted from seed. Our compost pile generates volunteer butternut squash every year, so we transplanted some of those. If that sounds like a lot, it was. We cheated the minimum spacing for everything. Since there was space between the beds, we put the vining plants (squash, pumpkin, melon, cucumber) at the ends so they could grow over. We got some wire frames6 to support the tomatoes and vines.

Cucumbers (far end), tomatoes, butternut squash. The little plants popping up a random are volunteer squash from seeds that were present in our kitchen compost.
Results and Lessons
Most of the plants grew well. The carrots did not (crowded out by broccoli) and the peas did not (started too late, too hot). The butternut squash grew like crazy, giant leaves, plenty of blooms, but not one single squash. The father-in-law told us this is a soil composition problem, that happens with too much nitrogen (chicken manure). We got plenty of cucumbers, and some decent heads from the broccoli and cauliflower. We got some green beans. The full size peppers have not produced well, but the mini peppers are making up for it. The tomatoes went completely ape shit. The melon and pumpkin both have three or four good size fruits working.
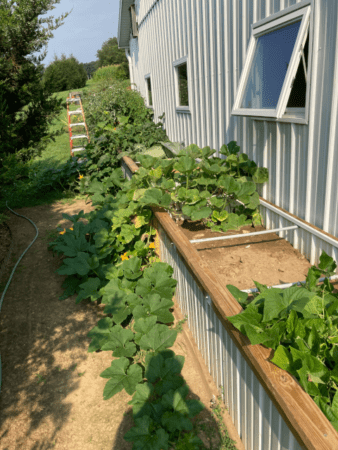
The pumpkin and melon are spilling over. The empty spot is from the broccoli that we took out after harvest.
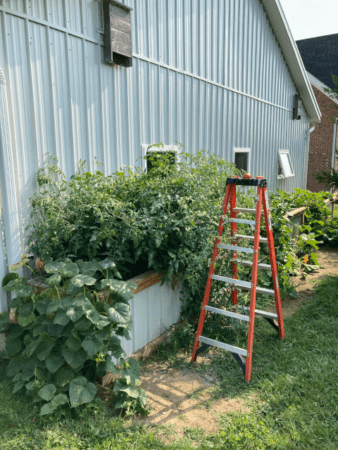
Jeebus, tomatoes.
The big lesson is, we overestimated what we could do with the space available. When I was building the beds, I was focusing on the volume of the beds. I was thinking, these are huge. However, what matters is surface area. The minimum spacing requirements really do matter. We planted too much. Our tomatoes are so close together, and so big, the fruits in the middle are aren’t getting sun to ripen. The beds being up against the garage is also sub-optimal, particularly with the tomatoes. The vining plants are all over between and in front of the beds, making access a little difficult.
Next year, we’re planning on putting in at least one more bed. This one will be away from the garage, so we can get to both sides. We’ll probably put the tomatoes in this bed, to address the issues we had this year. Also, we’ll crack out the Organic Method book and get some advice about soil composition for specific plants. Last, we’ll look at putting in plants at the best time for each type. This year, we waited on everything until Last Frost Date for Ohio (sometime in late May). Next year, we’ll look at putting in some types earlier (peas). The wood frames of the beds will make it easy to attach an improvised greenhouse-ish cover if we’re worried about hard frosts.
1 Strawberries. In my defense, we planted about 160 ft2 of June-bearers, based on some dubious advice.
2 Jesus wept. My ass still hurts from the cost of the materials.
4 https://www.youtube.com/watch?v=JrPcc7p-Xvc. This guy has a big ol’ Bob Marley joint just out of frame.
5 DDG “how much topsoil in a ton”, input some BS numbers, get a BS result.
6 https://ohioamishcountry.info/directory/berlin-seeds/. Silly Amish don’t have a website of their own.
I say it’s a bit overkill, but it matched the garage great, and the results are fantastic, Nice Work!
The big lesson is, we overestimated what we could do with the space available.
You and me both. Everything except the cukes were stunted this year because I over planted. I’m doing containers since we’re in a rental, and the fall season is going to be much more subdued.
I have to keep telling myself “just keep the skills fresh, you don’t need to feed the whole family right now”
Interesting article.
We are planning to start our garden next year.
Probably not going to go 30 inches tall. I am guessing around 18 inches (maybe, I haven’t gotten that far yet).
First, I need to clear out a bunch of shitty trees that are in the way.
clear out a bunch of shitty trees that are in the way
And you can dump the trunks under the beds!
32″ has worked out fairly well for us, in terms of not bending over a lot. But it requires a lot more dirt.
Next year, we’ll look at putting in some types earlier (peas)
One thing that really helped out with my early crops this year was pre-planning in early February. I had planting days mapped out in advance based on days until harvest and frost hardiness, and (almost) everything went in the ground on that schedule. I also staggered plantings of the same crop to hedge against a late frost and/or early heat, as well as to space out the harvest a bit.
A few hours of preplanning made for much better lettuce, spinach, potatoes, and bush beans harvests this year.
Planting, waiting a week, planting more, definitely stretches the harvest.
Somewhat Relevant: deal on Aerogarden kit
Very nice! I was thinking about doing a square foot garden for next spring. Like so
https://youtu.be/BU2szw7qwsU
Thanks for the link. That led me to many more on cinderblock raised beds.
I like this idea.
It’s really tempting to plant too much, but you’ll get a better yield if you stick to the guidelines. Also, I hope you kept the dirt because as the compost you put in breaks down, it will compact.
Sadly didn’t have a place it would be convenient to leave it in a pile, and did have some places that we wanted to fix up the grade, so it’s been used. Absolutely correct about how much the dirt has compacted in the beds. We’ll get at least another half ton next spring, and again cut that with sand and chicken manure.
Measuring the amount of dirt you need is almost impossible to figure out by the ton due to water content. I always figure out amount needed based on the cubic yard. One yard of dirt covers about 324 sq. feet at one inch thick. For any amount over one inch thick, divide the thickness by 324 to figure out how much one yard will cover. For example, if you are going 6 inches deep, one yard will cover a surface area of 54 square feet. This factors in proper compacting by doing an Indian rain dance on top of the dirt after each inch is spread out.
If you tamp down the dirt, you defeat the benefits of a raised bed. Add the dirt and your amendments, based on cubic footage, and then water it down. Ad a little additional dirt, if needed, and then run a pitchfork through it. Smooth it with a garden rake and plant.
We have clay soil. If you want to amend the ground, you till the dirt, manure, and sand (maybe straw) into the clay instead of blending it and throwing it on top. After your stuff’s planted, you throw a thick bed of mulch over that.
A proper mulch is important.
You don’t want to compact it.
Nice article thanks. I overplanted my first time as well, me and the girls went to the nursery and picked out different things to grow and when it was obvious we had too much stuff—i jammed everything into our two gardens anyway. Love being able to just grab some basil or parsley from outside instead of driving all the way to the supermarket whenever i make some sauce and meatballs.
Very nice! I have nine 4’x12’x15″ raised beds I built out of redwood. You’re right, raised beds increase yield enough that you have to be careful about overcrowding them.
Yowsa. That’s some real estate.
Two are for different types of flowers, one is a raspberry bed, and another is blueberries and strawberries. That leaves me five for vegetables.
Yeah that’s foreign to me. Combination of shade and small lot. No place for a bed.
I will be clearing a roughly 50 ft by 80 ft area to put in planting beds.
I will plant grapes and brambles in some beds and veggies in most of them.
Shooting for self-sufficiency before the bad times set in.
FYI, your brambles will not want to stay in the bed.
Bramble On.
https://youtu.be/LzGBQerkvWs
+1 bustle in your hedge row
Meanwhile this is playing in the background.
https://youtu.be/JhokU8SlmNg
The Placard of the Heart.
I would love to have raspberries, but….yeah, they don’t stay put.
You say this as if it’s a bad thing to have too many raspberries.
JK
Of all the volunteer/wild/feral plants on my lot, the raspberries are the greatest disappointment. They taste of nothing.
I have been working in my orchard for 7 years.
I have vicious pruning skills.
But yes, brambles will be a challenge.
I’m planning to plant more lettuce and beets, and maybe some cauliflower. My tomatoes are done, peppers are going gangbusters, and I still have a few cantaloupes coming. Everything tastes better than the grocery store versions.
We have six small barely-raised beds – the highest are no more than a foot tall, I believe – but only planted four of them this year. One bed each for tomatoes, bell peppers, zucchini, and a few sugar snap peas. Just finished a salad with three out of the four.
We have so many zucchini for just the two of us that I think I’m going to have to blow the low-carb diet even more than I already have and bust out my recipe for zucchini brownies. It may sound horrible, but of course you peel and de-seed the zucchs, and the grated zucchini makes the brownies come out deliciously moist.
We have so many zucchini for just the two of us
No neighbors or co-workers you’re trying to get rid of?
I successfully fended off planting any zuccs. Not my favorite, although the wife has a couple recipes that make the tolerable.
Slice them longitudinally 1/4 inch thick, toss in some olive oil, salt and fresh pepper, and grill ’em hot and fast over gas or coals.
Yum.
Option 1: Matchstick the zuccs, cook in olive oil with slivered almonds until almonds are toasted. You’re basically eating the almonds with zucc filler.
Option 2: She’s got a widget that cuts the zuccs into long spirals, called “zoodles”. She puts a Thai peanut sauce on these, with peanuts. Again, you’re basically eating the peanuts and sauce with filler.
That’s an interesting idea. I got one of those for Christmas years and years ago but I’ve literally never used it. I might have to try that.
Ever tried ratatouille?
Makes sense, zucchini bread is the best after all.
This is very helpful.
Thanks for the ideas.
Very welcome.
Melon in raised beds? I’m guessing they weren’t Carolina Cross.
I was expecting a different kind of melons.
Yeah, those aren’t the melons I want to come across in a raised bed.
Did nobody get the joke?
No.
Did you read my below post?
No.
Too early to go OT. Besides, I have an interest in the subject, although currently as an apartment dweller, no real way to work on it. And even my black thumb couldn’t stop me from killing a melon, probably the only thing I’ve ever been able to grow successfully in my lifetime. It was delicious, and basically free to me, since I pretty much did nothing. Had I thinned out the other non-producing lines, I probably could’ve gotten two.
For anyone who doesn’t (or didn’t) want to click, Burpee has seeds for a watermelon they claim can grow up to 200 lbs.
Spud – sometimes you have to just deal with what life gives you. It still might be tasty.
Nice. I never had raised beds anywhere that high.
“The butternut squash grew like crazy, giant leaves, plenty of blooms, but not one single squash. The father-in-law told us this is a soil composition problem, that happens with too much nitrogen (chicken manure).”
You can fix that with foliar feeding PK.
Thanks for the info.
Or pinch off several of the vines to make the remaining vines produce.
Fuck UPS. I been waiting two days.
Is that something that just arrived, or are you waiting for the CPU?
This must be a regional problem both ups and fedex provide great service where I am at.
I think you need some more fans.
We bought a couple of raised boxes – so far, quite happy with them:
https://ibb.co/8bJ3hqP
(dog not included)
Nice. And I like your dog.
Thanks, they’re from these guys:
https://boldly-growing.myshopify.com/
who look to be a nice family business. They’re upfront about the fact the beds will only last for X years, which is nice.
And thanks, too, about the dog – she’s a good dog, albeit afraid of everything.
I have to say, I’ve thought for a while now that back yards filled with grass are somewhat pointless. If you live in the suburbs, why not make your backyards a garden? And plant flowers and other nicery in the front.
BTW, great article Grummun.
Yes!
One of the first questions I ask when buying landscaping plants is: Can I eat it?
The second is: Is it pretty?
pon: check this plant out. It could meet both your criteria.
Haha agreed. I’m not a fan of botanical bimbos – sitting around looking pretty and demanding a lot of attention while offering nothing in return except their looks, which are ephemeral anyway.
Nice article, Grummun.
I hate most vegetables, so gardening is not on my self-sufficiency list, but your beds look awesome and your forward thinking in hothouse-type covers is impressive.
I measure dirt/mulch/gravel by the cubic yard (2 scoops of a Bobcat bucket). My truck can take 2 scoops of mulch easily, 3 scoops with a droopy ass. 2 scoops of dirt or 1 scoop of gravel. We have a place called Missouri Organic Recycling where we get it. Our close-by nursery gets it from there and marks it up 2.5 times again. A local lumberyard gets it from there, bags it, then sells it for your first born and two fingers. I usually end up getting about 9 yd3 of mulch for my mom every year.
so gardening is not on my self-sufficiency list,
If things get bad enough, it will be.
It has occurred to me.
Lots.
My thinking exactly. Particularly with uncertainty of what declining the vax will do to my employment situation, growing food is crucial.
I get it, for sure. The dinky container garden feels inadequate given the likelihood of me being canned this fall for refusing the vaccine.
And oh, besides throwing in renegade limbs and grass clippings to fill up space, you can use light trash like plastic pop bottles and milk jugs, which take up a lot of space, but don’t weigh much and give you great drainage.
I’m impressed Grummun.
I had all kinds of plans, bought a bunch of books, and then moved.
No garden.
I have, however, already used my Kreg jig. Pocket screws are the bomb. Especially for stuff that need not be heirloom quality.
Thanks for the article and enjoy your rewards!
The stuff growing best in my garden Is stuff I didn’t even plant. I have a massive volunteer acorn squash plant, several volunteer cherry tomato plants, and a ton of volunteer coriander. And the fucking white-tailed deer.
The only thing I have harvested so far is 3 cucumbers, some coriander, and some lettuce.
The tomatillos should be ready soon and the Roma tomatoes are starting to turn pink.
The deer should be ready to harvest by November.
Deer should be ready whenever…
I gotta figure out how to lure them into the garage so the neighbors don’t have to witness the carnage. I figure I have been feeding them for 15 years here, maybe they owe me some meat.
Find a butcher first, unless you’re willing to do it yourself.
My bro lived outside Ocala, FL for awhile. He found a backwoods butcher who’d process the carcass for the price of the better cuts of meat.
And yeah, I know you were mostly joking. But if you ever get really pissed about those giant rats…
I butcher my own deer.
The toughest part is taking a life. Once the life is snuffed, I’m better. At that point it is just meat.
The second hardest part is getting the skin off.
The third hardest part is figuring out what to do with the meat*.
* heart just after you kill it, to honor the animal. Grilled tenderloins next.
I still have 2 tanned deer hides that I need to figure out how to use.
/talking about deer, not people.
Fresh, grilled (or fried) tenderloins are divine.
Yes they are.
Are you harvesting it as coriander or *shivers* cilantro?
Both, but now that it is mature, just coriander.
Are you one of the soapweed clan?
I’m actually on the fence. I don’t think it tastes particularly good, (maybe a tish soapy) but it has it’s place…in moderation.
OT: I have been watching random acts of kindness on YT, and after some misty moments, i feel a bit better about Humans, we aren’t so bad,
The problem is that so many asshole love to be on camera. It skews our view of the population as a whole.
I’m tired of Discord and anger, I am beginning to trust people a bit, up here they are different, respectful, kind and defiant, there is still good in the world.
This is the problem. 90% of interactions I have in person are perfectly congenial and courteous. It’s the opposite on most of the Internet. A lot of factors on the Internet bring out the worst in people.
People watch these “restore your faith in humanity” videos on their damn phones – they should try just walking outside.
Yusef, now that I re-read that I realize that it might sound like it’s a passive-aggressive dig at your original post. It’s not. I’ve just been irked lately with people who could be in the most wonderful places on Earth and spend the whole time staring down at their phones plugged into The Matrix of social media. It wasn’t about you, and if you enjoy those videos that’s totally cool.
I live outdoors, as much as possible, the sensory experience, I feel alive, it’s why I disc, Zen. When I come home its Glibs and the latest News, so a happy video is kind of relaxing.
I have always been out in the Mountains, deserts and Ocean, indoors just Kills me,
-1 Style points,
Every time ?
Good idea.
Please post your favorite!
This one had me in tears most of the way, I’m a softy,
https://www.youtube.com/watch?v=XmcSh0GdPlc
Excellent.
Thanks, Yusef.
Im off to work, kids. Behave.
I trust your sobriety will keep you sane til Morning,
Cheers!
Don’t tell me what to do.
Was I talking to you?
Tall, Beverage of Choice!
Great article, Grum. My garden lay fallow this year, well, not exactly, it grew a lot of weeds.
1. Grow what you like
2. Short season (radishes, etc) can be replanted right now, grow a second crop.
My garden is totally sand, like a beach, but with a little black dirt, not much, in the hole with a transplant makes a difference. Leaves around the plants, to be tilled in the following year. This year a few friends have been sharing produce with us, Mrs F put in a few tomatoes in a raised bed, lots of tomatoes. I advised her about planting them too close but would she listen? Nooooooooo, her Asian lettuce way overpowered all her herbs, even as I warned her.
I grew some apple trees from seed, just put them in the garden for a couple years, so far all 10 look good but a couple may be too weak. This winter I’ll start more, kind of fun to use seeds from store apples and see if they’ll grow. They’ll be hybrid but with a chance I’ll move them to around deer stands. Kinnath gave me some advice, which I ignored but in spite of myself, they are doing well so far.
Hopefully 2022 will be a rebirth in my gardening efforts. With sun, fertilizer and water even sand will grow stuff. I like your raised beds though, getting tougher to bend over these days.
Kinnath gave me some advice, which I ignored but in spite of myself, they are doing well so far.
I was guessing. If they are growing, you did it right.
4×20, My garden crashed hard this year, but i still have your seed bnk in storage. I have some raised beds I never assembled, but here’s the point.
My neighbors are rockin! I blew it. even 10 foot tall weed plants, tons of veggies, next year will rock!
I liked that! I appreciate the ashoe cat commentary. Cats are conditioning-resistant, recalcitrant ashoes but they are super adorable and the most libertarian of pets, it is known.
When I was going through the photos I took for this article, I had as many photos of just the cat as all the other photos together.
?
My dream job would be in agronomy or straight soil science. Dirt is king.
Clarkson’s Farm was wildly entertaining & I learned a bit. Charlie the agronomist is great.
“Clarkson’s Farm was wildly entertaining”
Yes it was. And I say that as a farm boy.
I thank Tulip for turning me on to it.
The smell of fresh turned earth and diesel exhaust always brings back great memories to me.
#metoo. Love it.
I have a soil science degree, I still use a lot of the principles, but more of my job relates to horticulture. I still love playing in the dirt, and get about 2 full dustpans of dirt and debris out of my work shoes in a typical week. I could still probably identify the 13 types of soil by feel with a little water and doing a ribbon test. My advisor in college hated it when I referred to it as dirt. “It’s not dirt, it’s soil! It’s only dirt when it’s under your finger nails.”
Here’s a fun little story from college in The People’s Republic of Madison, WI. There was a newer program when I started called Environmental Studies. They were independent from any of the colleges at the time (now it’s part of the College of Humanities). One of their requirements was Soils 301, Introduction to Soil Science. The Professor who taught it was a good teacher, but his class was tough and he didn’t let you skate through. Quite a few of the Environmental Studies majors couldn’t pass the class, so they started protesting against the professor and the Ag School, demanding that the standards be lowered and a different professor teach the class. They made a big spectacle out of it. I had a few of these nitwits in a couple classes. At the time, the teachers would have none of their bullshit and would usually shoot them down when they wanted to go on their political rants (GMO, inorganic fertilizer, pesticides).
Here’s another story that relates to last night’s post. At my mandatory orientation for the College of Ag and Life Sciences, all the new students were in an auditorium after the campus tour. Most were freshman, but me and some others were transfers. After a couple speakers, some Asst. Dean of Diversity or some shit comes on stage and the first thing he says is that all the white kids are racist whether we know it or not. I thought I was a liberal at the time, but my immediate instinct was to get up and walk out, which I did along with one other person out of a couple hundred. It didn’t take me long there to realize I was a much different kind of liberal than your standard Madison statist. This was in 1991 when UW-Madison still had speech codes on campus.
Unfortunately, I have yet to take a class from Dr. Cassidy.
https://youtu.be/DEH8RF2fwrA
His other job
https://youtu.be/ijAYN9zVnwg
Ha! He seemed cool from the beginning of the video, and probably a fun teacher. He had quite the career change.
Yes he did!
https://www.corvallisadvocate.com/2020/james-cassidy-from-pop-culture-to-agriculture%E2%80%AF/
Although I misremembered him as holding a PhD in the field.
And he’s still playing in the band!
I loved pretty much all of the Ag classes I took. Nearly all of it, even including the endangered species act class were good solid reasoning and professionalism and not emotionalism. My big takeaway from soil class was excess fertilizer running off fields isn’t so much pollution as it is a resource going to waste unused. Something a farmer paid good money for and isn’t doing him a damn bit of good. Same with improper irrigation techniques where water is in excess of need. It’s just as much, or more, in their interest not just dump stuff on a field and hope for the best.
My typical school clothes were work boots and old jeans, and you always dressed for the weather because practically every day had a class outside in the elements. My favorite class was Soil Morphology. Most labs included digging a deep hole and looking at soil profiles. The one big downside of the Ag school though was not many pretty girls.
The only “crop” I deal with now is turfgrass. We maintain a lot of lawns, and one of the biggest problems I run into is people with irrigation overwatering their lawns, especially early in the season. I’m always stressing that you shouldn’t water your lawn, especially early in the season, until the soil starts to dry out. That way the grass roots keep pushing down to search for water, establishing a deeper root system and healthier plant. When people (the worst culprits are HOA’s) water too much, you end up with a shallow root system and a weak plant that is much more susceptible to insect and disease damage when it gets hot and the plant is under stress.
With fertilizer, it’s not just about the rates used, but also timing. Putting down too much nitrogen at the wrong time can often be detrimental. Same with pesticide applications and watering. If you are overwatering with high heat and humidity, you can really bring on a lot of disease issues. And of course, every year is different weather conditions, so you are always adapting and revising plans as you go. It can be really frustrating, but it keeps things interesting. I still constantly bitch about the weather just like a typical farmer.
As an aside, I think practically all my grass seed and 1/2 the landscape plants I buy every year come from Oregon.
I’m probably guilty of that, at least this year. Upside is the grass around the house isn’t completely brown this year, only patches.
What I really need to do is torch the entire lawn and start right. But being the lazy sob, I’m just going to continue my multi year “improvement”. Reminds me I need to lime and get ready for fall seeding. A little behind on that.
I’m just south of the grass seed nexus, but most of it is unavailable at retail. Same JB and Scotts on the shelves as elsewhere.
Australian Mark Steyn on their lock down insanity,
https://youtu.be/aKPjMR13tFo
I put in a raised bed this year as well.
12x4x24″ high.
The increased height is really nice, and you can reach everything easily enough so long as you have access to both sides.
Few too much lettuce, some corn, and tons of carrots.
Onions and potatoes didn’t do very well for some reason. Possibly related to the weather.
Now I’ve got basil and another round of lettuce going. Saving seeds of things that decided to make them and have been passing those along.
Next year going to try to stagger my planting by a week for the same crop, so everything doesn’t mature at the same exact time.
Rest of the garden had herbs and my grapes finally came in. Now I have too many grapes, apparently only the seeded varieties survived, not very popular with the family.
I planted a ton of stuff in peat pots earlier this year – basil, parsley, collards, kale, bell peppers, jalapenos, eggplant, etc. I think I was neglectful in watering them and only ended up with six survivors. Worse, the moisture seeping out from the peat pots wore off the Sharpie with which I had labelled them, so I’m not sure what they are. They’re either eggplant, jalapenos, or bell peppers, but they all look kind of similar this early on (two of them bore me jalapenos, so I know those for sure).
I also replant green onion root ends in the ground and re-grow them. One of them actually wintered over from last year and it’s still going. Those things are amazing.
Finally, I found some mystery plant growing out of the compost, so I replanted it. It’s not looking too hot, but we’ll see how it does. There’s another one growing on the ground near the compost, so I’ll just leave that one where it is. It looks like a cucumber plant, but I’m really not sure. That would be pretty sweet since they always give a big harvest (hence everyone trying to give them away).
Thanks for the positive comments, folks. I’m for bed now.
Ohh, this is hilarious, reminds me of a Tuefulhund I had,
https://www.youtube.com/watch?v=Qv58hR2SGkg
Seriously funny!
It gets off to a good start.
In all seriousness I enjoyed this post. With regards to using treated lumber for this, I heard that this can be bad for growing vegetables (at least root vegetables?) because of toxins leaking into the soil. Myth? Okay when using a liner?
I wouldn’t use treated lumber if it were in direct contact with the soil or if rainwater could run off the wood into the soil or soak through the wood into the soil. But it looks like Grumman’s wood is just used for trim and structure and doesn’t present much of a leaching risk.
I have been thinking about putting this on the inside of pressure treated lumber.
https://www.amazon.com/gp/product/B01GFY9X3E/ref=ox_sc_saved_title_1?smid=A1TTB2MXHGYRTJ&psc=1
I would guess it would extend the life of the lumber and reduce leaching into the soil.
But, now I am looking at cinder blocks, because I learned stuff today.
All very swanky.
Back when we were still in the LOwer Rainland, we built our raised beds out of sections of freshly-sawn Douglas fir boards, actual (not nominal) 2″ x 12″ x 16′, harvested just a few klicks from where we lived in the UBC Model Forest and cut down there in their own little sawmill. The beds were 24″ off the ground, which was just about perfect. I placed copper mesh all the way around them to protect the veggies from grubs; worked great.
They weren’t cheap: $2,200.00, and the BIL delivered ’em on his own trailer. Four cubic yards of black earth from a local wholesale garden centre that made their own soil. Gave us three years’ worth of veggies before we moved. Sadly, the entire Fraser Valley has endemic diseases like early blight and powdery mildew which really took a toll on the tomatoes, potatoes and squash. Yet the tomatilloes did really well, mostly because all of the endemics didn’t faze ’em at all.
I’m told the couple that bought our place ripped ’em out and put in a sandbox for their kids. Philistines. Probably did something stupid with the Douglas fir planks like used ’em for firewood or somesuch.
Oh well. The tomatilloes still do great in Edmonton!
Good to hear they’re handling the frozen wasteland, BEAM.
One man’s treasure is another idiot’s litter box.
The plug in clickjacking is getting worse
I’ve only had it happen on my phone. Not sure why that is.
I’ve had it happen on my laptop a couple times.
I have it on my phone and iPad.
I’m not 100% sure what we’re talking about. When you think your click is going to result in one site, but it takes you to another?
I’ll click just randomly on the page after it’s sitting for a bit and I’ll get a couple of sketchy pop-up sites.
Oh. That’s a new one. I thankfully haven’t experienced that, yet.
Click on some page element on Glibs such as up/down arrows or reply and it opens an unrelated site, usually in another tab or window.
https://en.m.wikipedia.org/wiki/Clickjacking
*reads article*
Fucking Flash.
Well, that’s great. Knock on wood, I can gladly say I haven’t experienced this yet.
I haven’t seen that but what I do get is on my phone it invariably loads a sketchy site in addition to Glibs when I click my Glibs bookmark.
#me too, don’t know why,
I’m heading to Down East Maine tomorrow, for a week. No wild parties while I’m gone. You can raid the wine cellar but leave the good stuff on the top two shelves alone.
Damn – last full week I worked was July 19th. Next full week will be September 13th.
No wonder I’m getting nothing done.
Gotta love Maine in the summer – NWS Alert – Beach hazard statement – basically, “don’t get fooled by the warm day, the water will still give you hypothermia”.
Truth. I’m a U Maine Law guy and we had a home in South Portland while I was there.
We took our girls to a beach one summer in June and – kids being kids – they went down to the water to frolic about.
I went down with them touched my toes in the water, and couldn’t believe how effing cold it was.
I sucked it up and dove in the 58° water at Crane Beach a few weeks back. Mattapoisett 5 days later was 20° warmer. Cape Ann is cold as shit.
My doodads ran up inside me just seeing that number. I believe we went somewhere along Cape Elizabeth, but it’s all cold with the North Atlantic crashing on those shores.
Reminds me of that time I tried to take a dip in Loch Ness.
SCOTUS ended the CDC eviction moratorium today. Breyer made a strong constitutional ? argument in the dissent.
Yet again proving why he’s the worst Justice on the court.
Dangerous ultra-right wingnut Kavanaugh… sided with Breyer. Also ?.
“I still like statism!”
hahaha. I wonder if that will end up on a T-shirt.
Really?! WTF. Here is Reuters’ take on it:
SCOTUSBlog is usually good for this stuff:
https://www.scotusblog.com/2021/08/court-lifts-federal-ban-on-evictions/
Kavanaugh sided with leaving it during the last challenge, not this time:
This time it was just the 3 leftys in dissent.
Yes. Thanks, Slum. That jogged my memory about the first go-round. The reasoning those 2 ass-hats used to join the 3 idiots was pretty amazing: “Well, it’s unconstitutional, but it lasted this long and will be over soon, so…let’s just let it go a bit longer instead of rocking the boat.”
I think my bad. The story I first read appears to be referring to an earlier ruling in June.
I just read like four stories that came out tonight and none of them were written in anything like a clear manner.
I’ll pimp SCOTUSBlog again.
Article on them shooting down the Biden request to quash “Remain In Mexico”
https://www.scotusblog.com/2021/08/court-wont-block-order-requiring-reinstatement-of-remain-in-mexico-policy/
From Legal Insurrection:
authentic Frontier Gibberish I say!
These questions call for considered decisionmaking, informed by full briefing and argument.
Oh fuck off. The moratorium is laughably unconstitutional under any but the most tortured readings of the Constitution and deserves to be handled as such.
Dare to dream that this might help get the economy back on track? Now that deadbeats have to pay rent again maybe they’ll get off their ass and find a job? I guess the government is still wildly spraying around unemployment “benefits” but I doubt that is enough to cover rent plus everything else.
Oh who am I kidding. The Dems will find a way to kill this market dead too.
I currently have a defeatist attitude about what FegGov has coming our way. This CDC moratorium was (by their own admission!) only to buy some time until they could cook up an even better way to spray around dolla bills.
Nowhere to run to, baby, nowhere to hide.
No attractive boltholes when the world’s reserve currency just starts running the presses.
We’re just going to have to ride it out.
I already hid up here, there are places to go..
Breyer is a fucking idiot. Under he reasoning, FDR is still entirely justified in imprisoning American citizens indefinitely without conviction or even first being charged with a specific crime.
PUBLIC INTEREST!!!!1!!11!!!
That’s exactly Breyer’s reasoning.
Under his reasoning, you could fire a guy for not getting mainlined with some wacky experimental drug that prevents a mostly mild disease for about 6 months.
Heroin for Everyone!
I thought you said you were not a lawyer.
The three of them are a bunch of statists.
Do consider where your soil has been.
Sometimes people garden next to a house where the soil has been treated for termites. While those pesticides are durable (because they resist water), one suspects they are not easily taken up by plant roots (because they resist water). I don’t think it’s yet proven that this situation is dangerous, but studies suggest it might be:
https://www.ncbi.nlm.nih.gov/pmc/articles/PMC4284386/
CCP EMPies us,
the EU stands back
the CCP offers to help us,
Shit goes down,
Should I write a story? or just let events unfold,
I fear for our Nation, and way or life,
Always write a story. I unfortunately don’t keep a note pad by the bed but last night I had what seemed to be a series of short horror story dreams.
Hmm, OK, i have an idea, Thanks
Not that you shouldn’t write something, but it’s been done:
https://en.wikipedia.org/wiki/One_Second_After
(among others)
I know the tale, I just started something different, hope you like my result,
“Never interfere with your enemy when he is making a mistake.”
I doubt CCP is going to do anything at this point cause we are continuing to dig in our hole.
Does the quote start with Confucius say…?
He who go to bed with itchy butt wakes up with stinky finger.
Fortune cookie writer confirmed.
From the top rope
https://www.duffelblog.com/p/us-offers-to-trade-back-bowe-bergdahl
https://www.duffelblog.com/p/intelligence-report-confirms-direct
Know what happened when we were caught with our hands in our pockets? We were accused of playing with ourselves with our dickbeaters.
The truth hurts.
We just yelled at. And something about Air Force gloves.
I still do the thumb hook sometimes.
I’m up and running. Hooray!
Lots of tidying up and cable management remains to be done, but it booted up and Windows is installed.
So part of the teens’ punishment for missing the bus and then taking 4 hours to walk to class was me yanking $50 bucks from their accounts. Man are they pissed. We warned you what would happen if you cannot wake up and do your primary job. Phones can be used for calling us, grandparents and brothers. Internet is on only for school work.
Yes, he’s incompetent but how about you win an election?
https://www.washingtonexaminer.com/news/republicans-impeach-biden-resign-kabul-attack
That would be uncouth. They’re the loyal opposition.
I wish it were that. More like the stupid party is gonna stupid.
“how about you win an election?”
Well, I mean….
He means win-win.
Hmm…could be just a joke but many many UCMJ violations
https://twitter.com/i/status/1431078931705303041
A silver lining in the warfare bonanza over the decades is that you have a bunch of disgruntled vets with better training than the king’s enforcers. They are right to be scared.
I’m guessing someone who talks that way hasn’t been shot at.
Fuck around and find out. She’s talking tough as her leadership just finished up 2 decades of demonstrable incompetence.
First time I’ve seen an actual ladyboner.
She seems nice.
Drop the little badass off in Afghanistan. Maybe she can rescue some Talibani from their virginity.
I bet she’s a blast at parties.
In doing a bunch of research for a motion I’m working on, I keep stumbling onto media clips from less than a year ago.
It is absolutely amazing what propagandists the Media are for Team Blue:
Check out CNN on “rushing” vaccines and what could go wrong… from when Trump was still President. Then compare it to how they’re talking about vaccines now.
The ability to slide shamelessly between positions depending on political realities and convenience is an underrated, albeit immoral, skill that has been honed to razor sharp lethality over the years by CNN.
“One, the vaccine may not be safe. Two, if it is not safe, people will lose faith in vaccines. Three, if a vaccine doesn’t offer complete protection, people will have a false sense of security and increase their risk. Four, if a substandard vaccine gets an EUA, a better vaccine may never get approval, because people would be reluctant to enroll in trials and risk getting a placebo instead of a vaccine.“
My how things change, now go get your mandated ineffective shot you assholes.
My take on this now is that the vaccines have created an army of super spreaders for a virus that will continue to mutate. Remember when they said getting the vaccine would stop the spread? Do it for your family, they said. Bullshit. It made it worse.
The most egregious bullshit is them saying you still need the jabs if you got the Vid and fought it off, because the vax is better.
That’s astonishing.
Great article, this our first year with a raised bed garden. Lot’s o’maters and cucumbers. Light on the peppers and carrots. Oh, and kale. All the damned kale you could ever not want. The squash and zucchini are a bust.
Also, nice bat house. I need to put mine up. /Lazy
Also, nice bat house
Mine have been up for years, and no bats. One of the wife’s friends says we need to move them off the garage, that the garage door openers are creating vibrations that wake the bats up in the winter when they should be hibernating. I could move them up to the tractor shed, but that building isn’t as tall, so they won’t be as far off the ground. I don’t know how much that matters.
I thought 12-15 feet was good enough. I’ll have to look it up. Also, sun is required too as I recall.
There’s a list of criteria that may end in painting the bat house if some of them are met.
*runs off to find the installation guide*
Here’s one. I don’t think it’s the exact one I was thinking of
You shame me, Grumman but one minor quibble. You should have installed some sort of shielding between the wall and dirt. Other than that the results are fantastic. Imma hate you forever for that stepped drill bit tip! 😉
Mold will grow up the siding and vermin will find a way in.
I would have built standalone boxes and set them just far enough away from the structure so that you can weed-whack the space between. My 2 cents.
Just a foot or so. When I built our boxes (8×3) I just used a board screwed in at the halfway point to prevent bowing. No need to get technical when you’re being primitive!
suh’ fam
whats goody
Chowy-Wowie edibles from the pot store on every corner, lately!
Trippy !
Judi bought them for me. It does seem to resolve some of my aches and pains but to tell the truth it’s a nice mellow stone. If the vegan recommends, it must be good…
I know someone with a medical card, and Ive been tempted to try something for aches & pains. Maybe not drink so much beer, too.
My poor liver is so black & fat, it could have starred in the movie “Precious”.
Good morning, homey, Fes, TARDy, rhy, & Stinky! (I assume the other most recent commenters are asleep or otherwise engaged by now.)
I need a break from my boss. He watches too damn much news. He’s conservative/libertarian, and he hates CNN & MSNBC, but he still believes whatever Fox News tells him. I told him I don’t trust any of them. I fear my workplace will soon perhaps not REQUIRE shots, but punish you in some way if you don’t get one, such as making you pay a higher percentage of your med insurance premium. And right now, I’m the one in the middle with the info on who has and who hasn’t (or at least who has copped to getting it and who hasn’t.)
Gabrielle Enright was having a tough time talking this morning. But so help me, she’s darling.
Really takes the wrinkles out of my love-sausage.
I’m not here, and I’m not asleep. I’m at work.
*stares at work monitor*
*nothing changes*
Pro tip: To change things on your monitor, it helps to press the little button things or move the little mousy-shaped thing (or slide your finger over the little square below the button things.) ?
“Just a little pin-prick” Ouch! At least your boss isn’t woke. That’s something, right?
It helps. He claims we can talk to each other as friends (after 21 years) but he’s still my boss – and has to answer to HIS boss, who I gather is more inclined to go further than we have over the shot shit.
Agh! My bosses are faceless bureaucrats that drop edicts from on high, much like Zeus. At least you get to see the face of evil. I’m sorry that this is happening to you and I wish that I could make it better. We’re in the same boat so misery loves company, I suppose.
If you need a religious exemption, I am an ordained minister.
And while Im bound by sanctity of the confessional, it may or may not have worked in a certain chubby girl’s favor when her employer mandated it….
Religious exemptions don’t work up here. We either get the experiment or don the backpack of shame and live on the streets. At least I’ll be good at can picking. I know where the low-level alkies hang out in public spaces.
Price of gas dropped 2 cents per liter yesterday. It’s now $141.9. Someone has a snap election happening.
I knew it was bad, but $141/liter?
Har-d-Har Teds”
Fuck you.
Now I want Hardee’s for supper.
Door-dash! Do they deliver fast-food blow jobs?
I used that service yesterday, and way over-paid for Frisch’s.
Hardee’s isnt cheap to begin with.
I was thinking more braces but I’m being a terrible person today.
https://www.wfmz.com/news/area/southeastern-pa/quakertown-schools-to-remain-mask-optional/article_64e0e5c2-06e6-11ec-bfe2-c7a632a8c45d.html
Super local news.
*looks sideways at Pie*
That’s great news! All doom and gloom on this front.
ISIL-K
So Biden said he takes responsibility, but Trump made a deal with the Taliban. Of course, he also said this was ISIS-K and that the Taliban condemned it, so….
I’m not defending Trump, just pointing out that there’s no logic other than “but Trump!”
It was a weird flex. Trump brokered a deal that ended US deaths. Sounded more like an endorsement of 45’s policies than anything else.
Florida woman hospitalized with COVID-19 comes home to find husband dead of COVID-19
Uhh…maybe you shoulda got the vax, cause there’s no doubt your fat ass is in one of the risk groups.
SLD- totally would. Specially now that she’s newly single.
Good God! Those carpet fibers actually found their way into your brain… Was it the formaldehyde?
Smells like Teen Spirit ?
SLD? Super Large Damsel?
Meanwhile, in NJ…
Thanks for that. A small ray of sunshine.
I mentioned yesterday that we are raising a generation of jug-eared children. When I emerged from the womb the first thing after a snipping the cord that the Drs did was ape my teeny ear back. Apparently I held one ear shut whilst in the womb. 16 year old mother was apparently not happy about another baby.
Good morning everyone. And isn’t it a lovely morning? Tres and Festus, consult with a knowledgeable vendor; there are strains that have been grown specifically to have reduced psychoactive potency and increased analgesic value. There are also topical preparations that some folk swear by.
I don’t need to drive. This is fine.
Im not a good smoker. I may have related this story, but the last time I got seriously high I awoke around 2 am thinking Shaquille O’Neal was in my kitchen baking cookies.
L O L
I haven’t smoked for decades. This is much more pleasant but boundaries are not set.