In the comments to another article I mentioned that I 3D printed a cell phone wireless charging adapter for my car. Several people asked for an article about the process of the 3D printing. I’m far from an expert, but in the past few years have learned just enough to be dangerous.
The first step in 3D printing is finding something to print. The most common site for free files that can be printed is Thingiverse. It’s got great content, but the site itself is not so great. From some of the anecdotes I’ve read some VC group bought it and basically broke the search and as traffic grew starved the site site of resources. There are alternatives, but they are either very narrow or not very good either.
At some point you are likely going to one to either make your own design or modify a design so I thought I’d start with creating a file to 3D print. Realizing that Defense Distributed’s Liberator is probably the most Glib choice I chose the second most Glib selection. Here is what I found in our image library
Graphic Available Here – https://www.glibertarians.com/wp-content/uploads/2018/02/Glibs-logo-by-Lafe-Long-for-Avatars.png
The problem is that this particular file is 2D. I’ve never actually tried to make a 3D file from a 2D image, but it would appear there are few sites that will help you out here. Naturally, they likely retain a copy of what you upload for conversion, but I’ll risk it here.
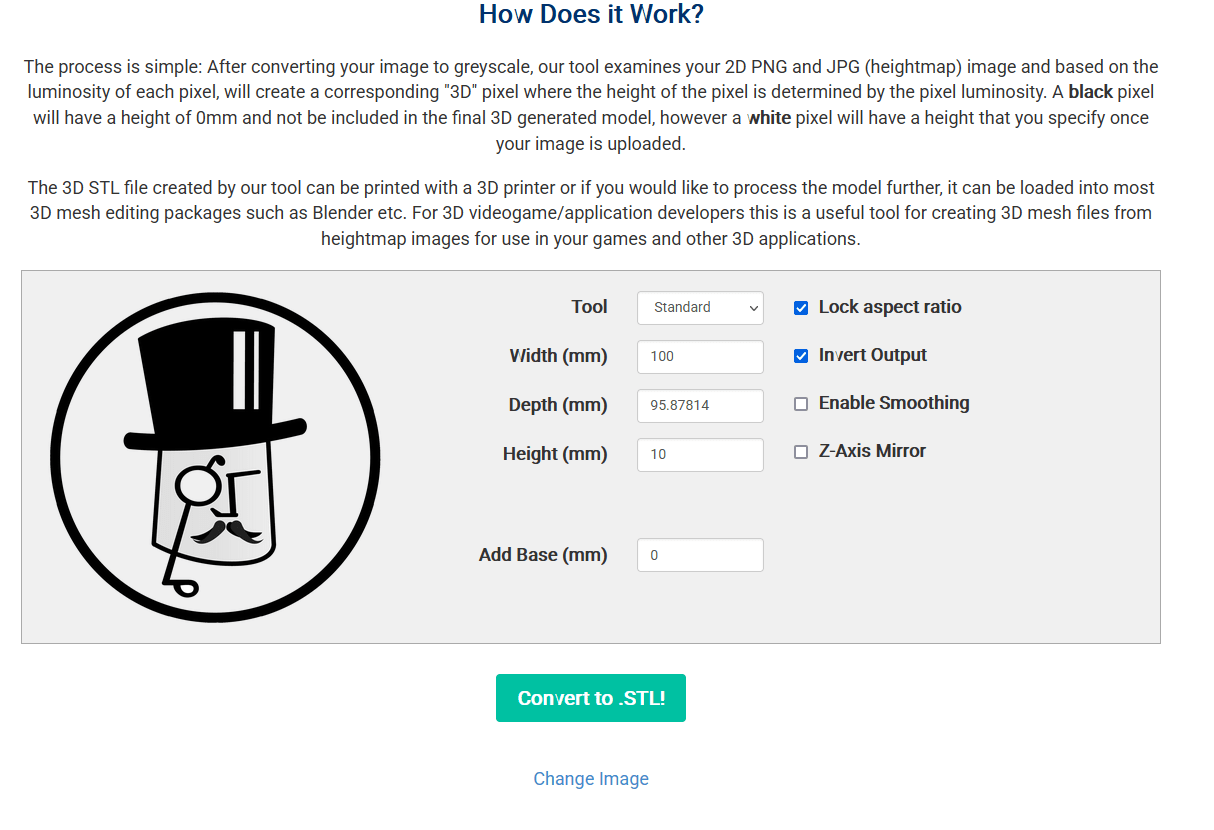
I randomly chose ImageToSTL.

Here is the what the site selected for default settings with exception of “Invert Output” which I selected. This will raise anything that is black in the image and set anything white in the image to have no height. See the field “Add Base”. I probably should have used a value there, but we will fix that later.
It’s time to CAD
We are going to take the STL file we just created and bring into a CAD (Computer Aided Design) program. Which one should we chose?
AutoCAD – It’s one of the gold standards and used across the world by many companies. I wonder how much it costs? Oh, nevermind. Plus it’s made by an all controlling corporation abusing its near monopoly on the professional market called AutoDesk.
How about Fusion 360? All the “makers” use it. Maker, the new word for cool people who actually make something. I guess this is show how much better these people are than mere “consumers”. Let’s check it out and see what pricing looks like. Looks, like I can actually get a personal subscription for free – at least for one year. When I looked at this a year ago you only got a single year free and after that you had to pay. It would appear “the Maker Community” has managed to make the company back off it’s licensing requirements. Let’s hope that the company doesn’t alter the agreement again. What company would that be? That would be AutoDesk.
I know let’s try Tinkercad. It’s relatively simple to learn, used to teach basic CAD to students. Plus I can finally get away from that terrible company called… Wait what does that logo say above Tinkercad?
![]()
Source – Wikipedia
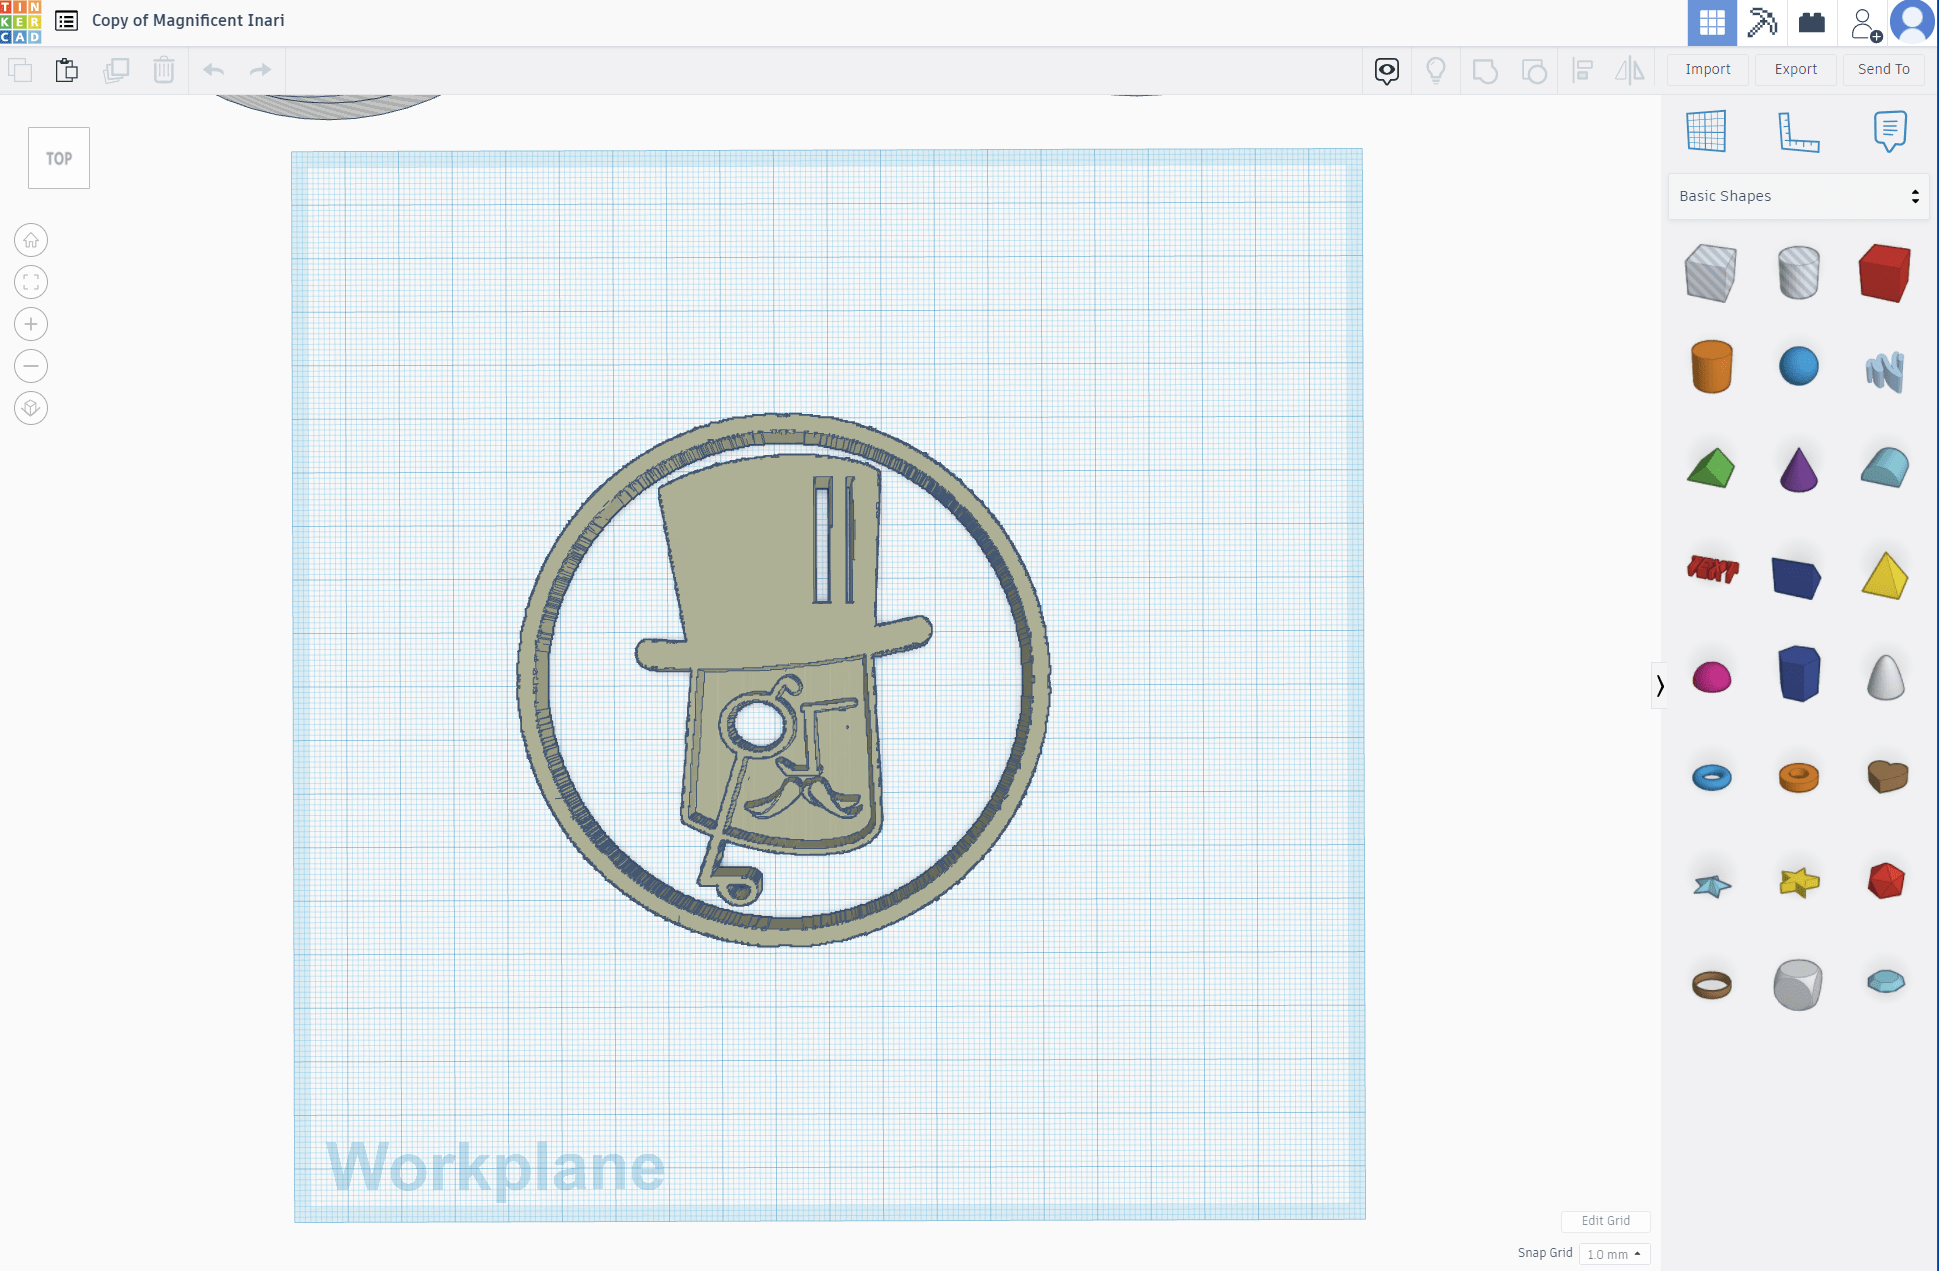
OK, using your AutoDesk product of choice let’s import the newly created STL logo.
Modifications
We have problem with the piece we’ve just converted. You can see that it is two pieces. We could print this just fine, but it will print it as two separate pieces. We want to have this as one single object. I believe this is what the “Add Base” option from the conversion site would have done. We can do the same or possibly better right in the CAD program.
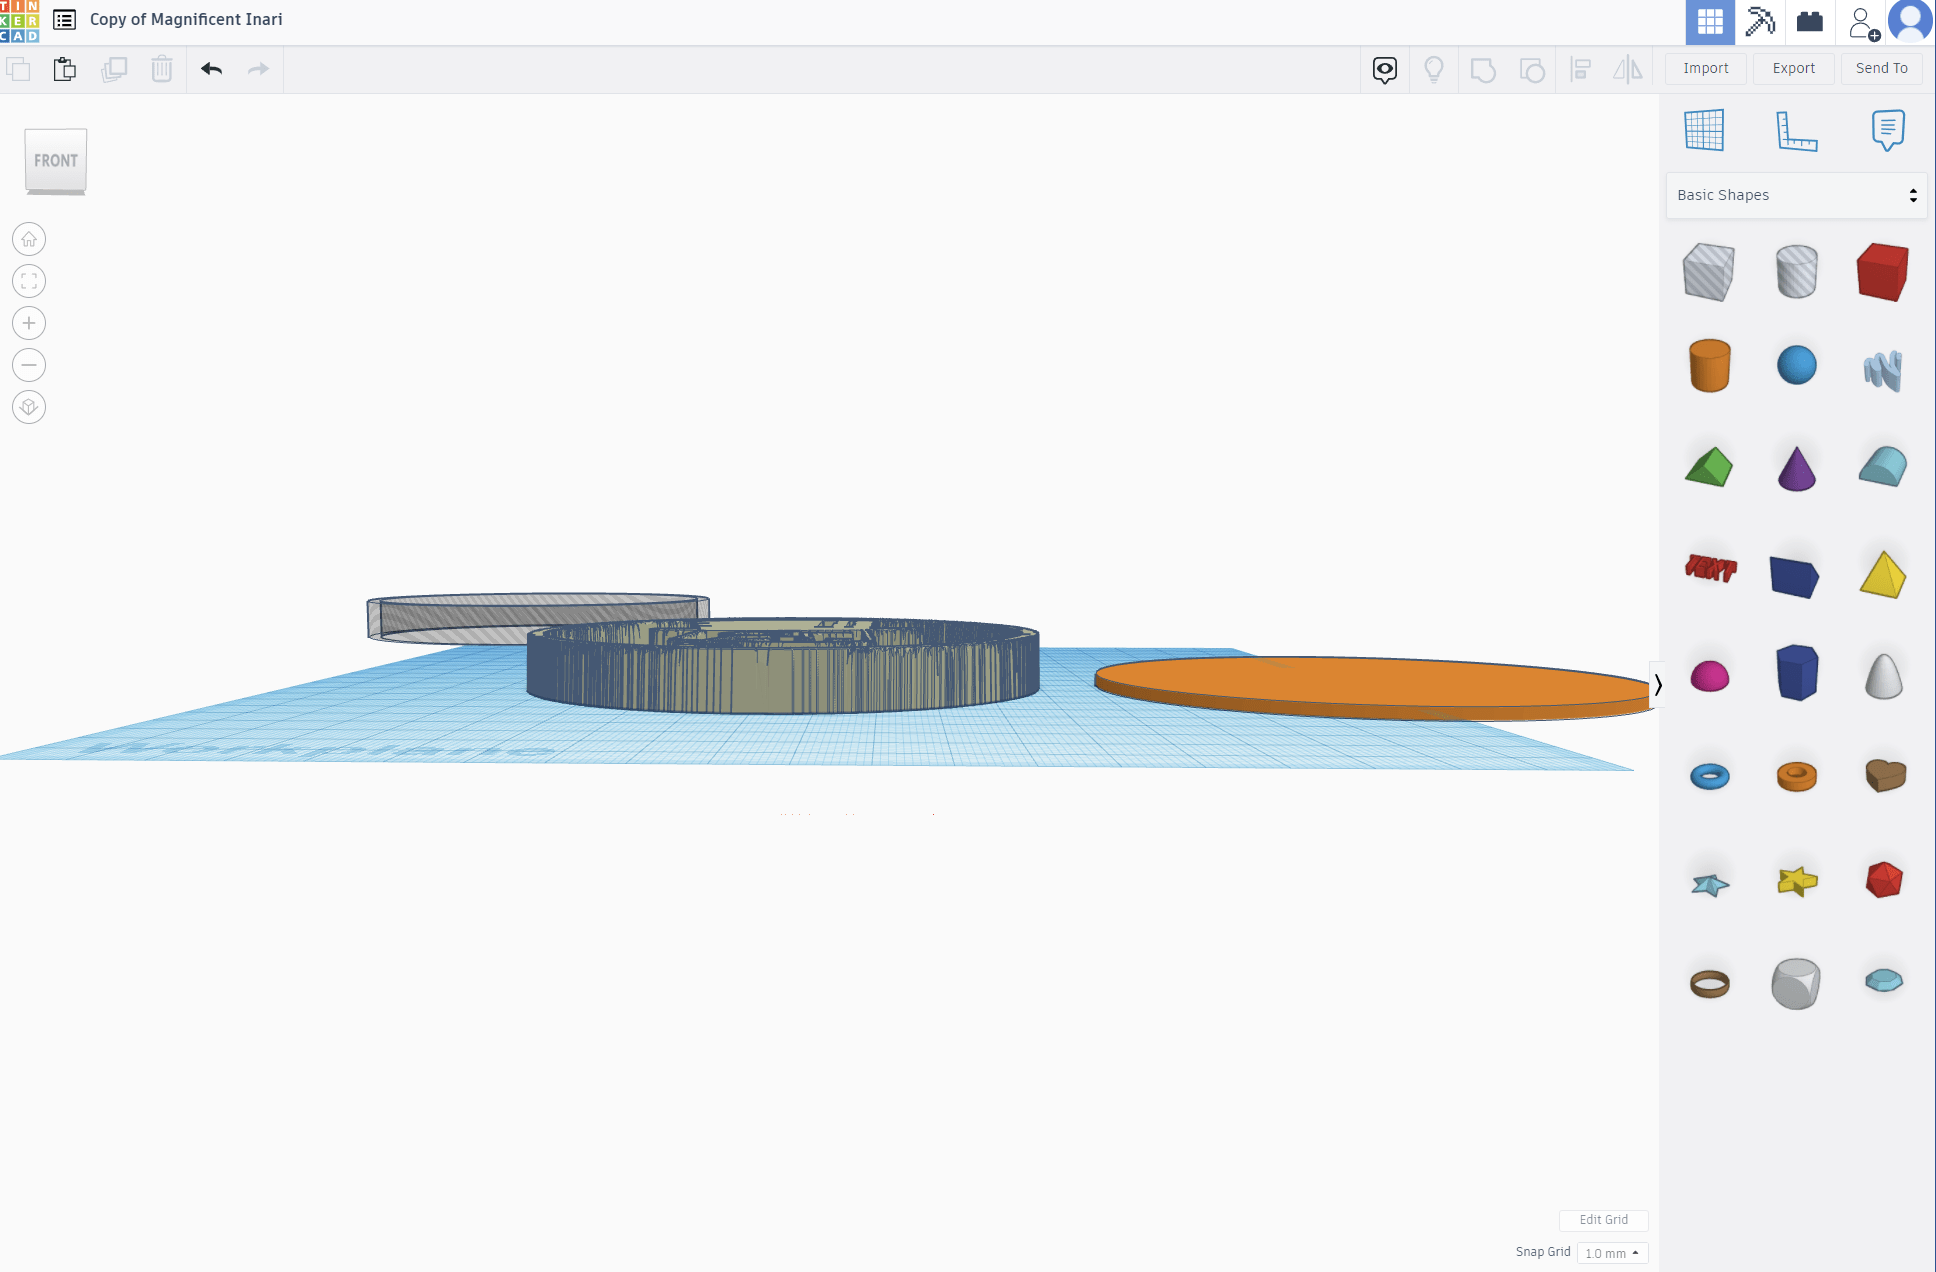
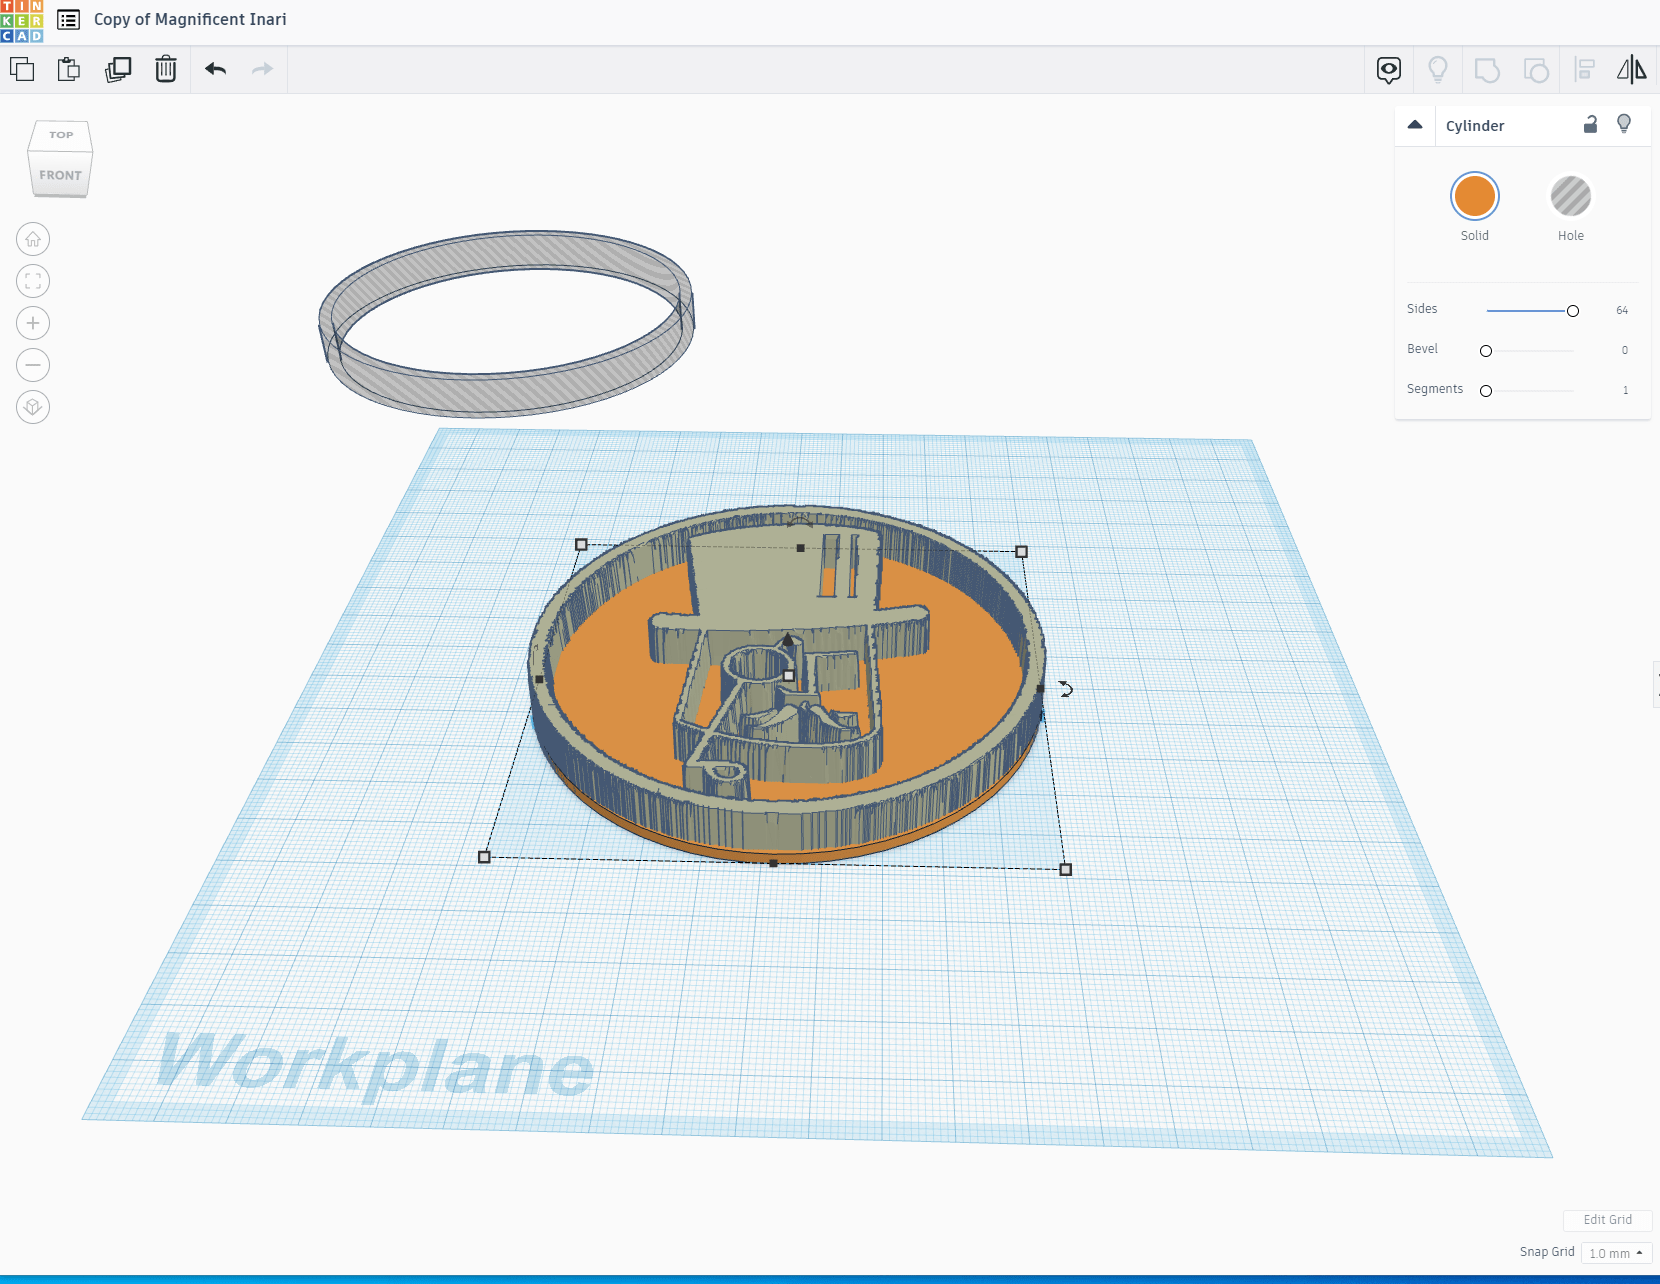
Tinkercad uses a simplified constructive solid geometry method of constructing models. A design is made up of primitive shapes that are either “solid” or “hole”. Combining solids and holes together, new shapes can be created, which in turn can be assigned the property of solid or hole. In addition to the standard library of primitive shapes, a user can create custom shape generators using a built-in JavaScript editor.
In our case we going to create a “solid” disc to fit under the logo and “hole” shape of a ring to which will both align the disc perfectly under the logo and make the outside completely round and smooth when we print it. Below the disc is orange and the ring is the grey striped object.
Grouping the Shapes
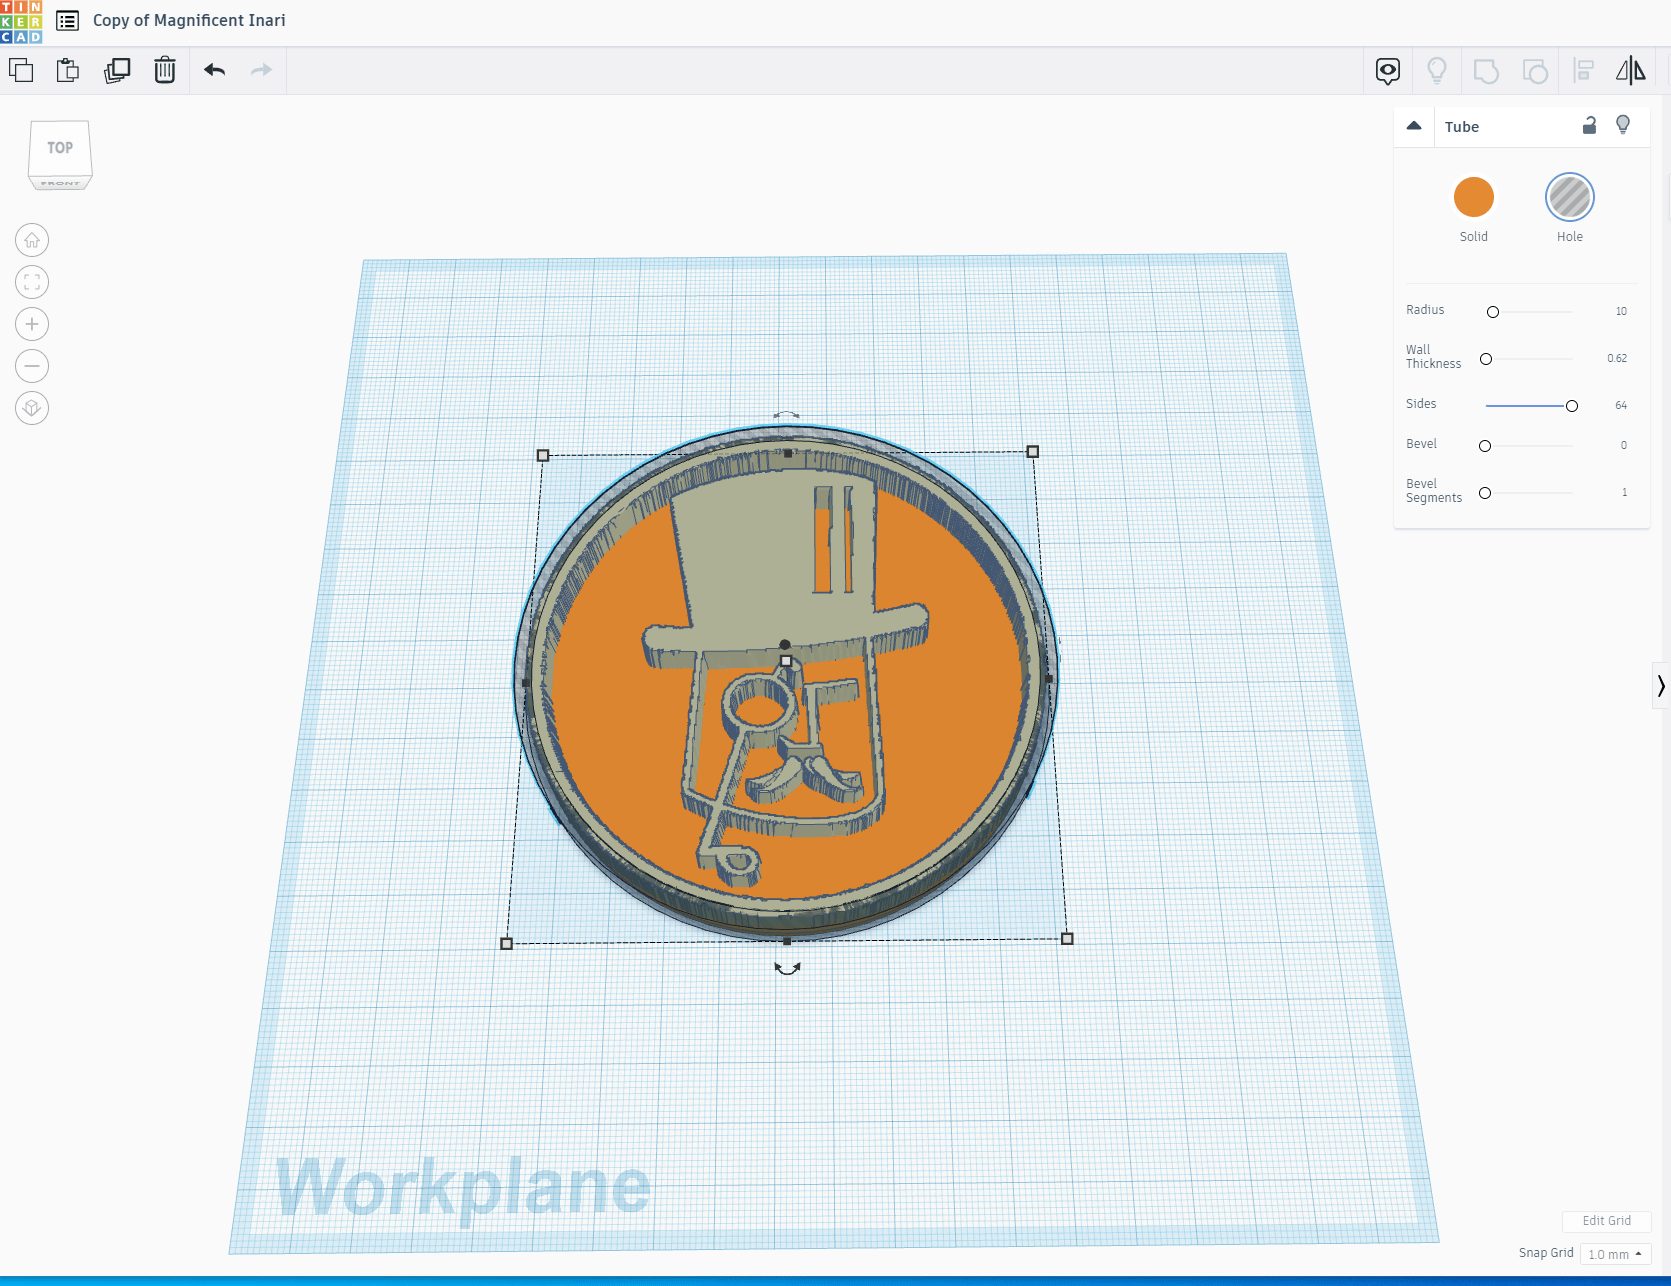
We’ve put the disc under the logo and now you have better view of the “hole” ring shape
Grouping Shapes
At this point we’ve now arranged all three shapes together.
Grouping and Exporting
Once we’ve got everything where we want it we will “Group” the three shapes together and create a single object. After that we export the file as STL format.
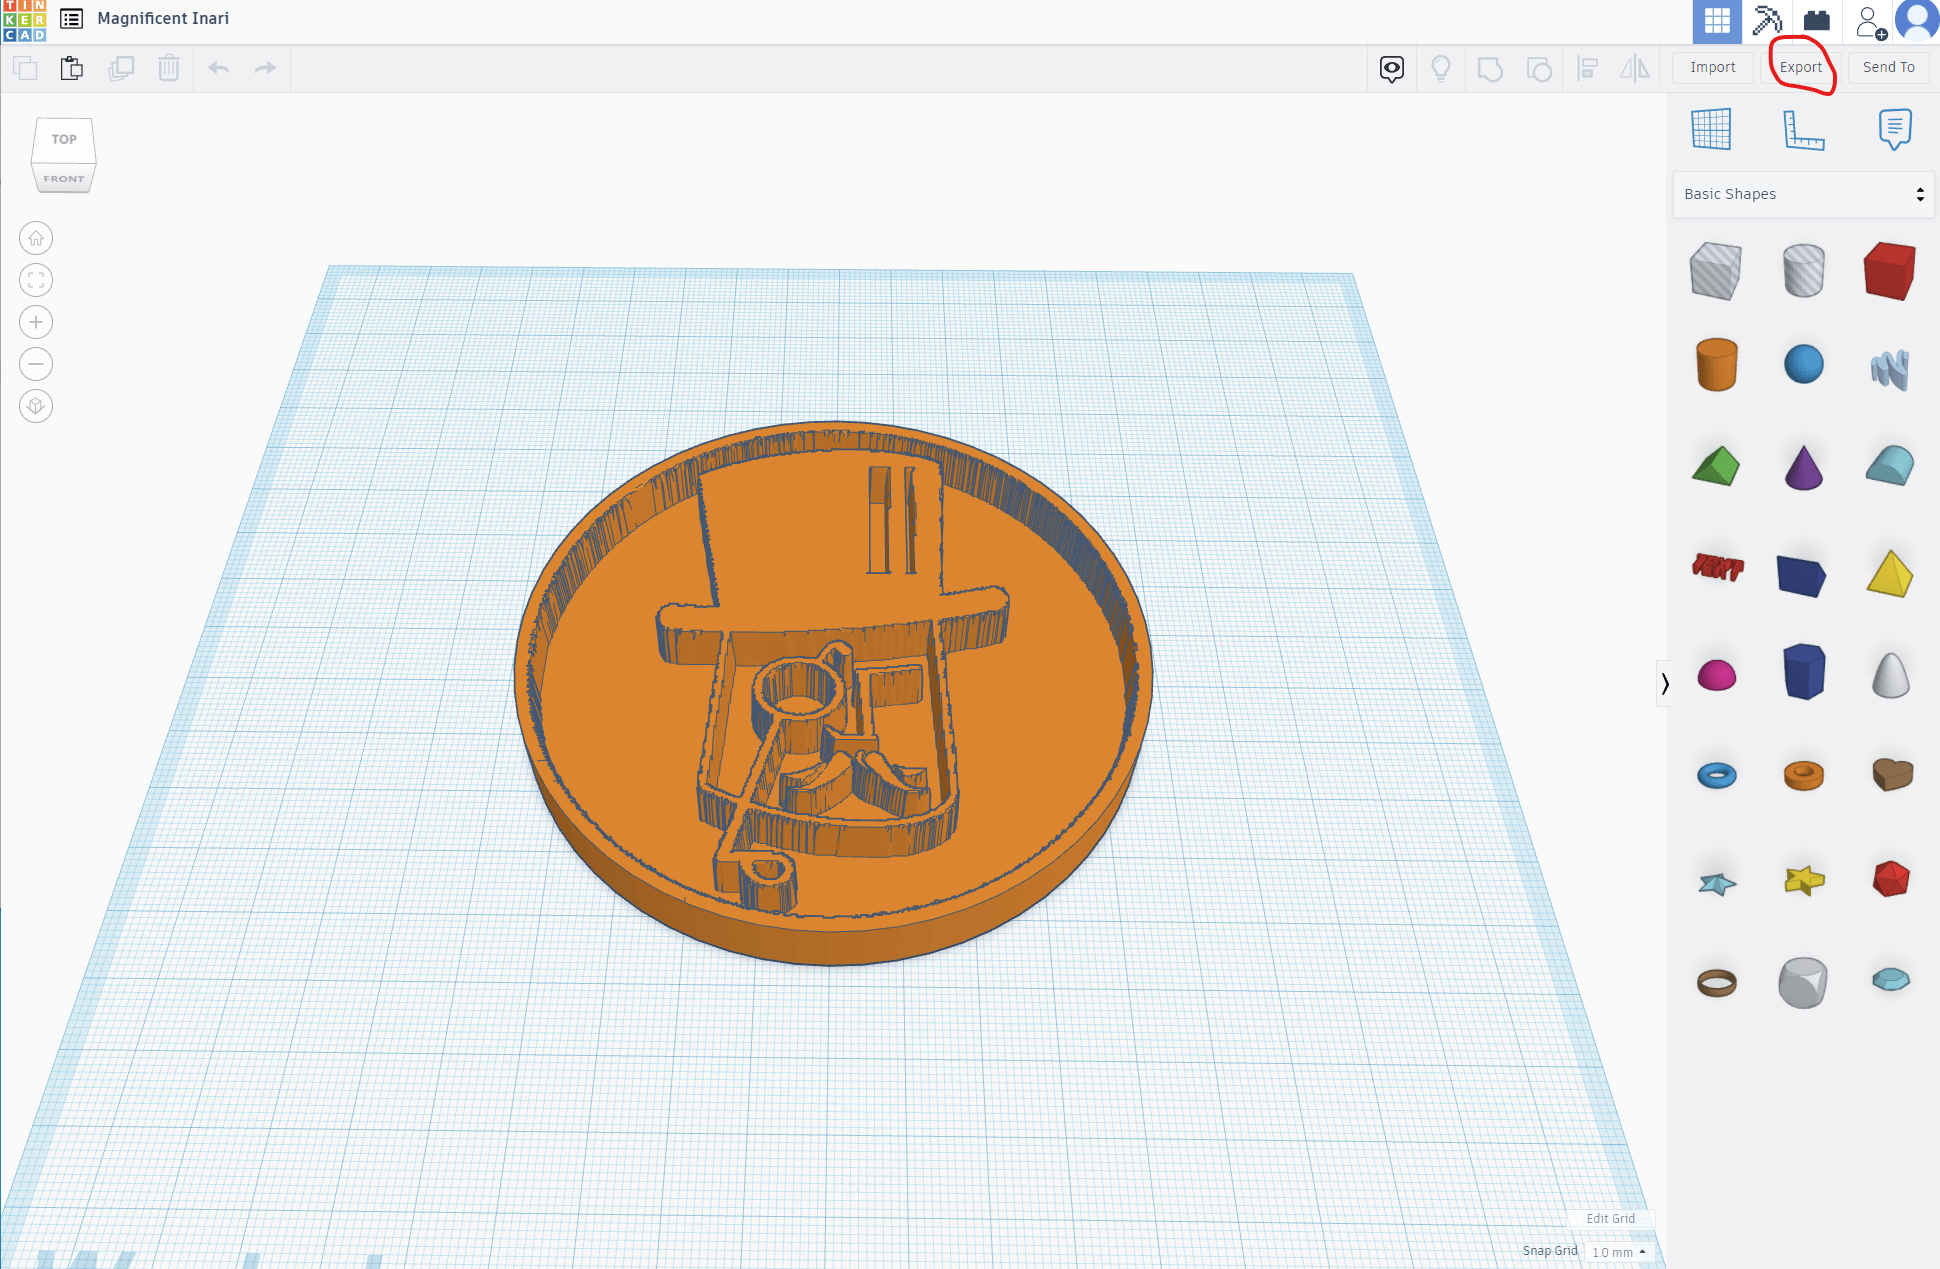
Completed STL – Magnificent Inari
One of the things that Tinkercad does is create random names for projects you start one. It’s must be fate as the name Tinkercad randomly assigned this particular project was “Magnificent Inari”.
So as to remain true to form –
Inari Ōkami (Japanese: 稲荷大神), also called Ō-Inari (大稲荷), is the Japanese kami of foxes, fertility, rice, tea and sake, of agriculture and industry, of general prosperity and worldly success[citation needed], and one of the principal kami of Shinto. In earlier Japan, Inari was also the patron of swordsmiths and merchants. Represented as male, female, or androgynous, Inari is sometimes seen as a collective of three or five individual kami. Inari appears to have been worshipped since the founding of a shrine at Inari Mountain in 711 AD, although some scholars believe that worship started in the late 5th century.
Here is a link to the STI file for the Magnificent Inari.
Next, Part 2 – The Slicer
Now that we’ve got a 3D object we need to get it printed. The next step in that process is to use a program called a “slicer”. A slicer takes the 3D object file and both converts it and modifies it to match the particular CNC (computer numerical control) device you are going to be using it with. In the next installment we will go through slicing the logo we just created. Slicing is more than just a straightforward file conversion. You have to adjust the model within the slicer to deal with constraints of device that you will be using to create the object.
Can’t wait to see how it turns out!!
That sets my teeth on edge.
Don’t be pretentious, people.
Makers make a curated collection of items.
Needz moar artisanal.
This is a thing that exists because I just saw a commercial the other day for what’s basically the Pretentious Crap of the Month club.
Etsy?
People on Etsy take the designs on Thingiverse, disregard the license agreement and sell them for ridiculous prices.
Some of the objects are printed just awfully too.
I know the commercial Rhywun is talking about, but I can’t remember the name of the company.
[thinks for several minutes]
Maybe Touch of Modern?
That’s an older one. They just have a catalog, I think. They’re pretentious too.
This new one sends you cute little tschotschkes in little boxes every month.
So you had a problem with Alvin The Maker?
Don’t know it. Not a big fan of his, so maybe I would?
Old sci-fi/fantasy. Complete fail on my part.
Not at all. I’ve heard of it. I just don’t care for most of his novels.
The first book is fascinating — OSC does excellent worldbuilding.
They’re a bit racist by modern standards. And Harry Potter and the Methods of Rationalityis a complete ripoff of them but if the rationalist community found out…
Hell, yes. Slow that shit down 8x and play it backwards, and Rekameht Nivla will steal your soul and sacrificie it to its overlord, Sknumpihc.
Yes. He screwed up nearly every single song by either forgetting the lyrics, or making up his own. He was a maker alright…a trouble maker.
Yeah, for millennia “hobbyist” worked quite well. Now this subset wants to be called “makers”. The shit I make -or am part of a team that makes- on a daily basis makes these pikers look like…well…hobbyists.
I think it’s because “hobbyist” is a broad term. It covers software, for example. But these folks decided that creating physical objects raises them to a higher level for some reason so they had to invent a new lingo for themselves.
Furniture maker.
https://www.youtube.com/watch?v=dTcvmmOkqJI
But seriously, this is the level of most of these people’s skills.
It’s an amazing level of hubris. Hobby woodworkers and hobby machinists have been doing this shit for centuries, but this new generation gets a 3D printer and some cheap Taiwanese micro CNC machines and all of a sudden they are Makers.
Don’t get me wrong, the more people interested in this stuff, the better. But check yourself.
I’m with ya. Some of these assholes get so pretentious. I’ve just been building shit all my life, don’t need a fancy label to show off my quirky lifestyle.
My guess is that they are trying to escape any sort of blue-collar association. Which is just lame.
I get that feeling too–they want to be *cool* and different from their coder colleagues, but not like those dirty unwashed who actually have to learn these skills to earn a living…
100%
Because they see themselves as educated and white collar.
I’ve enjoyed how much the whole “maker” thing has struck a chord here.
I wasn’t sure if folks were going to notice it in the post.
Dude.
The only way you could have got more response here is if you had made a Dune reference rather than a “Maker” hook.
Ah, good point. I hadn’t thought of it that way but it makes sense.
When you get good at it and do it all the time, are you a master maker?
*drum and cymbal
Are you trying to bait us?
What a jerk. Off with you.
Unless it 3D prints metals I would have little use for it. A metal printer could print car parts, tools, etc.
Right now my interest is more in CNC machines for wood carving.
https://duckduckgo.com/?q=cnc+wood+carving&t=h_&iax=images&ia=images
They exist, but are quite pricey.
They are coming down substantially in price…but everything is relative.
I ain’t your relative, pal.
I ain’t your pal, spuddy.
It ain’t easy having pals.
https://youtu.be/YX0MiXBrL84
YG I and II is arguable the best 2 movie series ever made.
I ain’t your spuddy…wait a minute.
A friend of mine, whom I have lost touch with, was a drafter at a foundry that made crankshafts for very large engines and PD pumps (think hydraulic fracturing), who tinkered with 3D printing years ago when it was just starting to be something the sort-of layman could get into. The CEO of his company tasked him to do research on metallic additive manufacturing, and they supposedly were going to get one of the early metal 3D printers to play with, then once the proof of concept was completed, begin moving into big stuff. I haven’t heard from him for a few years, but it was a sweet-ass assignment for him, and I imagine he’s doing pretty well with it.
This looks cool.
Love this!
I’ll wait for the dumbed-down Ronco version that can print me a steak in 30 seconds or you get your money back.
Very cool Sensei.
We use Draftsight by Dassault for 2D CAD work. Basically electrical schematics and refrigeration piping schematics. I think we used to have a free version until a couple of years ago. Not sure if we upgraded or if they got rid of the free version.
For 3D stuff we use Autodesk Inventor. A lot of sheetmetal drawings. I think we are on a subscription plan with Autodesk for a certain number of seat licenses.
I have been using Alibre Design for a long time. They haven’t gotten very big, but I think it’s about the best 3D modeling program I have run into in terms of user interface and intuitiveness. It started off as a free-for-amateurs system, and I think they might still have a free version. I ended up buying a license for it, which is pretty competitive with the others.
I got a free copy of SolidWorks through my EAA membership, and am not too impressed with it. I’m sure it’s great for professionals who have the time to learn its intricacies and need its really advanced features, but I prefer Alibre overall to it for what I do.
Another possible software option might be Sketchup, It’s what I use for building plans/design, and they have a free version, although I have the professional package *huffs on nails and polishes lapels* since using the free version for commercial work would be unethical even if I was fairly certain I could get away with it. Anyway I don’t 3D print so I’m not sure how good their interface is but the 3d modeling and rendering that I use it for is pretty sweet.
Oh, and it used to be a Google thing but has since become a Trimble thing, whomever they are. I don’t care, so I haven’t look into who actually owns the thing, but If that sort of thing is an issue for you there’s your heads up – they at one time were a Google product.
*stops reading*
What ever happened to Lafe Long?
*goes back to reading*
you too, eh?
FreeCAD is an interesting choice that I’ve also tried out. I liken it to CAD for people who suck at art, but are good programmers.
You create a model with parameters and can quickly change the parameters. So once you modeled a box and a fitting lid you can print one in any set of dimensions you like, for example.
FreeCAD
There are good, free/low cost CAD options out there. The “problem” with CAD is, there is a high learning curve that can’t really be reduced. If you aren’t willing to either a) learn it, or b) pay someone to do it for you, a lot of “maker space” is going to be difficult.
Precisely the reason I refuse to get myself locked into AutoDesk.
Professionally, for example, I’m locked into Excel as well as the rest of Office Professional. Essentially my company is now paying MSFT an annuity. It’s not like I’m going to switch to Open Office even though it’s essentially the same. The time debugging compatibility issues would be more expensive than just paying the license.
Compatibility, robustness and support, right? I want to to work with everything…always, and to have a large number of people to help me when I need it.
$$$$$
I’ve not tried FreeCAD, at least not that I remember. Alibre Design can be parametrically driven, and used to tie into Excel, so you could do calculations to drive a design in Excel, and tie in with VBA, etc., but they changed ownership and had a big code rewrite and ended up dropping the Excel links. It has an internal spreadsheet now to drive designs, but I think I preferred being able to tie it into a real spreadsheet program. It might still be able to do that, or connect to something like LibreOffice, but I haven’t dug into it.
Maybe I’ll give FreeCAD a try and see if it competes, maybe I can save some money next time my Alibre license comes up for renewal.
I have LibreCAD to play around with, and I really don’t like it. I drafted for years in HS, so I have some basic idea of CAD type work, and use a couple of similar drawing/art programs, but I would like something a little more intuitive. Or, I could go back to pen and velum, which would be about my speed.
Question is…can this be introduced as evidence?
Depends, does it have handbrake installed on it?
I really wonder if the defense is smart enough to listen to anyone on this and bring it up in front of the judge.
That was an astonishing sequence.
If the tophat doesn’t fit; you must acquit.
LOL
Ugh, I have a Zoom meeting at 9 o’clock. I suppose I should slow down on the vodka for a bit.
It’s expected on the GlibZooms.
Unfortunately, this is work.
pm?!
Yup and I meant
ZoomTeams.We don’t do video at my company, thank Zod.
I have to train the Night Ops teams on some shit.
None of them could be bothered to show up early as usual.
You know you must do it…open the meeting with this: https://www.youtube.com/watch?v=ePCiVK5Jjos
Shit, I hope I didn’t come across as half-drunk as I felt like I came across.
Enh, they’re the night crew, they’re probably used to it.
Teams >* Zoom
*by a factor of infinity
I like it well enough. It gets a lot of hate but it lets me do my job from home so I can’t complain.
God, when I play guitar my glasses fall off, damn you Blindness!
https://open.spotify.com/playlist/66BlgCzlSdO6NMOYnLiuU6
I have no interest in 3D printing. Although, I could definitely get into a CNC machine.
I’m a chld, oh fuck this,
https://open.spotify.com/track/1hWrl3T1kIH5b9zRHLfCOn?si=d3b06c8fd49d4823
Get back to me when you can 3D print a First. Then maybe I’ll be impressed.
Get back to me when you are real,
I would if you could show me what one looks like.
That’s like asking someone to articulate what the female orgasm looks like.
So, you don’t print 3D, but you talk shit, OK
What’s the sound of one hand rubbing?
Lol.
There’s the second thing you’ll never witness.
Boom goes the dynamite!
I gave your mother multiple orgasms just last night.
Back OT: Sensei. Thank you for putting this together. I know this info is out there, but it’s so cool to get it distilled down by won of our own. I’ve been tossing around the thought of getting a 3D printer for my side hustle, but I just can’t see making any money with it.
That said, I know the investment now could very possibly pay dividends in the future as metal 3D printers become for affordable. Just need to pull the trigger. Maybe when you are done with this how-to series, you could walk us through options and explain why you chose the machine you did?
Plan is to do a bit of that when I print the object.
Thanks for the kind words!
Can you print a disc? that would be cool.
I’ve seen some printed discs, but i think they have weight issues.
Nvm, the ones I was thinking of had cost issues.
I would think so subject to the size of the printer.
Material cost and print time suggest it would be easier and probably cheaper to buy it.
https://open.spotify.com/track/2g2a5kDeZexbUTD8abcvm6?si=209238064d774b7d
Yippy bt way of fun!
I need to gather the kids together for winter play, it wiil be tough, but God what fun! Ice!
I missed the last few hours, so forgive me for skipping the last round and jumping to the end… But I gotta chime in on the Rittenhouse trial.
I am now completely convinced.
Both sides are desperately trying to throw the case. The defense was indefensible today. The judge basically said “I am ready to toss this case with predjudice” and the defense suddenly softened and talked compromise. They even asked for a mistrial without predjudice. WTF?
I saw this on Rikeita’s live stream, and the lawyers were appoplectic.
The prosecution was so absolutely, unequivocally full of crap. Caught, red handed lying on top of lies about withholding evidence.
And they are all so dumb, nobody got it. The entire thing is a fraud. The whole blobsquatch of a Rorschach test that they claim proves he is pointing his gun was intentionally manufactured using frame interpolations and scaling algorithms. Given an actual expert and sufficient time, it would be trivial to go back to the original frames and demonstrate that they are manufacturing a fake image and promoting it as the responsive truth. But the defense is too dumb to have demanded a real expert and real time to examine the evidence.
I could not believe they punted on the hearing that the judge proposed today. Holy crap, he was about to put the prosecutor under oath because he knew he was lying… And they let the prosecutor filibuster until the judge forgot about it.
If Kyle gets convicted on anything, he has a pretty decent ineffective assistance of counsel claim for the appeal, complete with live reactions from people who do this every day.
I’m curious about the live stream full of lawyers criticizing other lawyers’ professional work in court. I’m pretty sure a licensed engineer couldn’t get away with publicly trashing another licensed engineer’s work.
Is that not a thing in lawyer-land?
And by “get away with” I mean “avoid censure by the licensing agency.”
The thought crossed my mind, as well. I know that trashing the judge would land them in hot water in no time flat, but I forget what exactly the standard is for criticizing counsel. Critiquing technique usually won’t land you in hot water, but outright calling the prosecution liars may run afoul of some of those “integrity of the system” ethics rules.
Is truth a valid defense?
Also, members of different bar associations mostly. Only one was a Wisconsin guy, I think.
An ABA article tangentially addressing the topic
Essentially, it appears the primary focus is on maligning judges while you have a case in front of them. As the facts drift away from that scenario, sanction becomes less likely.
Tinkercad? More like Tinkertrain
Plinker gets it.
3D Metal metal printed 1911
Enjoy! I’m signing off for the night.
またね。ありがとうございました。
https://archive.md/B6ljg/4b1c1a56808a80aaac9efec1e7d93c88125bd677.jpg
NSFW.
https://archive.md/J8Uks/f472efe6b26330fabc2c6a1a9cdf3870db28aa2f.jpg
NSFW.
https://archive.md/Y2Tyw/b0ea58a64e407b895700891ee6434dc49ef2e48b.jpg
NSFW.
https://archive.md/kcQQK/3aa110975d1967b88b2a1774a92f115097a2897e.jpg
NSFW.
The dude in the back of the picture is hilarious.
lol dat azz
It’s a sweet can.
I don’t blame him…tis a nice rear end to take the whiplash penalty for
Indeed.
My daughter’s college let’s students do one 3D printing per month. I’m going to try to get her to make me a gun.
I can’t tell you what to do, but while it’s legal (in general by federal law, IANAL, YMMV), to make a firearm for your own personal use, it’s bad news to make one for someone else.
She almost certainly would say no, but she’s devious enough that she’d think about it. Mostly I’m just joking though.
I’m also guessing that the school has figured out some kind of way to keep people from printing guns.
Staples Center to Be Renamed Crypto.com Arena
What, was Chronic already taken?
https://www.cnbc.com/2021/11/17/log-angeles-staples-center-to-be-renamed-cryptocom-arena.html
Heard about that. And I thought “Staples” was ridiculous.
Still not as ridiculous as
https://en.m.wikipedia.org/wiki/Climate_Pledge_Arena
Especially on an arena….hockey alone is an energy sink
It’s going to take some real effort to top that one.
Just heard that on the radio broadcast for the game.
TERFs assemble!
https://www.nationalreview.com/news/lawsuit-accuses-california-of-endangering-female-prisoners-by-forcing-them-to-share-housing-with-biological-males/
The idea of mixing populations in prison or schools or summer camp based solely on claimed gender identification is so obviously a terrible idea that it’s hard to believe anyone would advocate for it.
Damned science deniers.
And for those few model prison inmates who just want to have their dignity as a transwoman recognized and respected, I say “I guess you shouldn’t have committed a felony then.” Nobody frets about the fact that prisoners are also denied the freedom to ride a bike daily or get their nails did or eat at their favorite restaurant. Nor can they get a facelift or tummy tuck.
It’s prison. Your options are limited.
I think there is a legitimate safety issue for those who see themselves as legitimately transgendered. It goes both ways, though, obviously. Sticking someone with a penis in a female prison is an obvious safety issue, too.
Part of the problem is that society is basically accepting of the fact that prisons are rape cages.
Just just accepting it, but actively cheering it on.
Part of the problem is that society is basically accepting of the fact that prisons are rape cages.
I don’t know how prisons could be anything but. I don’t approve, of course, but I don’t see how you keep a bunch of devious people locked up and on good behavior. Beat them into submission, and then the guards are liable to be the ones on bad behavior. Maybe a complicated system of privileges could keep them in line, but that would be almost impossible to enforce fairly, and thus doomed to fail over time. Or maybe just keep it simple and make prostitutes available to those who maintain a record of good behavior, kill two birds with one stone.
When stories first started to circulate about female prisoners engaging in sex and/or being raped by those claiming to be transgendered, the fact checkers did their typical thing. They asked some government bureaucrats if it was true and then when give standard denials they claimed debunked. So it will be interesting to see this in an actual court of law. Makes it a little harder to deny when actual names are being put to the stories.
One terrific use for 3D printing is making the cavity for an injection mold of a part.
Because 3D printing is done in layers, it’s not homogeneous material so you can’t depend on it to hold liquids or gasses or hold off voltage as an insulator. BUT you can easily and cheaply print up your piece, however oddly shaped, fit check it, and then give it to an injection molding company who then makes the cavity mold and subsequently as many copies of the final material with the desired properties.
This has been great for professional R & D work as well as for hobbyists. Costs for custom molded parts have come way down, due in no small part to 3D printing.
Bored clicking through Twitch channels….
We could easily get 20 viewers on a Glib channel
I prayed to The Great Firster asking if it was acceptable for me to start an OnlyFans and Twitch account where I would First on demand. The next day I was second three times. It was an obvious omen. He voiced rare displeasure with me.
While they do have the lion’s share of the CAD market, AutoDesk does have a decent competitor in the form of Bentley Systems, which makes a competing product to AutoCAD called Microstation. But since it is a direct competing product, it’s almost as good and almost as expensive, so not really relevant to this discussion. Late night tangents FTW!
Fuck fuck fuck. I screwed up. Thanks to HR’s endless covid mandate , I’ve been ignoring their diarrea of emails. Well, forgot to pay attention to the annual enrollment dates. Even without the covid nonsense, their emails were way too frequent, zero relevance, full of non work appropriate material, and that stupid modernist clickbait/tracking teaser style of newsletter emails.
So went to the enrollment site since today is the last day. Nope, already shut off because of timezone difference. Hey assholes, your messaging says today is the last day, not today in some other timezone on the other side of the country.
I remember when annual enrollment was a month long window. Opened Nov 1 and closed at the end of the month. Now it’s week and a half or two weeks, ending in the middle of the week. In the end, it’s not too bad except my FSA is way too high so going to get fucked on that. (But not high enough for interesting medical devices)
At least you’re stil getting the default choices from this year (although I’ve always had my FSA/HDA revert to zero without intervention).
Maybe get some luxury item like prescription sunglasses, food sensitivity test, custom made shoe inserts, laser eye surgery, an AED for home …And your deductibles of course.
Still sucks that your HR spams your mailbox.
Ping HR, sometimes they can open it for 24 hours.
And yet the Medicare window is like two months.
At least that’s what all the geezers yelling at me every five minutes on television tell me.
Arby’s is going to be serving a legit Bloody Mary. With real vodka and everything.
Mind = fucking blown. The First That Will Change Everything hasn’t even happened yet.
That’s got to be a case/by/case thing (or, rather, restaurant by restaurant).
Some states have some seriously restrictive liquor laws and would never allow vodka sales from a place with no liquor license.
But if your local one does it, cheers!
Yeah, that is one of the things we libertarians have got to rectify. States and localities use their power over retail and wholesale alcohol sales to power corruption at all levels. They are copying this model for marijuana.
There is no excuse for it, but the issue does not have a natural constituency. It is just too complicated.
That used to be a staple issue over at Reason. Yet another reason for my scorn.
Throw nudity and the female form into the mix to make the situation extra Puritanical and stupid. That’s how we get Florida strip clubs that sell no booze, but happen to be built right next to a liquor store that will sell those little airplane bottles through a window. Or dancers in West Palm Beach who have to wear merkins to avoid state and county bans on showing pubic hair or genitalia while alcohol is being sold.
Getting shitfaced while eating a shredded leather boot on a bun with horsey sauce does have a certain appeal, I must admit.
That got a belly laugh.
My daughter has an irrational hatred for Arby’s. I don’t think she has been there more than 2 or 3 times in her life, and never in the last 3 or 4 years… She is only 11. Yet any suggestion of Arby’s merits a level of scorn usually reserved for a New Yorker discussing deep dish….
Ugh. It’s raining, and the traffic map on the local TV news powerhouse’s site is showing multiple accidents along my route to work, including one right where I get on the interstate.
I should get hazardous duty pay, since the nature of my job means I can’t work from home. ?/whining
Fun.
Odd barometer:
How are the “racism trials of the century” going? Well, I hopped on the CNN.com to find out. And I didn’t find out. Wall to wall coverage has become a vacuum. So at least CNN thinks the state is losing, YouTube legal pundits notwithstanding.
And what is important at CNN? The top five articles on the page ate about Trump and how all of the GOP is corrupt and stupid and tied to Trump.
It’s just straight up propaganda but they know what pays the bills. They need Trump more than QAnon Shaman needs Trump.
Sigh… Ozy Man makes it all better – https://youtu.be/r9irSCegHBs
The wisdom of the original ozzy.
https://youtu.be/WCxObybYNjY
Line you missed the first time you saw this clip: “when do the male models go on and start strokin’ it??”
You are Correct, Sir! Had a black-pilled day. I wonder if last escalator guy was Straff, homing.
Jesus re the 3D Printing. When I was a kid even silk-screening seemed like magic to me. That’s why my first effort turned out like a bad double exposure. Still got an “A” because the Teacher was fond of me and saw something in it that I didn’t. Ah, Miss Carson! So many memories, so many crusty socks… That “Ghost” movie stole my bit!
Mornin’ all.
Hazardous Duty Pay would be good, GT, sounds like Demolition Derby.
Baby Bro’s medical exemption was denied (NYC employee), he’ll be filing an appeal. It ain’t looking good.
Good morning, ‘patzie! I’d better go get ready to leave for work early. Sorry about BB’s denial. ?
Great article!
U juatr ==axchuive cinciounss
?
you speak the old tongue?
Speaking Hindi or having a stroke?
His mountain of beer cans fell over. That was a muffled cry for help. I can’t even with you people. Do you not read Drunken-ese?
Smoking toad
Tall Covfefe!
https://www.nj.com/healthfit/2021/11/drink-these-beverages-to-lower-your-risk-of-stroke-and-dementia-study-says.html
“Drinking coffee or tea exclusively had a lower risk for both stroke and dementia, but those who drank a combination of several cups of both fared best in the study.”
Morning coffee, afternoon tea FTW.
I’m going to be immortal! What with the red wine in the evening…
Do you pour it over your throbbing erection?
LOL, good one, M’Boy
Afternoon tea, morning beers.
Good mornin’ to all you early birds.
I’m waiting for the healthy, wealthy and wise to kick in. I’ve been waiting a long, long time.
https://www.youtube.com/watch?v=HJSjEl1JhHc
That transported me back a spell. Local stations used to play a hodge-podge of music. I’m no TedS but probably close.
I hope this is real.
Why can’t they just wrestle in Jello, like God intended?
Beaver moon is almost here.
“Beaver Moon”
Bend over backwards?
Funny. And the real article is almost as funny…. “The longest partial lunar eclipse….”
Uhmmm. Ok?
I’m gonna start calling it a Lunar Eclipse whenever the grey cat gets between me and whatever I’m trying to do.
Me too. I had a recent run in with an “artist” and “maker” who is one of the most pretentious and condescending people I’ve met in a long time. That’s another story, though.
“Makerspace”, however, appears to be a pretty neat concept , in theory, when they are properly managed.
I can imagine it it in a “Toff” accent.
Remember how anything questioning the effectiveness of the vaccine would get you banned?
Well, consider those goalposts shifted. Thanksgiving is upon us and vaccines don’t work… So mask up and isolate!
The NFL has ordered that all personnel mask up at all facilities starting thanksgiving, and after the holiday all personnel must be tested for covid…*regardless of vaccination status*
This was cheerfully conveyed to me on NBC Today Sow without comment or context. No ” in a major shift, companies are beginning to…”
Nope. Just “after seeing a rise in Covid cases, the NFL is requiring..”
Why so many questions, Citizen?
That’s because Covid Aaron is running around infecting everyone. We could have whipped this thing by now if it wasn’t for that guy.
“Enjoy the Daily Sceptic while you can”? https://dailysceptic.org/2021/11/16/climate-change-scepticism-in-line-for-censorship/ (rather orthogonal)
Hey F! You holding on?
Fingernails at this point. Thanks for asking!
Wut?
I am usually grateful for the sharing of knowledge… Ad drinking a puddle of bear urine is definitely comedy gold, just as Bear Grylls…. Still, I can’t help feeling I was better off before I learned this….
Also based only on the article…. It sounds like they have scant evidence that she actually started the fire. Crazy homeless lady has a lighter (and CO2 cartridges?) And therefore arsonist. Seems thin.
The old bear urine puddle teabag filtration and boiling predicament. It’s why there’s a bear on the state flag, is it not?
That’s not so bad. We had fire crews held up for hours awaiting delivery of a porta-potty. The forest fire was out of control but they waited on the roadside because it was deemed unsafe for them to do their fucking job. Bears shit in the woods and so do forestry workers.
Joe’s an excellent driver.
Joe Biden Administration
https://pasteboard.co/zNEzAcOOPEWP.png
We have a visitor for the weekend – a brief moment of calm:
https://ibb.co/7JpsNdj
(visitor on the right – they promptly claimed each other’s beds, of course).
It’s like having a low-key running battle throughout the (small) condo.
The one on the left is sure giving you the hairy eyeball.