In the last episode, we finished the main boxes assembly. Sort of anticipate 2 more write-ups including this one, with the last one covering the final assembly – hinges, glass, etc. Here, I’m going to go over the door construction, staining, and a bit of ‘internal’ assembly.
Staring with the doors. I need a total of 5 doors: 2 tall narrow doors for the top cabinet and 1 ‘narrow’ long door for the middle cabinet – both of these will have glass panels. In addition, I need two doors for the bottom cabinet – these are sort of ‘traditional’ cabinet doors and will have 1/4 inch plywood panels. I do most of my doors in ‘Shaker’ style. As it pertains to cabinet doors, Shaker style is simple – create a rectangle, no fancy edges or profiles. And I think it looks good! If/when I build a bunch of kitchen cabinets, I may do fancier raised panel doors, but for my, ah, “friends”, gun cabinet I think a Shaker style is actually aesthetically the right choice. For joinery I used something like an exposed mortise and tenon. Basically, one cuts an insert on one of the pieces and a slot on the other that will fit the insert. By through cutting, the cuts are easier to make – and I like the contrast between edge and face grain.

Upper left – rails and stiles for doors (L to R – lower cabinet, upper rifle cabinet, middle “angle” cabinet). Upper right, setup to cut the ‘mortises’. Lower left and right – the tenons initial cut and cleaned up.
So one starts by cutting all the pieces one will need to the right lengths. I need 4 long stiles (vertical members) and 4 short rails (horizontal members) for the rifle cabinet doors, 2 short stiles and 2 long rails for the middle ‘angled’ cabinet. All three of these doors
will need to have rabbets routed out on the inside of the back to accommodate the glass. For the bottom cabinet, I need 4 rails and 4 stiles, all roughly of the same length; here rather than a rabbet, I need to cut a slot on the inside edges of both the rails and stiles that the 1/4 panels will slide into and be ‘locked’ in. So off to the ‘finished’ cabinet boxes to make some measurements and the wood pile to cut a bunch of pieces to the right length. I’ll also note I measured for full overlay doors – the doors will cover the edges of the cabinet box fully. For the mortise and tenons, I just set up the table saw to make all the cuts. One the tenons, I just made multiple passes and then cleaned it up with a chisel. One major mistake I made was to plane the door thickness way down; generally doors are 3/4″ thick; I planned these down to 1/2″ – it will come back to haunt me in the hinge section of the story.

All doors cut, rabbeted, and slotted. All the tenons were cut slightly oversize so they could be hand sanded to a snug fit.
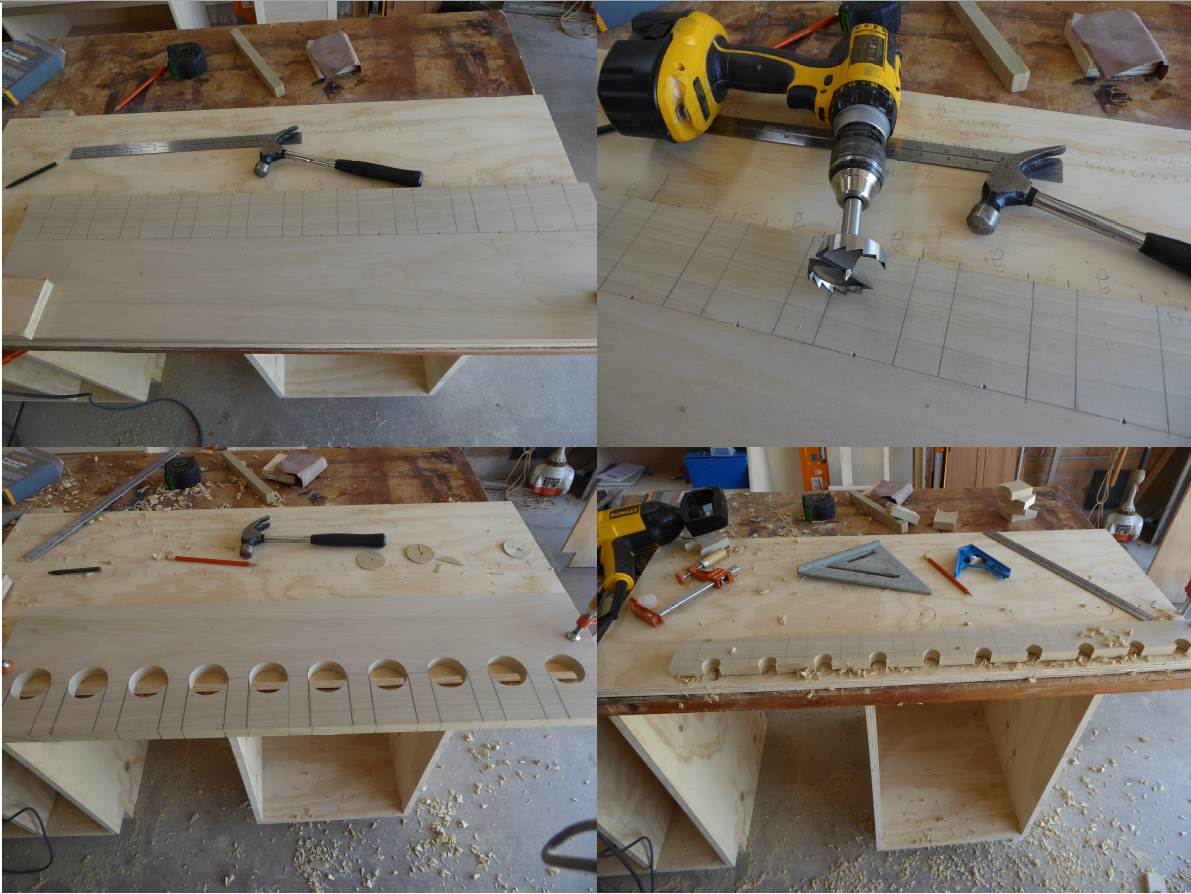
Upper right/left – layout for the butt rest. Lower right/left – initial cutouts on both butt and barrel.
With the doors finished, I moved onto making the rifle butt and barrel rests for the upper cabinet. The butt rest and the barrel rest both consist of a single piece of wood with the same length as the inside width of the cabinet. The barrel rest is relatively thin (in the depth dimension) and the butt rest is almost the same depth as the cabinet. For the butt rest, I need to cut slots for the rifles to slide into. The width of the slots is somewhat arbitrary as long as they are wide enough to fit the typical butt stock; I choose to make them 2″ wide. From there, lay out an evenly divisible number of slots that will leave sufficiently wide ‘fingers’ between the individual rest slots; these parameters left me with 10 evenly spaced slots. I’ll need to address any empties when this is all finished. With those measurements laid out, use a 2″ forstner bit to drill out holes that will act as the inside curve of the slots. Then I mapped the spacing onto the barrel rest piece of and used a 1/2″ forstner bit to drill the corresponding barrel rest holes.

Upper left – round over bit almost ready to go to work. Upper right – Round over, sanding, touch up complete and verifying I got the correct width. Bottom middle – close up of the finished edges.
Now it’s a matter of cutting the slots in the butt rest perpendicular to the long edge of the piece and tangent to the round holes that were just cut. With a chisel and sand paper, flatten out the edges of the barrel rest. After that, since I didn’t want sharp corners on the rests, I used a round over bit to provide some ‘relief’. With some sanding, I end up with the final rests. I’ll note that, at the height I wanted the barrel rest to be in the cabinet, the Garand’s wood forestock was at the level of the barrel rest and wouldn’t fit into the 1/2″ barrel rests, so I widened one of them out to accommodate the M1.
OK, onto “stain”. I’ll leave off the many tedious rounds of sanding and move straight to the finish. I wanted to use a cherry stain so I could pretend I built out of cherry wood. Someone here (cough, Tundra, cough) sang the praises of gel stain, so I grabbed some of that. You know, I used to like Tundra, might have even wanted to be like him when I grew up. I have to reconsider both of those positions now. Gel stain HMs. SLD aside, there ought to be a law against calling it a stain. It’s paint. Or some horrid bastardization trying to be both and succeeding at neither. Spit. We hates it. So anyway. Staining. I pre-conditioned the wood to more evenly absorb the “stain” then applied 2 coats of the stain-paint. Followed up with about 3 coats of polyurethane.

Artists rendition of my thoughts on Tundra pre (left) gel stain and post (right) gel stain. Man that stuff sucks worse than ‘precious goo’.

All pieces “stain-painted” and ready for assembly.
Well, this is going longer than I thought… but I’ll endeavor to persevere with a quick look at joining the top and bottom cabinets. Since the whole thing will be pretty heavy at the end of the day, I wanted to be able to disassemble the pieces while still having a stable connection. So I decided to use some lag bolts. But I also didn’t want the lag bolts to be visible. The perfect solution is to locate them below the rifle butt rest. That means the bolt heads need to recessed into the bottom of the top cabinet and penetrate into the lower box (couldn’t resist one little bit of in-your-endo) to be fastened with nuts that can be removed when you want to separate the pieces. But the bolts will be permanently fixed once the butt rest goes in. So I lined up the top and bottom cabinets as well as I could, clamped them in place and drilled insets using a Forstner bit of the appropriate size for the lag bolts, and then drilled through both cabinets. The bolts then get inserted – however, the lag bolts have a square base near the head to lock in, so I need to chisel out a matching square inside the recessed hole so that the bolts would lock – otherwise, they would just spin when you tried to tighten them up to connect the two pieces, since the rifle butt rest would cover the bolt heads (permanently). With all that done, I now have a means to connect the top and bottom pieces securely while still being able to separate them easily but not have ugly visible fasteners. Once the bolts are secure, attach the butt rest with wood glue and few screws. Similarly, the barrel rest is attached to the back of the cabinet – one of the reasons I used 1/2″ plywood for the top rather than my normal 1/4″.

Left – setup to make holes. Upper middle – bolts recessed and ‘locked’. Right – view from the bottom of upper case. If you look more closelier, can see the screws fastening the butt rest in place. Bottom middle – view from top of final assembled piece.
I think that’s more than enough for now! The final step is to mount the glass in the doors, attach the doors and hardware and fill with guns. Donations accepted for the last item to address the paucity of handguns. Will NOT trade steak though.
I leave you with my favorite things – well, two out of three ain’t bad

😶
yep, saw that too late to fix. RJ (I think) posted one last night and this is a better one anyway
Whoa, never saw that one!
Beautiful work, PM. I can only wish.
Ten slots? Oh, I get it, handguns/working rifles are kept handy. Good thinking. Otherwise, you’ll have to start another.
I really envy you and Kinnath and McGinty and all the others with the artistic skills and abilities. Thanks for the article
We hates it.
LOL!
Did you not do some test pieces?
Regardless, I’ve used it a lot and stand by my assertion. Softwoods suck to stain and the gel CAN be a good cheat.
Nice job on the cabinet!
He did a test piece – the gun cabinet.
I did, I did! It looked OK on a small piece and went on OK. I ignored my misgivings and started, and once you start can’t really change it up. Just didn’t really work for me over large work surfaces. With regular stain, with multiple applications and sanding in between, you can make some of the nice wood figure look almost 3-dimensional. Not so with gel stain. It’s just… paint. Obviously not my thing!
That sucks. Sorry dude. I’ve used it on maple and fir with good results.
I have a small cabinet that’s light wood (pine, maybe) with some sort of shiny top coat over it. Do you think the gel stain would go over it? I don’t really want to go through the effort of sanding it to stain it a darker color, since it’s a piece I got for cheap but it doesn’t match my other darker wood pieces.
How dark? But yes, this is a good use.
I would still sand it to get rid of the shiny. You don’t need bare wood or anything.
I would still sand it to get rid of the shiny.
Indeed. Depending on what the shiny is – well not really, any kind of shiny – and how thick and or smooth it is, you’re likely not going to get much to stick to it, regular stain, stain-paint, or paint. So I’d guess you’re going to have to sand it down to something resembling bare wood, even if it retains the color of the previous stain. You just want the shiny mostly gone.
All right, I guess I have to sand it. *sigh* At least it’s small.
Thanks both of you!
Nice write up. We may have the same Dewalt table saw, and I note with approval the home-made zero clearance insert. I actually made mine so that I could keep the riving knife installed — I was cutting some wood that immediately started twisting closed right past the blade as it was moving, and that was almost a trip to the hospital. Fixed my insert right after that and now I only take the knife off when I have to use a dado stack.
I will face drills, mills, belt grinders, and steel-burningly hot fires, but wood saws scare me.
They are very safe. Until you get complacent and forget what you are dealing with. Even binding and things like that shouldn’t injure you if you are handling things properly and following basics. And binding shouldn’t really happen (makes note to self to add riving knife to zero clearance plate) if you do things correctly.
My table saw loves to chuck things at the wall.
Behind you presumably? i.e. in the direction you are standing to feed stock into it? That should only happen if you are not doing things correctly when doing a rip cut. If your stock is between the fence and the blade, you have to have either a push stick on the stock between the blade and fence or a push ‘block’ of some sort. The stock between the fence and the blade should be fed all the way through until it clears the blade. Otherwise you’ll get a nice bruise on your gut or a hole in the wall. For cross cuts (never use a rip fence when you are cross cutting!), chucking things at the wall shouldn’t happen.
It throws at the wall away from me.
That is weird. The blade should be spinning towards you, in the direction you are feeding from. So all the forces are up or down (which is what can your hand pulled into the blade), perpendicular to the blade (the aforementioned ‘pinch’ which can also pull you into the blade) or back towards you. I’m not sure I’ve ever had something shoot ‘away’ from me, or understand how that could happen. Maybe someone else knows of a cause of that?
What?
How the hell does it do that? The blade turns toward you on the feed. I’ve had pieces blow up, but never shoot away from me.
I have shot a piece of wood into the drywall of the garage with a router table, though. That was exciting.
🤷♂️
My working theory is that the piece gets pushed far enough forward when it separates to catch the side of the rising teeth on the far side of the saw blade and that tosses it.
Whoa. As Meat said, the blade should be spinning such that the part above the fable is spinning towards you. If that’s not the case then your motor might be wired wrong or you’re just feeding material from the wrong side of the saw. Also how the blade is mounted is important. Most blades have an arrow marking the direction in which they are designed to be turning when used. If it’s on backwards, that’s a problem (although I wouldn’t think it would throw material away from you.)
It is spinning towards me, as in the teeth on the side closer to me are going down into the table surface.
You could also check that your fence is truly parallel to the blade. With the saw unplugged, bring the blade up as high as it will go and measure the distance from blade to fence both at the front and back of the blade. Correct as necessary.
You need a sharper blade.
Or I might affix a sprocket and chain to it and make it the motor to a power hammer.
F*ck gel stain. Busy at work now but I got that far and agree 110%.
https://www.lumberjocks.com/topics/48281
“F*ck gel stain.”
QFT
Heh.
Timeloose, if you’re around, I don’t think I’m going to be able to go to that festival in Asbury Park this weekend. I have two tickets for each of Friday and Saturday night, if you’re interested and able.
DB,
I would love to go, but i’m up to my ears in work and home based projects that are now hitting at the same time.
I appreciate the thought. Hope all goes well with your weekend. We have to find a concert to go to with similar qualities once our lives get less complex.
Thanks,
Agreed!
Gel stain is best used to stain things that can’t be stained. (Painted wood, hardboard, fiberglass, etc.)
Most of the wood in my house is painted. Painting extended the life of the oak kitchen cabinets.
Semi OT rant.
So, my landlord slapped on a fresh coat of paint before we moved in. That’s lovely. The house is nice. However, he used egshel for the baseboards and trim, and it is not smooth at all. Feels like they painted over dust. It is unable to be dusted in the least bit (no, don’t like/trust feather dusters or swiffer dusters). I think I’m going to sand it all down and repaint with semigloss so I can clean properly.
Did your landlord also paint over wall plates? I’ve had to use blades to cut paint when changing outlets and switches.
Ugh, one of my greatest minor fears. Everything around here is grubby and sticky, and I have probably the materials to fix them but so far not the time or energy. If I had to move out I wouldn’t want the next residents to suffer. I should call around for professional quotes.
PS. With what else besides those does one dust, besides a vacuum attachment?
Dust is a natural protective coating for walls, floors, and furniture. It should be afforded more protection than a wetland full of endangered baby birds.
We come from dust.
We return to dust.
That’s why I don’t dust. It might be someone I knew.
::fist bump or whatever the kids are doing these days::
If it’s your house, it’s mostly you. A major constituent of house dust is shed skin cells.
Quentin Crisp said that the dust never gets worse after the first four years.
SK, your avatar has the most boopable nose.
You can tell which room I vacuumed by the type of dust and proportion of dirt/dog hair in the chamber.
I dust. And I mostly pick up cat hair when I vacuum.
I dunno, dusting and then eventually vacuuming aren’t difficult.
A dustrag and Pledge.
I shall vanquish all of miteland.
Oh, not that kind of pledge.
It’s also good when you want color to penetrate into the grain but not spread along it.
https://www.youtube.com/watch?v=tDI96J73i9Y
Sorry for OT – still getting Server 500 errors when I try to post a larger chunk of text – emailed last night. Not sure why…
I think it is one of two things:
1. Use of quotation marks. Perhaps switch to single quotes? Might be getting recognized as some kind of voodoo HTML. This is my strongest suspicion. Especially if you start your comment with quotation marks.
2. Your source copy/paste has HTML in it which might need to be stripped out by first pasting to a notepad, or something. I can never tell because I just paste from my phone. So any HTML is invisible.
I’ll check the quotation marks. That might be it. I already converted to strict text and removed all other formatting.
Dunno..changed all quote marks to single quotes and still getting the same error. Is there a character limit now?
I had the same problem with just a short copy/paste from an article two days ago. I am stumped now.
Maybe I’ll get an email response….
You have seen Brooksie’s comments, right?
Are they on the forum?
Ummm…no. Just referring to their typical length with quotes from links…
Sorry, I was thinking in relation to solving website errors. Work on the brain.
These are fun to read. Most of my woodwork is either furniture restoration or I use mostly hand tools, so all I have in the woodworking machinery is a small 7″ table saw and a drill press that does double duty with metal work.
Keep up the good work. Although I would be nervous to keep my guns in an open rack like that.
Although I would be nervous to keep my guns in an open rack like that.
What? There’s glass. And those cool little magnetic claspy things. I challenge anyone to break through that security! More seriously, no kids running around, few visitors, very low likely hood of break-ins where I’m at. And they are sort of sitting on dressers or on a shelf in an unlocked case now so… not much change. Except now I can see them! Honestly, I rarely even think in terms of security like that; maybe I should?
Yep.
Although I do understand the desire to put your cool and/or pretty guns on display, I get nervous about storing them long-term outside a safe or lockbox.
Make sure the rest of your home security is up to par, because if anyone hits your house those guns are gone daddy gone.
Really, though, is it gonna matter? I watched a lot of videos of guys getting into big ass safes with angle grinders and pry bars.
I love the idea of a hidden room, though. A carpenter I knew used to specialize in them. My collection isn’t worth that level of security or expense, however.
I’d want a hidden room just for the fun of it.
Seriously.
In my house, the entire upstairs is hidden to most people. There’s a pair of doors that are in front of the stairs up, so most people assume it’s just a closet.
Never mind that you can see there’s an upstairs from outside the house.
The contractor refused to oblige me. There are specialty contractors that will convert a pre-built room into a secret room with nifty locks (chessboards!) and such, but those are pricey.
So you walled him up in the basement?
His thousand injuries I had borne as best I could.
😉
Yeah, given the right tools and enough time, even very serious safes can be defeated. To say nothing of the RSC crap that encompasses most home gun safes.
But all that takes time, and junkie housebreakers don’t want to spend much time on site. The average time on site for a residential burglar is around ten minutes. You need a safe or cabinet that will keep them out for twenty.
This is great advice. Don’t overbuild it.
I look at it the same way I look at working on a vehicle- if someone assembled this, someone else can take it apart.
Different levels of protection for different levels of threats.
Most burglaries are looking for the easy stuff — cash and valuables that can be carried off quickly.
The gun safe keeps those small-time burglars out of your guns.
But if someone comes with equipment and plans on spending the time, they can get into pretty much any gun safe.
Out here in remote Iowa, I worry about the opportunistic kids that are looking for fast cash.
I don’t know. I was in Silverton recently and at the (untended) museum, there was a wood gun case full of old west shotguns, most of which I was brought up shooting. (Getting old) no worries, that case and the guns inside had probably been there forever. Tourists came through all the time. If your neighborhood is good, display what you love and worry less.
You basically confirmed everything I feared about gel stains.
Nothing wrong with normal stains, preferably without the clear coat mixed in. You’d think it’s less work, but it’s more and with an inferior end result.
Gel isn’t faster (or easier) at all. It will, however, allow you to control color better under certain circumstances. On a douglas fir door we did (previously stained), we did multiple coats over many days and ended up with a gorgeous, deep finish. If you’re good enough to do that with stains/dyes, get after it!
I think sometimes the mistake is thinking that gels are a time-saver or that you only need a single coat. You still prep, do multiple coats, finish with a multiple top coats. Finish work is ALWAYS a pain in the ass (for DIYers).
Ever work with tung oil?
I haven’t. I helped my brother refinish some outdoor teak furniture, but IIRC, we used teak oil (oil/varnish mix). I think tung oil protects the wood while maintaining the color.
I would like to learn more about finishing, but it’s more tedious than fly-tying!
I was kinda wondering how shiny/slippery it ended up because I’m thinking relative to wooden knife handles.
That’s a great question, which prompted a search. My first thought was that it shouldn’t be slippery at all, but might not get very shiny.
Found this thread full of interesting ideas.
As usual: it depends on the wood.
I would like to learn more about finishing, but it’s more tedious than fly-tying!
Exactly. One of weakest parts of my overall weak wood-working-fu. It’s really easy to do, very difficult to do well.
WooHoo! The credit union just called and confirmed that I have indeed paid off my Mortgage!
Now to pay off the roof…
🍾 🥂
Great job!
Awesome!
Congrats!
We have another 14 months on the Palatial 2X-Wide™, but it will be paid off way early.
::fist bump or whatever…::
I see where I put my rifle but where do I put my gun?
If you don’t know by now…
Well, since one is for fighting and one is for fun….you figure it out.
in the glory hole, dummy
🐵🦠
Is that monkeypox ?
🙈🙉🙊
Yup.
Beautiful work. I wish I had the skill, patience and diligence to build something like that. Well, I could build *something* like that, but it wouldn’t be nearly as nice.
Do you ever shoot the M1? How are your thumbs? I have one that my dad gave me, but I’ve never fired it.
Do you ever shoot the M1?
Occasionally. I try to shoot a few rounds whenever I get out to the range. That happens rarely enough these days that it doesn’t get a lot love. They were not designed for comfort, that’s for sure. The weight and the kick with a metal butt plate… I think by the time I got off the boat and to the beach carrying that thing, I’d be done before even getting to the point of destroying my shoulder firing it! Different age I guess and you get accustomed to what you have.
PutridMeat: Totally awesome cabinet, I agree. I am over here snarking and I hadn’t even thanked you for the article.
OT: Brian Stelter fired from CNN
https://www.zerohedge.com/political/brian-stelter-out-cnn
CNN is down one potato after the network canceled host Brian Stelter’s Sunday media affairs show, Reliable Sources, leaving tens of fans crestfallen.
Ouch. Get the aloe.
The Bee writers are probably working through lunch.
He has a bright future reading Vogon poetry.
“Oh freddled gruntbuggly,
Thy micturitions are to me,
As plurdled gabbleblotchits,
On a lurgid bee…”
OT: https://www.modernretail.co/retailers/gen-z-is-flocking-to-buy-now-pay-later-to-beat-inflation/
Retailers have long relied on young shoppers to drive trends when it comes to apparel, music and pop culture. But as inflation continues to grow, Gen Z is fueling the growing popularity of buy now, pay later (BNPL) services.
Consumer prices were up 9.1% at the end of June, saddling the nation with the biggest year-over-year increase in 40 years. For the youngest consumers, who typically are the lowest earning adults, it means even more of their budget is going toward fixed expenses like food, shelter and fuel.
Enter BNPL as a potential solution, though one that has been criticized for being a doorway to debt. Roughly one in four Americans have used BNPL as a means to finance a purchase over time that often comes with zero interest or is fee-free if paid on time. Some BNPL experts anticipate that usage of the platforms could continue as inflation continues to rise, widening the risk for potentially overextended young consumers.
Giving Wimpy a burger now, agreeing he doesn’t have to pay you until Tuesday, and then expecting payment on Tuesday is a predatory business practice.
Liz Cheney Fails With Flying Colors – Razör Rants
All pieces “stain-painted” and ready for assembly.
Nice.
I just looked at the pictures. Will read later.
Beee-yooty-full, PM! And a wonderfully written write-up.
I can make a sammich. That’s all I got.
Well, and design high-voltage power sources for things like rail guns.
But you look adorable doing either.
Aren’t you sweet?
Today I’m in day 2 of training for how to use precision lasers to track particles that move during the implosion experiments we do underground. I won’t be doing those measurements personally, but I need to know what’s up so I can communicate with the physicists and engineers who will be operating that system.
It’s fun to learn new stuff.
Indeed.
I’m going to guess that training is proprietary if not secret.
Tragedy strikes
CNN is canceling its Sunday media affairs show Reliable Sources, and host Brian Stelter is departing the network, Stelter tells NPR.
In a statement to NPR, Stelter says he’s grateful for the show and his team’s examination of “the media, truth and the stories that shape our world.”
“It was a rare privilege to lead a weekly show focused on the press at a time when it has never been more consequential,” Stelter said, promising to say more on Sunday’s show — its final episode.
——-
CNN chief Chris Licht informed Stelter of the decision yesterday. Licht has been making cuts throughout the network since taking the helm as part of Warner Bros. Discovery’s takeover of the old Time Warner company. Stelter, who often touted the show’s ratings on Twitter, was among those CNN hosts targeted for frequent criticism from conservatives for his coverage of the media in the Trump years.
Among those publicly joining in on the broader criticism of CNN as having become politicized was the investor John Malone, a major financial stakeholder of the new WarnerDiscovery conglomerate. In an episode on February, Stelter cited Malone more than a dozen times in coverage of the Discovery deal for CNN and its sister properties, expressing some concern about the investor’s influence.
It was a political hit job, to silence a brave journalist dedicated to telling truth to power.
His dozens of devoted viewers will miss him.
Missed it by -that- much.
https://www.youtube.com/watch?v=IVP9WUGdgPg
Speaking of election interference.
YouTube has banned Steven Crowder from the platform for two weeks after Arizona GOP gubernatorial candidate Kari Lake appeared on “Louder with Crowder” for an interview, according to Crowder’s team.
Lake had informed Crowder that if elected, she would investigate claims of fraud in the 2020 presidential election. On Wednesday, Crowder posted on Instagram a message from YouTube saying the podcast had been removed for violating the platform’s misinformation policy. Crowder has since doubled down, saying he will now interview Kari Lake again.
STOP TALKING ABOUT THE THING
I’m surprised, but we’ll see if what’s released “ain’t black”…
https://thepostmillennial.com/breaking-judge-to-unseal-partial-affidavit-gives-doj-1-week-to-respond
FYI, I had your old email for the HH list and it bounced. If you want to update, just let me know!
Can you guys do a zoom chat from HH at some point so we can vicariously participate in the festivities?
Someday I will go in person…
That’s a really good idea!
My schedule is still tbd, but there are a bunch going for sure. I’m sure we can coordinate something!
Coolness. It’s the same, but with protonmail.com after the at thingy. Thanks!
Reinhart giving federal authorities one week to submit proposed redactions.
So the words “the” and “and” will not be redacted?
Following a hearing on Thursday, federal Magistrate Judge Bruce Reinhart will be unsealing several documents associated with the FBI raid at former President Donald Trump’s Mar-a-Lago residence last week.
Shouldn’t take that long. Redact names if you must but otherwise release it immediately.
Robert Barnes’ take is that there is no logical reason for their overall conduct in this case except to retrieve incriminating documents so they can destroy them.
One wonders if Trump created himself an insurance policy.
I hope he has them both copied and digitized on a killswitch to be released to the public should need arise. But that is probably my wishful thinking.
I believe he stumbled into that because he wanted memorabilia
Apparently his “beautiful” safe was empty, which is effing hilarious. Trump may be a buffoon on policy but he is canny about negotiations.
Just like Al Capone’s vault.
I hope it turns out that there was an “inside (Mar a Lago) whistleblower” that turns out to be a MAGA who baited the Deep State into making the raid.
I have no doubt Trump’s got a dead man’s switch wired to Scruffy’s incriminating doc’s.
Yep take out names if you must but what was the underlying evidence and specific places and items you wanted. That’s it…
A corporate spokesperson confirmed the show’s demise and said the network wished Stelter well in his future endeavors.
Happy trails, buckaroo
Triggered…
https://twitter.com/catturd2/status/1560323699848495108
Buckle up, buckaroos
Sports update”
‘Mullet Boy’ is all party — and biz — at 2022 USA Mullet Championship
Fuckin’ A, kid knows what’s up.
Enter here Glibs: https://mulletchamp.com
The good and bad of getting old.
Self-Taught Senior Builds Jet Engine Go Kart and Takes It for a Wild Ride
Balding rock fan ‘beat ANOTHER bald concertgoer senseless after complaining that the glare from his head was spoiling his view of the band’
I wonder if the bald guy was wearing that nice suit when he beat the other guy senseless. I just can’t see that guy all metaled out.
Well, it happened in England.
And though the article doesn’t relate, I’m assuming a fair amount of alcohol was involved.
That go-kart is batshit crazy.
I like it
Wow, all that metal was GLOWING! Holy crap. We need to recruit that guy, bet he’d write some cool articles and be a hoot on Zoom.
But what’s his incentive to hang around with us lot?
I gotta admit, those pulse-jet engines scare the bejeezus out of me.
awesome!
https://www.pennlive.com/news/2022/08/woman-accused-of-stealing-pelosis-laptop-approved-for-pa-ren-faire-outing.html
That’s fucking atrocious.
Jackson is the “judge” that worked Roger Stone over. That bit about the DC jury pool is fucking laughable. Nobody to the right of Pol Pot is going to get a fair trial in DC.
She’s also this judge, whose ruling could end up unwittingly helping Trump…
https://www.thelibertybeacon.com/audio-tapes-in-bill-clintons-sock-drawer-could-impact-mar-a-lago-search-dispute/
Huh.
The Bee has some good stuff the past few days. However, this one really made me chuckle.
Brand New Tactical Knife Is The Same One Used By Navy SEALs To Open Their Wives’ Amazon Packages
https://babylonbee.com/news/brand-new-tactical-knife-is-the-same-one-used-by-navy-seals-to-open-their-wives-amazon-packages
Hara-Kiri Blades has been designing knives, swords, and letter openers for the U.S. military. Their award-winning equipment has been utilized in nearly every global conflict in the last 20 years and was even left behind in Afghanistan when Biden tactfully withdrew soldiers from the country. The Boxer MK 4 Navy Knife, their latest masterpiece, retails for $349.95.
With that in mind, and given Jugsy’s purse inventory (mostly all Coach), I understand where this guy is coming from:
Man Ordered to Pay Ex-Girlfriend $1,150 After Urinating in Her Louis Vuitton Handbag
Civilians shouldn’t be allowed to own those.
The military should not be allowed any weapons forbidden to the average citizen.
The police should not be allowed any weapons.
That’s great! Well done Bee!
Still using one of a half-dozen old Leathermans to open boxes. I need to get with the times!
LOL!
Knife people make gun people look completely normal.
You speak as if the conditions are mutually exclusive.
They have some of the same issues.
They are tools and if you use them as intended they get beat up. Still perfectly functional, but beat up.
On something mid priced it doesn’t hurt as much as on something high priced.
Keep me away from the knife center youtube channel.
I know someone just posted the link about Cheeto Fingers recently. But it seems Lay’s (heh) has a solution:
Potato Chip Maker Launches Hilarious Finger Washing Machine
Chopsticks?
r/dontputyourdickinthat
Speaking of…
“The defendant appears to know little about the city or its people, and she relies on a flawed survey and mere assumptions and generalizations about the jury pool,” Jackson said.
“They’re not prejudiced. They all think just like me.”
How did Pauline Kael vote in the last few elections?
Was being sarcastic, and knew she had died in the last few decades, but bless her for missing out.