
This article will serve as an introduction to some edged weapon techniques to be used in Conflict Management. Why “Conflict Management”? Well, if you train in “self-defense” you are by definition preparing to defend yourself. And if you find yourself in a situation in which you’re defending yourself, you’ve already fucked up. But shit happens. On the other hand, if you use these techniques offensively, you’re a murderer or an assassin. So let’s go with “Conflict Management.”
Our scope here is limited to using a concealed carry clip knife, designed for the purposes of maiming or killing another person using certain techniques. Ya’ll can summon your pineapple pizza fractiousness to debate the best type of edged weapon for EDC. I have my favorite: an all black Kershaw Blur Tanto. But really, almost any knife will do in a pinch.

Learning to attack with an edged weapon is but one tool in your conflict management toolbox. If you’ve not trained to fight hand-to-hand sans extrinsic tools, I strongly suggest you do so before playing with knives, especially to learn footwork. My way of thinking about this is thus: I am the weapon; the knife is a tool that in my hand becomes an extension of myself.
It is important to understand, upon learning any conflict management technique, that in an actual conflict, or even while training, you should not approach the fight as if you’re going to do move x *to* your opponent. Rather, you and your opponent are going to do move x together, like it’s a dance. You must connect with your opponent. If you have trouble quickly connecting with strangers, you might consider taking some public speaking classes. As Musashi says, “To learn the sword, study the guitar. To learn the fist, study commerce.” You’ll be a better fighter if you’re a good public speaker. Think about it.
Some preliminary points (as if there weren’t enough already):
- If you play with knives, you will cut yourself. You should always train with an eye to protecting yourself from your own blade. Your enemy could strike out in such a way as to move your own blade toward you.
- There is no such thing as a knife fight. If your enemy in a conflict pulls a knife, do not pull your own. If you’ve already drawn yours, and your enemy then draws xers, lose yours. You don’t want to have to keep track of 2 blades in a fight.
- Legal concern: Knife wounds are messy, knife attacks are considered very personal, and blades are associated with horror movies. Those are all things to consider if you need to convince a jury that you were legally defending yourself with an edged weapon.
Where to Carry
Concealment gives you an element of surprise, but it also makes drawing your knife more difficult. Practice your draw. Many people carry their blade in their front pants pocket on their weapon hand side. If you sense an imminent conflict, you can put your thumb in your front pocket, using your palm to hide the clip from your enemy, in preparation to draw the knife.

I carry mine in my weapon hand side back pocket. If you carry a wallet, get in the habit of carrying it on your non-weapon hand side. This gives you the option to draw your knife instead, if your enemy demands money.
If you don’t now “talk with your hands,” start. When in a verbal phase of a conflict, talking with your non-weapon hand is a great distraction from what your weapon hand is doing. …as is raising that hand in supplication to your enemy or to cover a cough. Coughing can also cover the sound of opening your knife. Practice these distractions in your day-to-day. Catalog your interlocutors’ reactions.
Grips
First of all, keep your non-weapon hand between your blade and the rest of yourself, especially to protect your face and neck. Here are the 4 grips we’ll discuss…
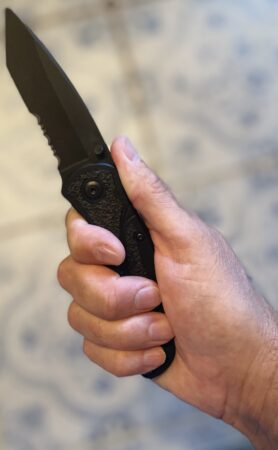
Extended/Normal grip, thumb on knurls.
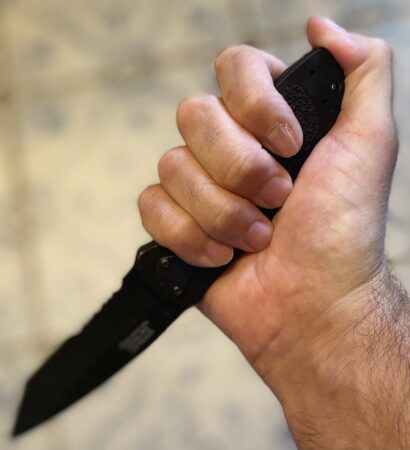
Inverted grip, thumb on butt, knife edge out.
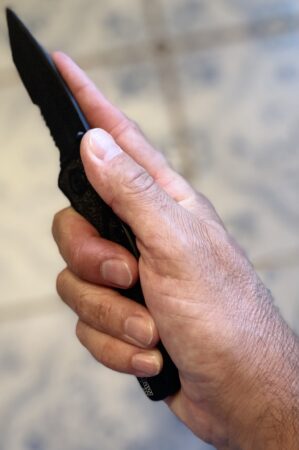
Extended/Normal grip, forefinger along blade.
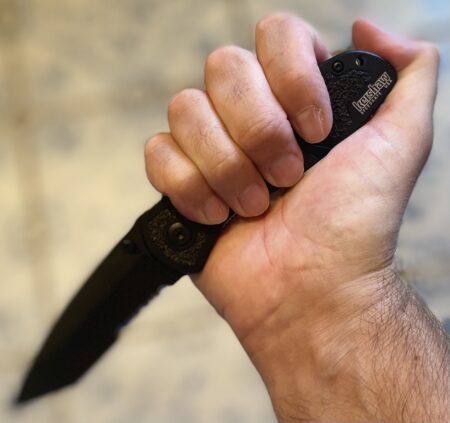
Inverted grip, thumb on butt, knife edge in. You’re most likely to cut yourself with this one. You can’t protect your own weapon hand forearm, so only use for a probable major artery strike.
Grip Flips
Not recommended during a fight, unless you’ve got space and you’re relaxed. However, it’s always best to practice at a level *far* beyond what you’ll actually need to use come game time.
Extended to inverted.
Inverted to extended. Reverse the above.
Inverted, toggle between edge in and out. Self-explanatory.
Targets
So, with the blade, you can hack away at your enemy’s chest like you’re Michael Meyers in Friday the 13th Redux, but the blade could break on, or get stuck in, bones, which is bad, so with a small clip knife I’d stick to soft targets, but you do you.
Ideally, you’ll strike a major artery early in the conflict and “only” have about 15 seconds more to deal with your opponent before xe bleeds unconscious. The veins take longer, but cutting them will start to weaken your opponent. The following bleeder targets are preferred because there are no first aid pressure points available to stop their bleeding (don’t judge me)…
- Carotid Artery, either side of neck. Pressure could be applied above your cut to stop the bleeding, but that’d cause your enemy to stroke out so… yeah…
- Subclavian Artery, behind clavicle (collar) bone.
- Axillary Vein, shoulder between humerus and upper rib cage.
- Axillary Vein, armpit.
- Abdominal Aorta Artery, behind intestines and stomach. You’ve got several inches to push through, or more depending on the glory of xers beer belly.
- Femoral Artery, inner thigh, the closer to the groin the better. The lower the cut on the inner thigh, the more opportunity there is to apply a tourniquet above it.
- Perineum, aka The Taint. Difficult to get to, but it’s a painful wound and quite the bleeder.

Chances are, your enemy will have its arms extended to defend itself, so you might have to do some disabling to get to the choice cuts. There may also be some clothing to slash through, and be prepared to hit bone. Don’t get distracted by its hands – they’re low-value targets – only strike them as a distraction to move into a more effective position. The arm targets…
- Forearm muscles. Upper arm targets are better, but disabling the forearm muscles and tendons diminishes/removes your enemy’s ability to grab you or make a fist.
- Bicep. Diminishes/removes ability to bend arm.
- Tricep. Diminishes/removes ability to straighten arm.
Aaannnd… the kidneys are a good pain target to opportunistically jab in passing from behind.
Strikes
First of all, keep your non-weapon hand between your blade and the rest of yourself, especially to protect your face and neck. Bend your knees. Lead with the hips. Use the big muscle groups – chest, lat’s, core – more so than the small muscle groups – bi’s & tri’s. Strike with your whole body, not just your arm. In the vid below, watch the slowmo and you’ll see the subtle-yet-powerful hip- and legwork that is difficult to see at regular speed. Notice (listen to) the footwork. Notice the eyes on target, not on the knife.
Cut *through* the target, do not merely strike the surface. If you’ve ever wondered how people survive all those baton strikes in a pig pile, it’s cuz the cops don’t know this principle. Watch a video and you’ll see; they should be breaking bones.
The following vid shows various strikes, grips and flips. Let’s walk through it… While opening with the gravity assist, I move unhesitatingly into 2 cross slashes at the neck, back and forth, using the extended grip. From there, a thrust with the forefinger along the blade, ideal for the shoulder axillary. Then a flip to the inverted grip with a downward neck slash (you can never have enough neck slashes), immediately followed by a hammer strike – neck again here, but also good for a kidney or taint shot. Finally, an inverted to extended flip (which I fumble with in the slowmo) with an upward thrust to the abdominal aorta or armpit axillary.
In Part 2…
We’ll do some vids with a real person and a training knife, and I’ll narrate the moves. Then, we’ll talk about how to safely train.
I don’t think I’m able to defend myself with a knife but I can pull a trigger, given the opportunity.
Interesting article, Plisade
Gotta use what you have. I always at least carry a knife. That said, what I would do with it in a fight might turn out to be the knife equivalent of spray and pray. So I’ll have to go over this info sometime when I am less tired.
“You don’t want to have to keep track of 2 blades in a fight.”
Very interesting. I would never have thought to ditch (or leave) my blade if the other guy pulls one. I may take some convincing.
Plisade just wants to have an easier time stabbing you.
^^^
It’s just that it’s so easy get cut fatally by an opponent with a knife. If you can’t run away or shoot him, you’ll want to be focused on where his knife is and prevent that fatal cut.
Pretty much any opponant is going to be stronger and faster than my fat ass. If I’m in stabbing range, I’m already screwed.
Knives scare the shit out of me, much more than guns do. And I don’t mean kitchen knives or pocket knives, but a person with one who is willing to use it. Much too close, much to personal. A friend watched a guy get stabbed forty odd times in a bar across a pool table, and the level of hatred flowing threw the attacker was palpable, apparently.
Guns for show, knives for a pro.
I ascribe to the GTFO theory of knife fighting.
That’s a very good theory.
subscribe, dammit… autocorrect
inscribe, proscribe, conscribe, whatever-scribe
MY laptop has decided it doesn’t want to load all the media embedded in this article.
I’m going to assume it was fantastic and I’m missing much.
That would be in line with how my day has been
“There is no such thing as a knife fight. If your enemy in a conflict pulls a knife, do not pull your own. If you’ve already drawn yours, and your enemy then draws xers, lose yours. You don’t want to have to keep track of 2 blades in a fight.”
Pretty sure I’ve seen knife fights. Not sure why you would want to lose yours, unless you are extremely good at disarming people.
Criminals often attack prison style — lots of fast abdominal stab wounds. You want to back up from that as fast as you can. Even if you eventually stop them, medics won’t be able to save you in time. That’s why it’s used in prisons.
“Legal concern: Knife wounds are messy, knife attacks are considered very personal, and blades are associated with horror movies. Those are all things to consider if you need to convince a jury that you were legally defending yourself with an edged weapon.”
Don’t forget, slash their eyes and run. It’s not a murder charge, and they can’t point at you in court.
*adds eye stabbing to acceptable knife fighting styles *
Someone pulls a knife, you scream ‘Aloha Snackbar’ and rip open your shirt to reveal the bomb vest. If they don’t run, they’re insane.
The only thing I know about knife fighting is that eventually you have to fight the guy who trained you or the guy who was like a brother to you while you were training but who turns out to be the bad guy and the only way to beat him is to do something entirely contrary to said training.
Like getting a rifle and sniping him from a dozen blocks away?
Usually it’s too late for that as you only find out your mentor/BFF is the bad guy when you get to the warehouse where the pesky reporter, who you couldn’t stand at first but find yourself falling for, is being held. Oh yeah, there is also like a bomb or something.
Sounds like you’re stuck in a generic 80’s movie.
No Rules
If you look like Paul Newman you can just charm your way out of it.
(I don’t click on youtube, I’m just guessing.)
I prefer to have a sword and buckler against a knife.
This is why I have to get my forge set up. I have a piece of steel I want to make into a shortsword.
Regarding the bottle of mead. Open it and drink it all. It does not store well after being opened. It will oxidize.
You can get away with putting the cork back in and putting in the fridge for a day or two, but it will oxidize even in the fridge with a cork in the bottle.
I see. Thanks for the advice.
you are welcome
Old car leaf-springs. You need to straighten them, but that is probably your best bet for good steel in the right size.
Going forward, obviously.
I saved a bunch of solid-core camshafts for that purpose. Haven’t got to try it out yet.
I’m about 60% through the Taibbi article on the DOJ, and the only thing I have issues with so far is this little paragraph, the rest is outstanding and a must-read:
It’s a possibility, but in the case of Trump I feel like something more is at play. They wanted something back very badly, or they want to burn him to such an extent that he just goes away quietly. It isn’t that the DOJ feels popular pressure to act, but that the people who really run things want them to do so, costs be damned. These people believe the institutions still have legitimacy with the people who elected Trump when they largely don’t, especially after Covid. They don’t realize how much they’ve fucked up their own preconceptions and the reality that a very large portion of the country does not agree with them that orange man bad as those in the DC bubble so assuredly agree.
I again say that the above take could be correct because these people making those decisions are in fact in a bubble. They are surrounded by like minded individuals and on a religious crusade against an opponent that they have convinced themselves is the greatest threat to the country, internal or external.
https://taibbi.substack.com/p/the-justice-department-was-dangerous-dbe?r=5mz1&s=w&utm_campaign=post&utm_medium=web
Link again, for those who haven’t seen it.
Thanks. At some point there’s going to be a reaction. Maybe that’s what some people are wanting. But I doubt these sort of people: https://substackcdn.com/image/fetch/f_auto,q_auto:good,fl_progressive:steep/https%3A%2F%2Fbucketeer-e05bbc84-baa3-437e-9518-adb32be77984.s3.amazonaws.com%2Fpublic%2Fimages%2F5cc15a0b-dea4-44dd-b6ba-c82a6dbed960_2086x1384.png
ever think they’re going to be capped for being little cogs of a monstrously grotesque machine.
It’s probably a mixed bag.
Based on leaks from insiders at the CDC, they’ve pretty much all drank the KoolAid. I imagine the other agencies are similar. Dissenters leave or get forced out and all that remains are true believers and grifters.
Reading that prosecutors think that anything they do is OK because it’s in their own internal manual was pretty fucking mind boggling to me. I mean, even for the federal government and them being prosecutors, that’s pretty dense. It reinforces what I already believed which is that the prosecutors are arrogant little shits just used to getting their own way because of general judicial deference to the government. Even when they were eventually struck down, they achieved their goals in a number of those cases highlighted.
They aren’t really used to having to construct fact laden arguments based in strong reason, so it’s no wonder this shit falls apart in front of juries or during appeals.
Prosecutorial arrogance pales in comparison with judicial arrogance.
The only edged weapons I need are my Firsting hands.
Sharp content, Plisade.
It’s edgy even for this site.
Seems pretty on point to me.
Cutting, even.
This chick’s personality will cut right through you.
Never apologize.
LOL I remember watching this guy doing the weather every morning and I’m not ashamed to admit that the thought “I’d hit it” occurred to me a few times.
An Emmy-nominated weatherman for Spectrum News NY1 claims he was fired after someone on an adult webcam site took nude photos of him and sent them to his boss, according to a new lawsuit.
Dick move.
“Despite being a public figure and being on television in the biggest market in the country in front of millions of people five days a week for more than a decade and a half, I secretly appeared on an adult webcam website,” Adame confessed in the post.
Don’t show your face because the internet is forever. But he looks like a guy who could actually make money doing that. So at least he has that to fall back on.
I’m surprised that they didn’t champion him and his willingness to be “sex positive.” Just a massive risk for a guy to take after a decade-and-a-half long career.
Really, what the hell was he even fired for? Are they afraid it’s going to leak to the public and bored housewives and a couple gay men will go look for it?
I know what the bullshit corporate reason was. But, this is one of the few instances where I’ll say it is current year, it’s NYC, and no one fucking cares about this.
Yup.
But we’re talking about corporate America here. They’re terrified of their “image” being “hurt”.
What image? that they’re liars and slander merchants? Impossible to hurt that image because one weatherdude exposes himself to people who literally asked for it.
If I had to guess, I would say he is on the Spectrum.
It’s good to get the gay perspective on the hot/crazy divide.
How to win a sword/knife fight.
Exactly what I was hoping for…
Supposedly that scene is based on a fairly obscure short-short sci-fi story. I’m blanking on both the name of the author and the story title, but it was the only story he ever published.
That scene is based on Harrison Ford having the runs and not being able to shoot the choreographed fight. So they improvised the gag.
Here is a whole article about it.
From what I’ve heard, that scene is based on Harrison Ford having severe diarrhea and needing to go back to his trailer.
Or what CPRM said.
You’re both right.
Oh, shit!
Is it ok if I just run like hell?
GREAT article Plisade. Looking forward to the next installment!
Definitely ok!
They’re just chase you down and stab you in the back.
Knifefiends are fast runners.
As a short, fat guy with bad knees, running is not an option. That’s what the gun is for.
As an old skinny guy with bad knees, running or walking fast is not an option. An S&W29 fits my hand perfectly, however.
How do I stop this autoplay? Every couple of comments, the site will start playing the videos on its own.
Sorry about that. Had a heck of a time figuring out the best way to embed them.
I don’t think anyone here has enough expertise with that feature. Eventually someone will figure it out. Maybe I should upload my fake documentary on the exile of a mutant chocolate bar.
Chrome(ium) has an extension for that (AutoplayStopper).
https://www.kansascity.com/news/nation-world/national/article265981831.html
JFC.
That’s a weird kink for a train, but whatever…
The battle over qualified immunity ought to be interesting.
Now Im in Wausau, played 2 courses,,
Getting drunk in my motel.
Honey harvest was so cool,
Meeting you all was the bestess,
Obligatory
I hate you.
Those eighties synth arpeggios are classic.
You second too much to be in my presence.
Good Lord. I was reading this (for once) and thought “no wonder we’re all on a list”.
I have a 25+ year-old gerber for my EDC. At work I have a utility knife. Were I to ever have an an opponent, the bleed points were most helpful.
10/10 would share
Glad to be of service. And with that I’m tapping out. Sleep tight, Glibbies 🙂
SOG 4 inch blade, edc, nice and heavy, good in the hand.
Next week, how to use a pool chain? Thanks Plisade for putting this up. Reinforces my desire not to have to ever use a knife in that manner but beggars can’t always be choosers.
Speaking of knives, I love Opinels but their standard blade sucks for long term storage in a vehicle. Need to see about picking up an inox version. Did yeomen’s work on the steak tonight, which was delicious.
Congrats Switzy, and while edelkirsch > kirschwasser , I wouldn’t turn down either.
My edc is a Benchmade Stimulus. Getting increasingly disenchanted with that company. Discontinuing solid models in favor of faddish ones with stupid names. It’s too bad. They’ve really been decent for a long time.
But it works great for what it does.
*taking down cardboard boxes and opening packing slips
I’d pour you a GROSSE KIRSCHWASSER.
Standing by. Room 125 Home2.
Now that would be an interesting article.
House Of Dragons is much better than the last few seasons of Game Of Thrones, but there are just a few ways where they just can’t help themselves. They are desperate to paint the main character, the future female queen, in as positive a light as possible. They can’t just make her a Targaryan who tears apart the kingdom and abandons real love for her own desire for power, as if the gender politics of the situation alone wouldn’t be enough to garner sympathy. She has to be burdened with knowing that her family line is necessary to save the world! A fact which George R. Martin was always ambiguous at best about in the books, but which he feels fine allowing the show to go all in on. It makes even less sense in show universe because no Targaryan sat on the throne at the time the Night King was defeated and a Stark landed the killing blow, so…
They had to insert some pointless reoccurring theme where the closest thing the show has to a villain can’t finish things, both figuratively and literally in every sense of the word (a problem Firsters do not have). Yes, he suffers from occasional erectile dysfunction. Was this ever even hinted at in the books? Of course not, but he’s the guy with toxic masculinity so…
Why torture yourself? You know it’s just going to get worse.
It is, for the most part, a quality show with very impressive production values. It looks much more like a real world than any of the shit Amazon has put out. It is well written. You have to look closely to see the modern political sentiments at play. I wondered for a moment why the show runners were so eager to embrace the Targaryans as saviors outright. It seemed like it could be chum for the fans who have speculated on the notion, but now I see they definitely had an ulterior motive.
They don’t want their female protagonist to come off quite so much as a power hungry bitch, even if that’s what she clearly is and was clearly written to be. Simply saying she acted no differently than a man would in her position might not have been enough to win her sympathy. She still isn’t a perfect character, but they definitely want you to feel sorry for her plight as a high born female as if she wasn’t more privileged than just about anyone else in the world at the time.
Now, I’ll state again – watching the Rings Of Power is more of the hate watching order, and to see the nerdy fans who love their lore so much defend it or ignore the butchering of Tolkien’s work because they can’t be seen as one of those icky people.
After seeing a bunch of reviews of Rings of Power on YouTube, I picked up a blu ray copy of the LoTR trilogy and started watching tonight. *chef’s kiss*
Do not underestimate the aversion an audience has to a power-hungry bitch. They REALLY do not like them. See: Cruella de Vil.
The Vikings fans are rather quiet tonight.
All I know is that I am destroying in the company fantasy football league this year…so far…
…and I have no idea about the players and stats that some people do. I am basically winging it.
Guess I’ll keep my blissful ignorance.
I forgot the game was on. 🤷♂️
Game was a tie – 0 to 0 – in second half. Nothing like penalties – ineligible receiver downfield, holding – to kill off promising drives.
Evidently, I offended a Canadian coworker by referring to Snopes (he brought it up) as Fact Chuckers.
There’s a special level of stupid to believing in truly impartial “fact checkers,” though I suppose it’s easier when they do nothing but reinforce your worldview at every turn.
I thought “canucks” was the operative/derogatory term.
Canadian? He probably knows the guys from Monkey Malik then, right?
Up With People took an odd turn.
You have to explain this Straff. Why is your coworker offended? This seems pretty anodyne.
Snopes is still the Holy Grail of urban legend debunkment.
He was the one who got famous. There were a lot better debunkers on alt.folklore.urban but snopes (and his then-wife) published his website so became the “standard” for skeptics.
Yeah, makes no sense.
Technically true but lacks context so mostly false.
New deck built, stairs yet to come. Who knew that pressure-treated lumber was so fucking dear? *thumbs chest* It’s alright, they’ve never listened anyway. Jesus Fuck I’m sick of things just “happening” rather than taking the bull by the horns. I’m losing control over my household or at least a half interest in it. Twice last weekend I had to step over the prone body of an addict. I always warn ahead and they always take me down, one brick at a time. Fuck.
I warned her. “It’s just like feeding a stray cat.” What the fuck is he gonna do when Judi zips off to the city for a few weeks and she can’t chase him around? That fucker eats at least 4X what I do. In case you haven’t noticed, I really don’t like him. This is going to be the cause of family strife for years to come.
Judi is feeding a homeless guy who comes to your house?
My money’s on an adult child, maybe Festus’s stepson.
That makes sense.
You are correct. Walking cane about to be prodding cane.
Her Son. It’s not complicated. He’s been a fuck-up and a con for 40 years. I’ve always been a “No addicts allowed” type feller but she has a soft spot for her first born. I for one give no shits.
Sorry Festus. That’s an awful situation.
Is Joe Biden really Quatto? I can’t think of another he can say one thing and the entire WH does another.
https://twitchy.com/brettt-3136/2022/09/19/white-house-says-covid-19-policy-unchanged-despite-what-president-biden-said-on-60-minutes/
“Oooopen yoourr miiiind, Man! C’mon Jack!”
Oddly surprised that nobody made the Quatto joke about Fetterman’s growth on the back of his neck. I waited and waited and there was nothing. Meme-Lords really missed the biscuit.
Not exactly what you wanted but pretty close.
https://babylonbee.com/news/neck-lump-has-gross-disgusting-politician-growing-out-of-it
Maybe he can get it like his spirit animal’s toomore.
https://rarehistoricalphotos.com/kim-il-sung-tumor-1984/
Now that a tumor.
It’s nice that he had a European faith healer there. Multi-cultural. Intersectional. Yay.
Also, he died, just not soon enough. Double Yay.
Wow. Just wow.
Quatto was far less repulsive than Joe Biden.
Gonna make sure to bring this up when they finally implement the testing they are desperate to implement. At least FAA lawyers admitted people were gaming the policies in place for free leave
How do I nominate this guy for the Presidential Medal of Freedom?
https://www.washingtonexaminer.com/restoring-america/fairness-justice/namesake-of-landmark-supreme-court-case-scores-another-second-amendment-win-in-dc
Indeed. It’s unfortunate that these government entities get to play the “oh we modified/repealed/stayed the rule/law, so it’s now moot and a court can’t rule on it” bullshit.
That’s not what happened here. His lawyer agreed to stay the case until the rule is repealed in October. Then he will negotiate a settlement with the city. The city caved because they realized they are screwed under the Bruen decision.
You do realize that every one of these “victories” is like the Damsel in Distress crying “Leave me alone, you Brute!” Shall not be infringed.
I guess I misread it then
sounded to me like another sidestepping of the judicial process to avoid a clear ruling and defeat.
Here’s a(n obvious) song for the thread. At least it’s good.
Not bad. My butt-hole widened a bit but it may have been flatulence.
I Keeed!
Oh, you wanted macho? Here ya go, eh?
Ha! I remember telling Metalheads back in the early 80’s that JP was a fag band.
Well, alrighty then. We’ll just go with some Canadian rock. I loved this song as a kid.
Seriously, though – hope you’re ok. And take them multi-B vitamins.
I shouldn’t have gone there. Husker Du says Sorry.
shit. https://www.youtube.com/watch?v=ZrgZAAkhEqQ
I’m sorry for the bad tidings. It just seems that every time that I claw my way out of the morass something else drags me back down. Step-daughter#1 had to help me back into the house. I wish that I could literally be left alone. I’ll shut up now.
Don’t shut up. I’m sorry to hear that Festus.
Festus, is there anything we can do for you? That’s a serious question. Any mobility aids or medicines or books or Slinkies or whatever that you can’t get there that you need?
I’ll be fine for awhile yet, sweet Mojo. It just hurts my heart that the work being done to our home is not done by me. Festus abides.
I hear you so loud. I really struggled with that when I had female problems (and subsequent surgery) that made me have to quit DIYing. I got out of shape, then my rotator cuff couldn’t be put off any longer. My husband had to hire someone to mud the sheetrock I put up. I never really went back to my toolshed. It was rough on my mental health.
My tools are buried beneath her tools. Literally.
All over the Twatters, people are like OMG THEY MADE SMALL CHILDREN GO TO A FUNERAL! HOW CRUEL!!! Bitch, plz. I had been to 3 funerals (including my beloved grandfather’s) by the time I was Prince George’s age. I knew what death was. It happened to old people and there were a lot of old folks in my family at the time. Not only that, but my cat had died when I was 4 or 5 and my parents didn’t pussyfoot around about “going to the farm” and whatnot. “Kittyco died. This means that [insert biology here]. We cry over our loved ones dying, but it is normal and natural.”
This is one reason people are afraid of death. They are not exposed to or taught the natural progression of life early enough.
They made the right decision, and the kids behaved perfectly from what I saw.
EGGSZACKLY!!!!!
So long as it wasn’t an open casket affair or God forbid having to kiss the corpse, so what? Itchy clothing for six hours.
Most of the funerals I have been to in my life were open casket. I can say a lot of uncomplimentary things about my dad, but he sure as hell knew how to calmly teach death to a small child.
https://i.dailymail.co.uk/i/pix/2011/01/17/article-1347820-00C1A35500000190-138_634x488.jpg
People are bitching that small children had to go to a funeral? I thought that was normal…it’s like we don’t live on the same planet anymore.
Barbarians forced back!
https://katu.com/news/local/tampons-to-stay-in-oregon-boys-bathrooms-after-petition-denied
https://adventurecommunist.fandom.com/wiki/AdVenture_Communist_Wiki
🤦♂️
Morning, Glibs. Have to get ready for the day, find ice, and figure out what I’m doing for breakfast.
figure out what I’m doing for breakfast – 150g blueberries 60g oats 200 ml of milk with one scoop unflavored whey and one tablespoon of cocoa powder
Too Metric.
At this rate, I’ll end up at a hardees and have my phone seized by the FBI.
These fuckers claim to be open, but they’re too much into their goddamn joke to tell me what’s in the fucking food!
I’m headed out to check out this other place that claims to be open, leave the jokers to their fun. If the other place isn’t serving real food yet, I’ll have burned enough time that it’ll be 6 and other places will start opening.
Looks worth a gamble. Maybe more fun with someone else.
I was deep in early morning crankiness, exacerbated by the fact nothing was open. The lack of a ‘be serious for a moment’ page turned me off that place, despite them being within walking distance of the hotel.
Hardee’s: Solid biscuits but overly salty sausage and whatnot. You could do worse for breakfast. +1 if there’s a big lady prepping the dough and sweating into it like we have at our local Hardees, it’s the magical ingredient that ties it all together.
The local bakery sold breakfast sandwiches, so I was back at the hotel before Hardees opened.
or more depending on the glory of xers beer belly.
I never thought of a beer belly as improving my armor class.
Thanks Plisade!
Off to the gym.
Good morning, DEG, U, Stinky, TO’G, and Pie (probably afternoon, in your case.)
Unaccustomed as I am to eating breakfast immediately upon rising, I’m having a bowl of cereal with my coffee this morning. I seem to have angered my sciatic nerve (I blame dozing off on my left side on the sofa Saturday evening during the NASCAR race.) It was bothering my Sunday, but not enough to keep me from chores like laundry and weed-whacking. Yesterday, however, I had to sit several times just in the process of standing at a counter sorting mail. I left work early, went to the doctor, and got a ‘scrip for a five-day course of prednisone. Which is supposed to be taken with food. Which is why I’m actually eating breakfast right now.
Roll around on a tennis ball?
Under my left leg?
The doctor (or PA or practitioner – whoever I saw) did suggest exercise, especially core exercise, so I may try to incorporate more of that in addition to my usual twice-weekly workouts on the “Nu Step” cross-trainer thingy at the Y. The trick will be if I can stand to walk from my car into the Y. My greatest accomplishment yesterday was walking from the grocery side of our local Meijer grocery/discount store alllllll the way over to the pharmacy at the opposite end of the store, then alllllll the way back, toting my prescription and three 4-packs of Atkins shakes. Without a cart.
Ouch. Sending some good vibes, back pain is no joke.
Thank you! The pain is actually centered around my left hip/butt cheek, with occasional twinges in my lower back or down my left thigh. Makes walking an adventure.
Yeah, that’s sciatica. I don’t know why I don’t get it anymore but tennis ball + wall (or floor) at L5/S1 helped when I did. You might have more nerve impingement though. And there’s also the “foot over extended opposite leg” stretch.
::starts to chant:: Sciatica! Sciatica!
😄
(and twist torso perpendicular away from foot, whatever that’s called. The ex had a bad back and was always doing that one.)
Just got the okey-dokey to use some of my maxed-out sick leave. I’d dance a jig, but…
Aw, pobrecita.
Good Morning.
Very happy to see Fest…
Yesterday was one of those days where a meeting goes so very bad….
Good morning, ‘bodru!
Oh dear! What went wrong at the meeting?
Ruh-roh. Hope everything is OK.
Caught you Toobin, aye? Don’t sweat it, it happens to the best of us.
Worse, they caught a glimpse of a framed Constitution in the background. The FBI has been notified.
Mornin’, reprobates. GT, my Mets did your Cardinals a solid last night 😊⚾⚾⚾
::checks scores, standings, and Cardinals’ magic number:: Thank you, ‘patzie and Mets! I dozed through most of yesterday evening and didn’t think to check! W00t!
I’m happy the senior Nats are out. I’m not as happy the junior Nats are out.
I was awakened by a thunderstorm, so here I sit,
Covfefe kids!
Mornin’!
27 more COVID deaths in China.
https://www.upi.com/Top_News/World-News/2022/09/19/deadly-bus-crash-covid-quarantine/4721663593248/
“Authorities on Monday are investigating a deadly crash involving a bus in southwestern China that was taking dozens of people to COVID-19 quarantine in another city when it overturned on an expressway.”
For the greater good, no doubt. Evil bastards.
From looking at the current weather it appears there might be a stormy sea across Lake Michigan today,
Just as we cross on the Badger, yay!⛈🦎
Take a care out on that water, matey! 🏴☠️
Morning. Back as a tech has given me more energy. I was a restless boss but you can only walk around so much.