
“Home of architect Richard Crowther, that is heated with solar energy collected by flat plate collectors. A flat black aluminum plate behind the glass absorbs sunlight and heats air forced between the glass and the black plate. The air is then forced through a bin containing several tons of two inch sized rocks, that store the heat. Because of extra special insulating features of this home, the solar heating system provides almost 90 percent of the heat needed,” May, 1975.
* * * * * * * *
Note: I am not an expert on this stuff. Assume the vocabulary was made up as I went along.
* * * * * * * *
My wife and I bought a tiny house in a tiny town in Iowa to rent to my brother. The house dates back to the 60s. It has meager insulation and electric baseboard heating. Even though it is only 400 square feet in size, it cost my brother about $300 a month in electricity to heat it last winter.
So, we were looking at options to provide supplemental heat to the house with minimal installation cost. And I began to think back to the glorious 1970s and the energy crises. Many people experimented with using solar energy to heat their homes or to heat water.
While the modern culture is fixated on photovoltaic panels to produce electricity, back in the 1970s these were just not commercially available for do-it-yourselfers to play with. So, the majority of solar collectors were designed to heat air (and transmit that air directly into the home or to a thermal mass for long term storage) or the collectors were designed to heat water.
As it turns out, there is still a lot of interest in making small-scale solar thermal collectors to provide heated air for rooms, garages, or other small spaces. There are many websites and youtube videos available to show how to build these. Most of these small-scale thermal collectors are based on one of two designs: 1) using pop cans as the medium to absorb sunlight; 2) using black screening material as the medium to absorb sunlight. See the image below for two nice examples.
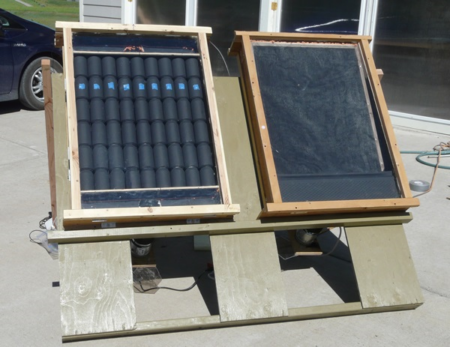
Either way, the solar absorber is contained in a box with transparent cover (glass or plastic) with inflow and outflow channels on the back. Click here for more details.
Many of these styles of thermal collectors are designed to be installed vertically on an exterior wall, and then holes are cut into the wall for the inflow and outflow channels of the collector. PC fans are frequently used for forcing air through the collector.
Another popular option is to route the inflow and outflow channels through an existing window. This allows for a semi-permanent installation that does no damage to the existing structure.

This is the design option that I choose to follow. Note that this type of solar collector may be active (having a fan to push or pull air through the collector) or passive (relying only on convection to move air through the collector).
Passive collectors work because the sun heats the solar absorber. The absorber then conducts heat to the air surrounding the absorber. The heated air rises up the front of the collector and exits the collector through the outflow vent. Cooler air from inside the house is drawn in through the inflow vent and then descends down the back of the collector below the solar absorber.
When the sun heats up the solar absorber, much of that heat is conducted to the in the collector. But some that energy is radiated back out through the transparent glass/plastic cover. Thus, the efficiency of the passive solar collector is limited by how much air will flow based upon convection alone. An active system with a fan can transfer more heat from the solar absorber to the air that is drawn/forced through the collector.
An active system with a fan gets more complicated and more expensive to build. A simple switch can be used to turn the fan on and off, but his requires someone to be available to turn the system on and off. This becomes impractical when the occupant of the house needs to leave before the sun comes up and gets home after the sun goes down (e.g., pretty much anyone with a day job in Iowa during winter).
I spent a lot of time trying to figure out how to build some kind smart switch using a photo sensor to tell when the sun was out. But this idea didn’t go very far. I also considered using a thermocouple inside the collector to tell when the solar absorber was getting warm, but abandoned this idea as well.
Then, one day I stumbled across register booster fans on Amazon.
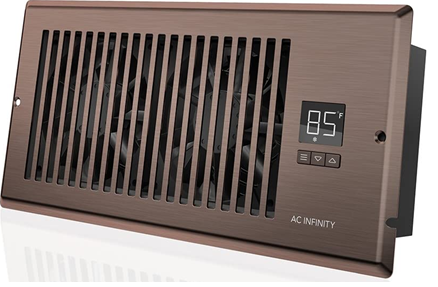
These booster fans are designed to work with for both heating and cooling operations. For heating purposes, when the furnace kicks on, warm air starts moving through ductwork. When the air coming through the ducts exceeds a user-set temperature, the boost fan turns on. When the furnace stops and the air in the ducts cools down, the booster fan turns off.
This is an elegant solution for the solar collector. When the sun comes out and the solar absorber gets hot, then convection will start to move warm air through the outflow vent. The booster fan turns on and dramatically increases the air flow through the solar collector. When the sun goes away and the solar absorber cools off, the booster fan turns itself off.
Seventy bucks from Amazon. No invention or labor required. It’s perfect.
This is the design for the collector. It is intended to go through a small window on the south side of the house. The bottom of the storm window is 59 inches off the ground. I intended the collector to be short enough that it would not sit on the ground directly. I want to avoid snow drifts from covering the lower part of the collector. And I want to minimize rot and insect damage to the main body of the collector.
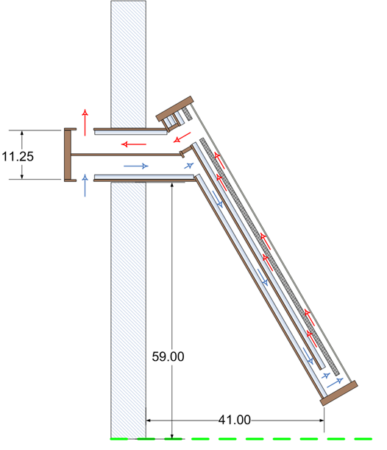
The collector is tilted at 30 degrees from perpendicular. The sun is very low in the sky during the middle of winter in Iowa. This angle puts the solar absorber nearly perpendicular to the sun from October through February while still providing good angles to the sun during the rest of the heating season from September through April.
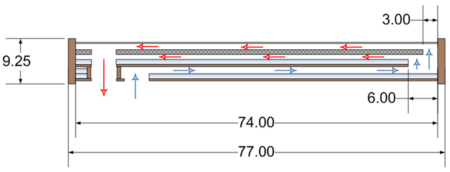
Air flows in from the inside of the house through the back panel of the collector. This air descends to the bottom of the collector, and then flows up the front of the collector. The solar absorber is roughly centered in the front/top chamber of the collector. This allows air to flow past the front and the back of the solar absorber doubling the surface area exposed to the air.
The outer dimensions of the solar thermal collector are 77 inches long, 46 inches wide, and 9 ¼ inches deep.
The materials used for the main body of the solar collector are:
- 2 each of 2 by 10 by 10 ft construction grade lumber
- 2 each of 4 ft by 8 ft exterior grade plywood (1/2 thick)
- 2 each of 4 ft by 8 ft rigid insulation (1 inch thick) {Polystyrene Board Insulation at Lowes}
- 2 each of 2 ft by 8 ft Corrugated Silver Steel Roof Panel {Union Corrugating at Lowes}
- 1 each of 4 ft by 8 ft Polycarbonate Sheet (1/4 inch thick, hollow) {PLASKOLITE at Lowes}
- Miscellaneous scraps of 3/4 inch pine; 2x4s; and 3/8 inch plywood.
The solar absorber is made from corrugated, galvanized steel roof panels which are painted flat black. These roof panels are far more durable and have much greater thermal mass than pop cans or screen mesh.
This is the solar collector as it is installed. It faces due south (thanks to tendency for all small towns in in Iowa to be laid out on east-west/north-south grid).

Note that I installed the collector with temporary legs this fall. I will need to replace them with pressure-treated lumber next spring.
The vent box for the collector was designed to be 1/2 inch narrower than the exterior storm window. When installed, there is roughly a 1/4 gap on both sides of the vent box. The main body of the collector barely touches the exterior storm window above the vent box. This does a decent job of shielding the vent box and the open storm window from the weather. We should have sealed the 1/4 inch gap with duct tape or something, but didn’t bother at this point. Some swirling snow might get blown in during winter, but it should be fairly well protected until spring when it starts to rain. The storm window is lowered to rest directly on the vent box. So, there is no gap above the vent box.

Note, those “holes” in the side of the collector (the exposed dadoes) will need to get filled in the spring before it starts raining (hopefully). The exposed dadoes at the bottom end of the collector are covered by the temporary legs.
This is the vent box extending through the double hung window into the room. It ain’t pretty, and it doesn’t need to be. We stuffed a cheap bath towel into the window to seal the gaps between the sides/bottom of the vent box and the window frame. The window is dropped down directly onto the vent box. Long term, we need to do a better job of sealing this up. But, it’s good enough for now.

The register booster fan drops into the hole in the top of the vent box. It is plugged into a standard electrical outlet on the wall just below the window.
And the big question is: Does it work?
Initial Results: 18 December 2022. First full day of sunshine since the collector was installed. The outside air temperature is 13 degrees F. Midday, the collector is putting out heated air at 101 degrees F. The register booster fan kicked on automatically as expected.
So yes, it works and works pretty damn well.
Will it make a difference? We’ll have to see what his electric bill is. But, we know this. The register booster fan has a maximum flow rate of 120 cubic feet per minute. The house is nominally 400 square feet with 9 foot ceilings in most of the house. So 3600 cubic feet. The booster fan is capable of moving the whole volume of the house through the collector in 30 minutes. We have the fan set to 60%, so 72 CFM. Thus, the collector will move the whole volume of the house through the collector in 50 minutes. Air goes in at room temperature and comes out at 100 degrees. The system will turn over the whole volume of the house 7 times from 10 am till 4 pm (when the sun is doing a good job of heating up the collector) heating up the air 20 to 30 degrees each time it goes through the collector. I expect that will add up to significant savings this winter.
That sounds like a lot of work, but those are pretty incredible results.
I guess time will tell if it was worth the effort.
Nice writeup.
Agreed.
Looks worth the effort. Have to save this post for when we move out of southern CA.
Nice work! We had an active liquid collector system for heating the hot water year ago. I can’t remember if it made much effect on the electric bills but the wife swore by the hot water. Wasn’t economical to replace (trees growth blocking the sky) when we reroofed so it’s gone now.
My house had solar water heating back in the 80s. My parents said the gas water heater rarely turned on. The cost of the electricity for the pump was minimal.
When we renovated the pool and backyard in San Diego we added solar heat for the pool. It just about doubled our usable season.
I remember swimming in an unheated pool in January. It was like swimming in the Pacific in July.
We are contemplating heating our pool here in SW Nevada. It’s surprisingly chilly, due to the desert nights.
A friend recommended just using a pool cover, so we will start with that cheap fix while looking into other options. It’s an in-ground pool and is a pretty as a yard feature, so I hate to put a pool cover on it, but it’s probably worth it.
And then there’s the fantasy goal of getting a hot tub…plenty of room for one, and my aging joints would love it…
“SW Nevada”
Prime location for solar panels, right?
Yup. Sun is shining most of the time. Comparison shopping now.
Got a letter from the utility company a couple of weeks ago that electricity rates (prices) are going up 17.8% in January.
That will bankrupt some people I know. Quite a hike.
My electric bill is up about 30% from this time last year. It did not or barely budged in the 10 years I lived here until now.
Retractable solar cover.
Keeps heat in at night and heats the pool when the sun is out.
Hand cranked ones for cheap or really nice powered ones that you can walk on for (a lot) more.
Excellent article. I look forward to the results.
Also whenever you post, I will see that 70s guy in my imagination.
You can thank the editor for that photo. It wasn’t mine.
You are welcome.
*cheese eating grin*
Now I need to look for my high school photo with the leisure suit and the turtleneck.
PERFECT.
I recognized the guy in the picture from high school reunions, 1/2 the class, the other half wore dresses/gowns
at an all-boys school?
So many boys dropped out it was almost a Girl’s School
*applause*
*joins in*
Very impressive
Nice work and nice write-up. This is what makes Glibs so much more than just a political bitchfest (NTTAWTT).
Neat.
Just curios if they want their Formica, paneling, shag carpet, lava lamps, incense burners, black lights, and avocado green appliances back? I’ll keep the music.
+1 orange corduroy couch
Naugahyde for the win baby!
Wow, that is far more effective than I expected.
I’ve seen youtube videos where they claim to get 50 degrees increase from input air temperature. I assume those have very low airflow.
I was very pleased to get a 30ish degree increase at 72 cfm airflow.
It’s a pretty big panel. I expect it may overheat the house on mild days in the spring and fall.
The real issue would be number of sunny days in the winter months. I seem to remember a lot of grey gloomy days in my youth in the winters for southern Minnesoda.
Run the regular heat on the cloudy days of course
If it works 3 out of 5 days in winter that’s still over half the days
Also, run up the temp when it is sunny outside, knowing that you will lose heat in the overcast hours.
Open the non-vented windows, and turn off the booster fan I imagine.
Same here – I was shocked it was that high.
Note, this was just days before the solstice with the weakest sun of the year. It will perform better as we get into Jan and Feb.
Think there would be any performance gains found in painting the exterior framing black?
Inside the frame, under the clear top. Yes.
Outside the frame, maybe. But this will stay installed year round. I don’t want the exterior painted black. We will go back next spring and put a coat of exterior grade white paint on the frame. The plastic will get covered with plywood also painted white. Heat is the enemy in the summer.
You would have better results doing a complete seal everywhere. You will have loss where the panels meet, the wood frame is assembled, etc. seal all that for a fair gain. That would work better than painting the inside black. It’s amazing how lossy panel intersections can be.
I started late. Lost a whole weekend to a stomach bug. So, there was a rush to finish it off and get it installed before it started to snow. It needs to be thoroughly sealed and painted.
I would say that you made an awesome effort that paid off. Yes, there will be refinements, but in trials, you nailed it.
Awesome work, good job!
At division base camp in Saudi Arabia we had solar heated showers. I would wait for one of my buddies to take a shower and listen for the screams. It usually either scalded him with boiling water or frozen him with ice water. If there weren’t any screams, it was time for a shower.
LOL. Good observation!!
Gotta use the buddy-system.
“My buddy says it ain’t time to use it”.
The Blue Falcon system.
Buddy is only half of the expression.
Very nice. In about 1978 or 9 I was working construction, and I hand shoveled about 15 tons of river rock into the collector for one of those solar air systems. I have no idea if it worked.
Air passes on both sides of the corrugated panel; how big is the airway, roughly?
There is about 3 inches of space between the center board/insulation and the plastic top. The corrugation is just under an inch tall from peak to peak. So there is plenty of room above and below the steel panel.
It looks like somebody…
*dons sunglasses*
…is bringing the heat.
9 ¼ inches deep
Phrasing?
Will it make a difference? We’ll have to see what his electric bill is. But, we know this. The register booster fan has a maximum flow rate of 120 cubic feet per minute. The house is nominally 400 square feet with 9 foot ceilings in most of the house. So 3600 cubic feet. The booster fan is capable of moving the whole volume of the house through the collector in 30 minutes. We have the fan set to 60%, so 72 CFM. Thus, the collector will move the whole volume of the house through the collector in 50 minutes. Air goes in at room temperature and comes out at 100 degrees. The system will turn over the whole volume of the house 7 times from 10 am till 4 pm (when the sun is doing a good job of heating up the collector) heating up the air 20 to 30 degrees each time it goes through the collector. I expect that will add up to significant savings this winter.
This looks promising. I look forward to seeing what the electric bill is.
Zwak besmirched and blasphemed against the great art of Firsting in the morning links. And you people abided.
Shame on you all. Shame.
You besmirched this excellent article we’ve been gifted by pathetically begging for attention yet again.
“Look at MEEEEEE!!! and my worn-out premise!”
That First horse is not only dead and rotten but its flesh has been stripped away by vultures who have since died of old age and been eaten by other vultures.
Your comments on politics, history, and current events prove that you are intelligent and savvy. Why do you go out of your way to be such a loser? You’re rarely even first anyway.
Give it a rest, especially when a Glib contributor puts real effort into an article like this.
The Firsters shall inherit the Earth.
But many that are first shall be last, and the last shall be first.
Matthew 19:30
Choose your kingdom.
When the rest of humanity has shit all over it and fled to other planets, it will all be yours.
I’m afraid that the rest of us are not going anywhere. That is why we are all doomed. Fleeing from the idiots is no longer possible.
We’ll all be wiped out by a telephone-handset borne illness when we ship Bro off planet.
“That First horse is not only dead and rotten but its flesh has been stripped away by vultures who have since died of old age and been eaten by other vultures.”
Nice!
I had all shame removed from me in 1992. Best money I ever spent.
“The house is nominally 400 square feet”
That is the actual sq ft of the home? That doesn’t seem possible. My apt is 1200 sq ft and it seems really small. Just curious what you mean by nominally. Only, barely? I guess tiny homes can be that size, I dunno. I think Elon Musk said his house is 500 sq ft. Seems like it would take some really good layout to get a bed, bathroom, kitchen, and a small closet into that. Our apt is really shitty laid out, it was built in the 60s, so probably tons of wasted space. Even with my bad organizational skills, I can see that is true. 400 sq ft still seems tiny.
Yes it is that small. I think the official sq foot on the house is 390 something.
We were trying to buy a different house that was closer to our own home, but that deal fell through. It was even smaller.
Is it a pre-fav Tiny House of new fad trend? They often use a loft in order to have a “bedroom”. Curious about this one.
Great write up, BTW.
Went back and checked the records. The house was listed at 536 sq ft. That main part of the house is a bit over 400 and there is a tiny bedroom tacked on after the fact.
Cabin is 18 X 26 outside dimensions, fortunately no one comes in the winter, electric heat and 2″ X 4″ walls. I’m not sure the heat could keep up with the comfort. BTW, cabin is available to Glibs.
Previously had a fuel oil furnace but got to the point that there was no one around that could keep it maintained, as the old timers left the business.
Thanks, Kinnath, something for me to think about. Do you know a guy that….?
Our tiny house is roughly the same dimensions as your cabin with a small bedroom tacked onto the side.
I’m not sure the heat could keep up with the comfort. BTW, cabin is available to Glibs.
How to assure no one overstays there welcome.
At the prices today and the interest rates, I guess be happy you have a house at all. I’m seriously not sure if I can afford anything at all now, it’s depressing.
I guess I could buy one of those pre-fab tiny homes on wheels if I can afford a postage stamp size lot to put it on. Then I’ll need two railroad box cars to house my wife’s shopping addiction. I could actually read your article and see if I can manage that to help with electric, and I could garden on the roof of the tiny home.
Those stupid tiny-homes are ridiculously overpriced. You are seriously better off with a standard single-wide.
I think the tiny home are steel frame though and the single wides are 2×2 with carboard for the drywall. They are like living in a cardboard home. I could be wrong, that’s just how it used to be. I lived in a single wide for a shot time when I was 19. The thing truly had walls mad of paper.
Here it is.
It is very small. The basic footprint is about 13 ft by 27 ft with a small addition in the back.
My first wife and I were in a rented house about that size when my oldest kid was born. Seems like there were a lot of these built in the post-WW2 years.
When I was first out on my own, I mean the very first time I moved out of my grandparent’s place, I rented this house from a farmer, it was a small living room, small bedroom, and small kitchen, and teeny bathroom with only room for a toilet and tiny shower. I think that place was maybe 300 sq ft. I didn’t stay there very long and then rented a pretty nice place, 2 bedrooms and some land. I had a nice wood stove and the farmer I rented from had like 500 acres, told me to cut all the wood I needed off a section of woods he owned. And I had a huge garden he plowed up every spring for me, for free. My rent was $40 a month, lol. The fucking good old days but I did not know it at the time. I had one of those large satellite TV dishes, like 8ft. I got all sorts of shit, even pr0n, for free!
Hey Kinnath, how big is the lot? That’s in Iowa? What part are you in?
Pretty good sized yard for a small town. 100 ft by 100 ft perhaps.
I am in east central Iowa.
Big enough for a garden. I see you got a storage shed too. I had a friend who lived near Iowa City, I used to visit, we fished a lot.
We joked about him needed to garden to feed himself when civilization collapsed.
But, it was an actual consideration.
Gardening is going to be priority number one for me when I get a property, if it has any lawn space at all. Like I said, seriously, I would consider doing it on top of the house if it has a flat roof.
My house is 1,000sf, 3 bed 1 bath. I could be comfortable in an 750-800sf cabin styled house*, preferably 2 bed, 2 bath. But you do anything out of necessity. For instance I have stayed in several 400-500 sf Airbnb cabins/small homes. They were nice. Living in one full time would require a bit of downsizing on my part and having one that makes efficient use of space for storage.
*what I am leaning towards for retirement, if I can attain it.
really good layout to get a bed, bathroom, kitchen, and a small closet into that
You can get all that and a living room. There is no need for the bedroom or bathroom to be large, after all.
I lived in a house that was about 900sq ft., but there was a partial basement for the laundry. Also, I renovated the attic and put dormers on it and sky lights, which put it up to about 1300 sq ft. 2 smallish bedrooms, one bath and my office and storage in the attic. Also had a one car garage and a large deck for living space when it wasn’t too cold, and a 1/2 acre lot.
I sold that for 65K and it was completely renovated, all new wiring, windows, floors, lay out changes, new deck, garage. That was in 2001. Try buying that today for 65K in Biden’s America. Hahahhaha!!! It would probably go for 300K now as ridiculous as that is. There is zero real estate in the entire country that is worth even a third of the asking price today, not even close. If it ever crashes and burns, it will be worse than the Great Depression. Great Reset time! Gate, Foochee, and Klaus will be in their bunks! This shit is infuriating, it’s time for the Great Chpwoodr.
I’ve seen smaller places listed for more.
My wife & I plus dog live in 747 sq. ft. It’s very well laid out, so it doesn’t feel that small. Although 1,500 would be nice.
I’ve got basement space as well, which helps a lot.
We have stuff. Lots of stuff. For a wannabe minimalist, I sure do have a lot of stuff.
I mean, those ginormous outdoor wreaths take up a lot of room!
We rattle around inside our primary residence, but our getaway would be too small for permanent status. One day we’ll find just right.
“just right” always finds you. Turns out it’s usually about 84 in by 28 in by 23 in.
That booster fan is just what I need.
I’ve got one room at the end of the house that just doesn’t get enough airflow from the HVAC. I didn’t know these existed.
Article was worth it for that alone.
glad to be of service
I’m also thinking I can retrofit a south facing bay window with a similar rig. Thanks for the idea.
You are welcome
These are going to become popular again as the green nutbags destroy the energy infrastructure.
Here in Pahrump, it’s normal to have 2 independent HVAC systems in one house. For me, it’s a smaller system that covers the (rather large) master suite (big bedroom/sitting room, bathroom, walk-in closet) and a larger system that covers the main house.
I don’t think there’s any connection even in the ductwork.
I like it because I can keep the bedroom at a nice 67F while my husband cranks up the rest of the house to 72F. I swear, he’s never been the same since they stopped his heart and chilled him for surgery. He wanted 85F at the hospital and rehab for weeks afterwards. Even 72F is a compromise for him.
We do 69 at night and upper 70s in the day. One thing I hate if how damn dry it is here in the winter, like blood in nose dry, I hate it. When it warms up a little won’t be so bad, but it was 31F this morning.
Ummm…
LOL, I walked right into that one.
Sounds like a happy couple to me.
Houston does that too.
Very nice!
I’m always interested in tech that can divorce the suppliers of natural energy from the consumer. It’s why I don’t get too het up over solar/wind/water downsides (e.g., kills birds—so do cats). And I don’t really care about the environment. Gaia can take care of itself. I have a “use it up, wear it out, make it do, or do without” mentality, which in my mind applies to energy.
It’s just … government should not be part of it in any way. Not regulation, not mandates, not initiatives, not subsidies, not special dispensations, not nuthin’. The market can supply when the time is right. I did think about putting solar shingles on my POS house, but then we had a lot of other problems with that house, so that was not an option.
“I’m always interested in tech that can divorce the suppliers of natural energy from the consumer.”
There’s this one trick your utility company will hate…
Is it a pre-fav Tiny House of new fad trend? They often use a loft in order to have a “bedroom”. Curious about this one.
</em
One of the places I looked at had a "guest house" which was nothing other than a giant garden shed with aloft bedroom about 2/3 the area of the footprint. I can't remember the footage, but it couldn't have been much more than 450 or 500.
Tiny houses were “cute” when the economy was booming. Now they are going to be a God-send for people who are getting squeezed by the recession.
Unfortunately a lot of towns ban them. They really only need a power and water/sewer hookup! Doesn’t that fall literally in the scope of the “infrastructure” bill???
Better by far than “tent cities” and allows the resident to earn and pay his way, which is fundamentally necessary for good mental health.
I’m frustrated that in the “live and let live” town of Pahrump, there’s been a crackdown on people living full-time in their RVs.
Seriously? What’s the problem? If they keep it tidy and safe, and they own the land or have a deal with the owner, why judge how they want to live? Many of these folks lost jobs in the past 2 years and are struggling. Let them be!!
Government is about fucking over the little guy and the downtrodden in favor of people politically connected to said government.
Need more zoning board commissioners.
We used to call “tiny houses” mobile homes and they could be found in trailer parks around the country.
You could see them sitting on acreages in rural Iowa in the not-so-distant past.
Planning commissions are notoriously stacked with people who want to elevate the “desirability” factor of the town. Whether it’s because they want the higher tax rates or it’s just pure class envy, they like those McMansions.
Used to be. Now it depends on the location. Leftist controlled areas, the planning commissions are cramming down shed houses and mult tenant additions to destroy SFH neighborhoods and make car use/ownership as inconvenient as possible. And other things like banning NG in new construction.
Leftist controlled areas are losing population at record at an accelerated pace. They will all be deserted hellscapes soon. While areas you want to live in will become unaffordable because everything that goes on the market is gobbled up the same day.
Leaving it alone and letting the developers make the decisions is never an option.
It’s nudges all the way down. But dress up the latest as zoning repeal (it’s not) and dimwits will lap it up. Just like creating a massive surveillance and tolling system for roads is somehow an improvement on the current method because it’s called a user fee.
There is one area of the county where you can’t build a home on anything less than 10(5?) acres, the area is only having mansions put up now.
It’s all good when it happens because of a fair open market economy. It’s bad when it’s being forced on us by an evil cabal of global elites, which is exactly what is happening. It seems though, for now, their plan to force us all into overcrowded cities has failed and the exodus continues. Places like Philly are going to be deserted hellscapes where no one treads. And the rest of us will be living in tiny homes scattered around the country. The price of a 3000 sq ft 3 bedroom, 3 bath home is already beyond the means of most middle class Americans. That was mot true just a couple of years ago. In fact, we were looking at homes that were 4-5000 sq ft, with acreage, and were affordable. Now it is just depressing.
To be fair, a 3K foot home was almost unheard of, other than for the wealthy, until quite recently as these things go. Growing up solidly middle class, our home and our friends’ homes were all in the 2K range. I think my parent’s first home was probably more in the 1400 sf range. Two bedroom, one bath.
*shakes cane*
I should say, in the 2K range at the top end. Lots of people, maybe more “working class” had houses that were probably more 1500 sf ish.
1500 sf three-bedroom ranch.
Standard starter home in PHX circa 1985.
24×60 modular ranch home from 1974 is where I grew up.
Surprisingly bigger than older housing development homes, but felt a lot smaller than the developments for the people who worked at the IBM plant.
My best friend growing up lived in a house that probably dated to the 30s, but kept getting added onto and was quite big but had a really wacky layout. When friend’s mom finally dies and they sell the house (friend is an only child), he’s probably going to hit the jackpot.
“To be fair, a 3K foot home was almost unheard of”
This is certainly true if you are talking when I was in my 20s or younger. And it was also unheard of that a home was more than like 60k, except for the wealthy. But 4-5000 sq ft homes were around more than 20 years ago. I had a 3000 sq ft home with a 2 car garage and full basement, on 25 acres. $160,000 I paid for that.
The first home I ever lived in, well not the first, but the first I can remember. It was a 2 bedroom ranch with an attached garage on a nice lot with a wall around it, in Simi Valley, CA. I cannot even tell you what it costs then, but my grandfather built it. I looked it up on Zillow last year and found it. $695,000.
I’m really looking back to the ‘60s and ‘70s. I’m guessing 3K sf homes were relatively unusual until the ‘90s? When I started practicing law and buying houses (and visiting my lawyer buddies) in the late ‘80s, we were in 2K, maybe a little bigger homes, in Richmond VA and Madison WI. Even at that size, with decent salaries, we felt somewhat house-poor. I paid 90K or so for my first house in Richmond in the late ‘80s, and I want to say it was 1800 sf? Something like that. And I was pleased as punch with my 9.9% mortgage – it was the first time you could get a single digit interest rate on a mortgage in quite some time.
The home we lived in, in the 70s, my grandfather build that one too. 3 bedrooms. It was an L shaped ranch. I’m guessing it was right around 2000 sq ft. So just about in line with what you are saying and yes that is the size of about everyone’s home that I knew back then, unless the were really poor or really rich, but middle class homes did seem to be about 2K sq ft.
I think I’ve told the story before of my acquaintance who was renovating a Baltimore rowhouse he got cheap (not the $1 version, but around $20K). He had a housewarming when it was all done and we laughed at how when the place was built, it was occupied by an extended family. A generation later it was suitable for a nuclear family, and another generation after that it became a bachelor pad.
Tiny houses are trailers for people who don’t want to be thought of as living in a trailer park.
Tiny houses were “cute” when the economy was booming. Now they are going to be a God-send for people who are getting squeezed by the recession.
As intolerable as it would be to live in a “tiny house village” it would still be preferable (to me) to living in an apartment building.
Think I’ll forward this on to our Iowa kids.
We’ve been looking into a number of alternatives up here. This system is intriguing but when we’d really need it, the sun is too low in the sky. Right now the sun is only up for about 4 hours and just describes a low arc across the southern horizon. There are a number of off-grid folks using solar for electricity, but I’m skeptical as to how well that really works. The ones we know all have to have Diesel or gas generators as backup. Since we’re on grid, the advantage would be that the electrical co-op will buy excess power from us in the summer to offset our winter bills.
There are a couple of geothermal outfits around, but haven’t looked into that seriously yet.
The sun is high enough in the sky to provide heat from around 9 am till 4 pm or so at the solstice (just a few days after we got our first data). The days will get longer going into Jan and Feb which are the highest heating days here.
I’m not sure how effective they would be as far up in MN as Fourscore is at. They would not seem to have my value in Alaska.
Our situation is complicated by the house being in some heavy woods. Even in winter with the leaves off the birches and alders, we don’t get much direct sun at the house; the trees to the south block a lot of it.
You’re also a wee bit north of Kinnath. There’s probably not any time in Iowa with 20 hours of darkness, lol. Just kidding, not sure what that’s like where you are, I know you are not above the Arctic Circle.
That’s about right; sunrise this morning, a week after the solstice, was at 10:21, sunset will be at 3:43.
Do you think putting a reflective surface on the interior of the heat chamber would have an appreciable effect? Particularly one the surface below the corrugated panel?
Already there. https://www.lowes.com/pd/Common-1-in-x-4-ft-x-8-ft-Actual-0-9375-in-x-3-875-ft-x-7-875-ft-R-Expanded-Polystyrene-Foam-Board-Insulation/3365576
The solid insulation board has reflective foil on one side. That side is up, facing the galvanized steel solar absorber.
I have been thinking about putting those on the basement side of the floor joists.
I’m still trying to figure out what the crime is.
Long Island prosecutors have launched an investigation into U.S. Rep.-elect George Santos of New York, after revelations surfaced that the now-embattled Republican lied about his heritage, education and professional pedigree as he campaigned for office. …
“The numerous fabrications and inconsistencies associated with Congressman-Elect Santos are nothing short of stunning,” said Nassau County District Attorney Anne T. Donnelly, a Republican.
“The residents of Nassau County and other parts of the third district must have an honest and accountable representative in Congress,” she said. “No one is above the law and if a crime was committed in this county, we will prosecute it.”
Have you met literally anyone in the government?
Fellow Long Island Republican, Rep.-elect Nick Lalota said he was troubled by the revelations.
“I believe a full investigation by the House Ethics Committee and, if necessary, law enforcement, is required,” Lalota said Tuesday.
Congresscritters are notorious for their ethics…
Cairo said he “expected more than just a blanket apology,” adding that “the damage that his lies have caused to many people, especially those who have been impacted by the Holocaust, are profound.”
The damage you cuntes do on a daily basis is real and far more consequential than someone being dishonest about his past.
Sentence first. The ends are what matter.
Let me know when they treat Blumenthal and Kerry the same way.
Or Biden.
A victim of butthurt has more value than a victim of murder. The victim of murder can’t cry on TV or TikTok about how unfair the world is.
Just because he’s gay doesn’t mean his butt hurts.
“if a crime was committed in this county”
Shouldn’t you identify that a crime has been committed before you start gathering evidence to prosecute somebody? I remember when law enforcement would start with a crime, and then find the person to prosecute, not identify a person who needs prosecutin’ and then gin up a crime.
*shakes cane*
LOL Donald Trump waves Hi.
Not that he hasn’t probably committed multiple crimes but they have yet to name an actual one.
All our prosecutors are being trained in the Lavrentiy Beria school of law!
The crime is not being a lefty.
To be fair, he could be lying about that too.
This guy seems even sleazier than usual.
But yeah, all the crying and moaning is tedious. He won. Deal with it.
It’s like they are election deniers. Imagine that.
One key point for Iowa is that the coldest days (below zero) are generally clear days. Cloudy days tend to be much warmer. The clouds act like a blanket and trap in heat.
So the solar collector will work most of the time on the coldest days. And the cloudy days when it won’t work tend to be 20 degrees warmer.
This is not always true. We get blizzards when -20 degree temps. But those are the exception, not the rule.
When I was in Alaska I wanted clear days and cloudy nights. It made a difference.
Best answer. Sun heats up the ground, then the blanket gets thrown over the top at night.
Is there interest in an article on the construction of the collector?
This article got long enough without the details on construction, so I left them out.
Yes, please.
OK. Give me week to put it together.
Seconded. I love stuff like this.
Yes.
Great stuff, kinnath. Pls. Give us an update on the electrical bills.
I have the opposite problem in Tucson. If I could get a more or less passive* cooling system blowing 50 degree air into my house, I would be a very happy camper.
*That register fan barely counts as “active” in my book.
Right. I spent 7 years in Phoenix.
The plant I worked in used chilled water to cool the buildings. The evaporative cooling towers would chill tanks of water at night that was then circulated during the day. This gives you the cost benefit of evaporative cooling without the “swamp” conditions in the house.
My house, the one I live in, was designed with passive solar engineering in mind.
We have a south facing slope. So we have about $25K worth of windows facing south. We keep the thermostat at 71. We are currently up to about 74 degrees in the house. The furnace hasn’t run since 8 or 9 am this morning. In the spring and fall, we have to open up windows to keep the temperature from getting over 80 degrees in the house.
Cool, if only I had a South facing window I’d definitely build one of those,
*Busts out Sawzall*
We don’t need no steenkin’ windows!
You can do a permanent installation through south facing wall.
We are going to reside our house next spring. I will be putting in a couple of permanent solar collectors after that. We have casement windows which cannot support a through-the-window design for the solar collector. So we will be going through the walls.
I actually don’t even have any good wall space, kitchen cabnets,side door,shower,another door then a storage cubboard/closet. I guess I could put it into the closet and leave the door open. hmmmm?
Never mind that’s where my gas meter is, I don’t think they’d like me to cover that up. Ah well, my heating bills haven’t been that bad, place must be well insulated and I don’t mind keeping it cool and dressing warmly.
Looks like you’re putting in a skylight.
If / when we get the new house bought and renovated, I’ll be looking solar options. Obviously in SC, supplementing power for air conditioning is as important as heat (although the past week has been cold).
Shade trees.
Keep the house cool in the summer, then drop off their leaves and let the sun shine on the house in the winter.
I hate trees anyway near a house. Rule for me is 100 ft minimum for a tree any larger than a small fruit or ornamental tree. Otherwise, chainsaw time. House, imho, needs sun, otherwise you can get mold or mildew.
👆👆
Moisture damage is far more expensive over the long term than power. My neighbor’s house is a tear-down and replace candidate because of that.
And that’s not considering trees that decide to take a nap on your home.
If we buy this place, there will definitely be some tree clearing. Some will go to open up the yard, let me plant some fruit trees, and spare the roof.
Yeah, big trees are messy and dirty as hell, do not belong close to your home. They are pretty, but do not belong near to my house.
It’s also expensive when a big ass tree falls on your house, lol.
The brew house calls. I must go and put booze into kegs.
I will come back later and answer any questions that pop up.
I should be back in the afternoon links.
And we can always start a new thread in the forum.
Is that what you got in that shed?
The king is dead. RIP Pele.
Well fuck.
“Are we the baddies?”
Remember the British woman who was arrested for praying silently? She’s been charged.
It’s her fault for living in Airstrip One.
Ukraine flag is there to say she was akshually arrested for “breaking a Public Space Protection Order”.
OK, then.
“He wasn’t lynched for being black. He was lynched for being where blacks aren’t allowed.”
I might have enjoyed visiting the UK some day if it hadn’t turned into a police state.
Yea. My wife also talks about visiting Canada but I don’t want to risk involuntarily commitment.
Come to Alberta. We’re presently giving the finger to the Feds on several issues, and I’m hoping we’ll do a lot more.
Alberta: Problem Child of Confederation™ (thank God!).
Confederates? Must cancel.
Similar feelings about Australia. Oh, well.
It was really nice in 1986. I’m just going to hold on to those memories.
Same as my memories of California.
As a visitor to most places, you can still skate by unnoticed by the state for a few days.
As a permanent work from homer, I’ve been interested in trying this type of thing ever since I heard about it.
its always annoyed me to heat the whole house above the ‘away’ temp in winter. Usually just use a tiny space heater in my office to keep the chill off.
Only problem with passive solar in my house is the house is angled so its not ideal alignment – front faces NE.
Also have trees to contend with. Due south have a big maple in the back yard, and even taller oaks in neighbors yards.
When/if I ever build a house, passive heating/cooling assistance is something I plan to incorporate in the design.
OT: Kari Lake is appealing.
I found her notice of appeal.
Exhibit A is the judge’s ruling on compensation. He denied Hobb’s claims for attorney fees and sanctions. He ordered Lake to pay certain expert witness and ballot inspection fees.
Exhibit B is the judge’s ruling on counts – what counts were dismissed and what ones narrowed. Count II was narrowed, and was the one where Lake had to prove malicious intent. My take on what the judge is saying is Lake fucked herself by disclaiming fraud but continuing to allege “intentional misconduct sufficient to affect the outcome of the election”.
Exhibit C is the judge’s ruling after the hearing. It looks to me like he was not convinced by Lake’s case.
All documents in the Lake/Hobbs case.
To add to my last comment, I’m not a lawyer, so it’s simply my take as a layman.
I’m out for Happy Hour.
It’s amazing they let it drag on as far as it did.
If the law doesn’t require proof of intent and she claimed to prove intent, that would be a hell of an unforced error.
I agree with you on Exhibit B.
Kari Lake is appealing.
She’s a total milf.
intentional misconduct sufficient to affect the outcome of the election
Shouldn’t matter. Incompetence can delegitimize an election as well.
Price for L.A-San Francisco Flights Soars to $700 Amid Travel Crisis
Woot. The magic choo-choo could be competitive.
Leave the guy alone. He has more important things to tend to than transportation.
“Travel crisis”??
Locally, some poor folks had their buses cancelled and then got locked out of the Greyhound station on Christmas. THAT’S what I call a travel crisis: https://www.whio.com/news/local/its-despicable-trotwood-mayor-police-chief-speak-out-after-greyhound-riders-stranded-cold/O4YJRBHGGVG6BGE3GJLH2BUD2E/
This too-local news is nuts.
This morning it was a “random home invasion” not far from me.
Now they’re saying the daughter cooked it up. I thought the original claim seemed a little too extraordinary.
Once I saw “stabbing” I thought “I don’t think this is how you conduct a successful home invasion”.
So, you’re an expert now?
Seems labor-intensive.
Was Anthony Michael-Hall involved?
I wonder what good bullets are without the charge and casing.
After a mass shooting, public attention inevitably turns to a debate on the control of guns. But with shooters so often stocked up on ammunition to kill as many as possible, many are left to wonder: What about the bullets? …
It’s remarkably easy for anyone to obtain large quantities of ammunition, said Ari Freilich, state policy director at the Giffords Law Center to Prevent Gun Violence, led by former U.S. Rep. Gabrielle Giffords, who survived a mass shooting in 2011.
In most places in the country, people can go online and have hundreds or thousands of bullets delivered to their door “as if ordering a pizza,” he said.
The Giffords group and other gun regulation advocates also propose that ammunition sellers be required to maintain records of their sales and make the information available to law enforcement, as New Jersey will soon enact.
Data collection and reporting of large sales to state police, along with other measures such as behavioral threat assessments, will help law enforcement to identify bad actors, said Platkin, the New Jersey attorney general. Law-abiding gun owners who purchase ammunition in bulk won’t have anything to worry about, Platkin said.
Oh, you are an ignorant hoplophobe.
That reminds me, time to buy more ammo
I may have placed some orders this month. Santa may have left some in my stocking as well.
5000 rounds of 22 showed up yesterday, but none today. This is unacceptable.
Q can breathe a little easier.
https://www.businessinsider.com/hooters-dispels-shutting-down-rebranding-2022-12
I can’t muster a shocked face.
Alleged Crypto Fraudster Sam Bankman-Fried is Given Judge Who Oversaw Jeffrey Epstein Case and Let Kevin Spacey Walk
https://bigleaguepolitics.com/alleged-crypto-fraudster-sam-bankman-fried-is-given-judge-who-oversaw-jeffrey-epstein-case-and-let-kevin-spacey-walk/
Now they’re just fucking with us.
Wow, are they ever.