Here is part 2 of my concrete counter top build. In Part 1, I covered some background and basic preparation. Here, we build the forms and pour the concrete.
Counter Top Forms

Cross section of the 1/4 bullnose form. Form will cover up to 5/8″ of substrate; in my case I had 1/2″ Hardie plus 1/2″ MDF, so I needed to conceal the exposed MDF edge with band edging. The form produces a 1.5″ overhang on the counter top.
With forms, there are (at least) two approaches; build your own forms with e.g. melamine or buy pre-made forms. Building your own is an option for both cast in place (CIP) and precast (see Part 1), while most pre-made forms are really an option for CIP. I did a precast with my own forms for a utility sink in the garage several years ago. It turned out pretty well, and would have no qualms about doing the same thing. However, in a CIP, one needs a base and, depending on your forms, the edge of the base will be exposed. So you either need to be careful about building your forms – you can’t just build a simple box – or get pre-made forms. I opted for the later. I’ve settled on Z-forms from Concrete Countertop Solutions. These are plastic forms that come in a variety of edge profiles that you attach to the base with pan head screws. These run about $150 for 30 linear feet and $250 for 60 linear feet; shipping nearly doubles the cost though! Fortunately, I found a local distributor that carried the forms so avoided the shipping- as I’m doing several more pours after this one, I got 60 linear feet of the quarter bull-nose. If you go with pre-made forms, definitely look for local distribution. An attractive feature of the forms is the design of the overhang which extends down to cover the edge of your substrate. After the concrete sets, the edging is snapped off at a built in ‘weak’ spot in the form underneath the overhang with the end result being that your counter top sits in front of the cabinet face and looks ‘seamless’. In my case, owing to the mistake in the prep with the MDF and the fact that form will only cover 5/8 inch below the base of the counter top, the MDF edge remained exposed and I had to edge band it. The form is attached directly to the substrate with pan head screws. Note the back edging against the wall; this edge does not get removed and as a ~1/4 in lip to provide support when screeding (see Pour). It’s obviously designed for someone with more skill than I as I could not effectively use it for screeding.
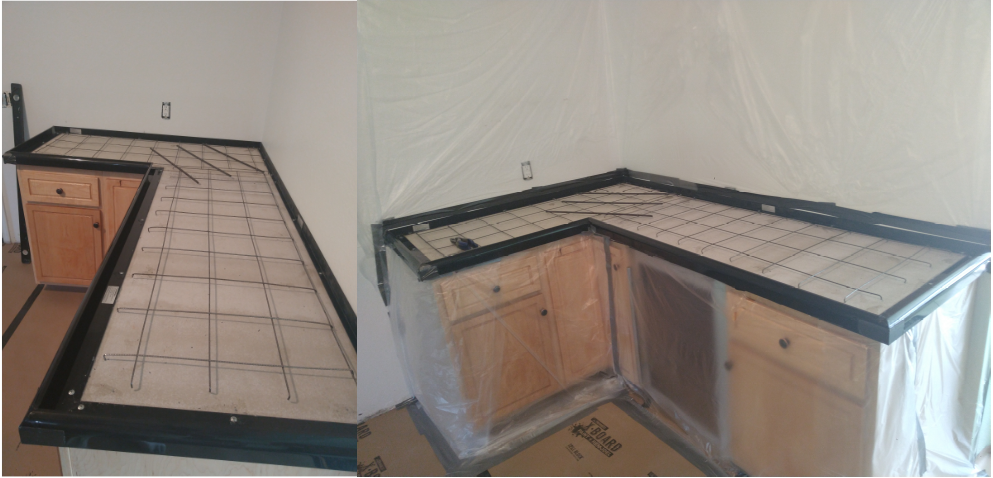
Here the forms are installed, mesh and rebar in place. On the right, I’ve covered the cabinet and wall with plastic to mitigate the inevitable mess that is incoming. Floor has been covered with ram board as well.
Corners on ‘like’ forms are easily cut on a miter saw – Concrete Countertop Solutions sells a wooden jig to hold the forms ‘perfectly’, but unless I was doing 10’s of cuts per day every day, it’s not really worth it – easy enough to hold in place. In contrast, corners where your edge form meet the back form will require a bit of snipping of the back form to merge them – extend your edge form all the way to the wall and cut sections of the back so it overlaps well with the edge form. On exposed corners, you’ll want to re-enforce with tape – I used duct tape – and caulk. But only caulk the OUTSIDE of the form – any caulk on the inside of the form will imprint on the finished surface and you don’t want that. Or maybe you do, I’m not your supervisor. But it will be ugly. Where the edge form meets the back form, you can caulk and tape your improvised seams (the edge form should extend all the way to the wall) from the inside as it will all be covered by the concrete when you’re done. Note that the forms will generally add about 1.75 in to your cabinet height so plan accordingly for the final height. If you build your own form, you can customize a bit, but I don’t think you’d want to pour anything less than 1+ inches or it’s going to be prone to cracking.
Depending on the size of your pour, you’ll want to re-enforce the concrete with a a mesh and/or rebar. In my case, I used a 6 in steel mesh for most of the counter top. For this counter top, I have 90 degree corner which is weak/stress point, prone to cracking diagonally back towards the wall corner. Therefore, I put some rebar across the corner to stabilize it. The counter top did crack very slightly as it cured; but it was shallow and stopped… where the first piece of rebar was. With the right fill and stain, I’m calling it an aesthetic touch. You could do two lifts here – e.g. pour a first later of concrete, then lay the mesh and rebar and then pour the remaining concrete. I just cut the mesh such that I had ends I could bend down to hold in place above the HardieBacker substrate and tied the rebar to the mesh with steel wire. Note here the tape on the form corners; You really want to have these corners stabilized and sealed before pouring. In addition, now is the time to cover everything. You want ram board or equivalent on the floor (unless you’re pouring on an unfinished floor or you’re replacing the floor later) and a heavy duty plastic covering every exposed surface on the cabinets. I also covered the walls to minimize potential splatter on my newly painted walls.
The Pour
Now it’s pour time; presumably, you’ve picked the concrete. In principle, you can use standard concrete mix. You’ll have large aggregate (pebbles/chunks of rock) and it will be a bit harder to work with and you may need to do more grinding on the larger aggregate. There are also counter top specific mixes – I used this on a small vanity and it works well. But I couldn’t find any in stock, so I ended up using sand topping mix. Concrete Countertop Solutions also makes a specific mix for counter tops; looks interesting, very small (no?) aggregate, but the shipping (and cost itself) is ridiculous and simple sand mix yields good results at a fraction of the price. There are calculators to figure out how many bags you’ll need for a given size and thickness; they seem pretty accurate, but I make sure to buy at least 2 bags more than they recommend – if they say 4.5 bags, I’ll buy 7. It’s much easier to return an unused bag than come up short on pour day. So the process on pour day is pretty straightforward – mix the concrete, pour it into the form, mix next bag, pour into form, rinse, lather repeat. I found it better to mix with paddle mixer in single bag batches – a 10 gallon bucket is best here rather than the standard 5 gal Home Despot/Lowes buckets. Here’s where it’s very useful to have two people; one can spread the poured concrete while the other goes and mixes the next batch. I did do two lifts here; poured about 1 in deep with the first few mixes. That made it easier to focus on getting it down into the base of the edge forms and flow around the rebar/mesh.
Trying to make a flowable concrete was my major mistake on this pour. I wanted to minimize air pockets and voids in the form edges and easy flowing concrete is easier to work with. There are additives that are supposed to increase flowability without adding water – Concrete Solutions makes Liqui-Crete, but shipping was too much and I couldn’t find it at the local distributor; when you combine the cost of the concrete with this at one box per bag, it rapidly gets unreasonable for – as I’ve found – minimal benefit. I used Counter-Flo, but that didn’t really add to the flowability. So I checked a few youtube videos, and saw people adding up to 7-8 quarts of water to make the concrete flowable, even on concrete I know specifies no more than 4.5 quarts. Since I’d never expect youtube to lie, I went with flowable and added ~6 quarts of water per bag. Big mistake, almost botched the entire effort. Also note that my test pour (bench) was done with the additive and recommended water added – that was harder to work with than I wanted, and I deviated from my test pour to try and ‘fix’ that. If you’re going to experiment, do another test, don’t experiment on your final work! With that much water (6 quarts in my case), the bleed water (water that rises to the top of the pour, ‘cream’ that allows a smooth finish) was so watery as to essentially rinse the (small) aggregate into a sand, removing all the cementitious material; I was basically screeding water. That’s going to lead to a powdery, soft layer in the concrete. Speaking of screeding – that’s the process of ‘rubbing’ a long flat board across the surface to the poured concrete to level it. Basically, you over fill your form very slightly, take a long flat, in my case, piece of 2×4 and resting it on either edge of the form, pull it across to remove the excess, leaving flat surface behind. Generally, you want to draw the screed board across the surface with a sawing motion. However, up against a wall like this pour was, the very narrow back form sections do not provide support to ‘saw’, especially with the soft watery concrete I had f’d up into. The screed board would slip off the edge and I’d end up screeding below the level of the form. If you’re doing an island (or doing a pre-cast) that’s not up against a wall, and do a proper concrete consistency, this will not be a problem. In my case, it just meant a lot of fussing around and manual by-eye adjustment and attention to detail, making the process more tedious than it needed to be. Once you got the basic pour and screed done, start vibrating the edges; in fact you should be vibrating the edges as you pour, at least taping with the end of the trowel you are spreading the concrete with. This is necessary to remove air pockets on the form edges. With the pour complete, start in earnest with the vibrating. When you think you’ve done enough, make another two passes. And then 3 more. I used my random orbit sander on the lowest setting. I stopped at “you think you’ve done enough” stage and still had some air holes on the edge. This whole stage is attention to detail and there’s not really a formula. You have you float in one hand, a pail with extra concrete (usually stuff you’ve screeded off), and you’re vibrating and floating the surface. If vibrating lowers a section a bit, add concrete and work it in with the float. You have to be careful here – always run the float at a slight angle, elevated in the direction your are moving the float – you don’t want to dig the front edge of the float into the concrete or your going to spend a bunch of time fixing the imperfections you just introduced. For me, this was 10-15 minutes with the float just babying the surface – and lamenting the issues I knew I was going to have given how much rinsed aggregate there was in the bleed water. DO NOT OVER WATER YOUR CONCRETE!!!!!

All the concrete is poured, screeded, floated, and vibrated. It is mess, but the ram board did a great job protecting my new tile.
Once you’ve floated and vibrated to your hearts content, just walk away. I find it hard to leave it as this stage, it’s definitely a case of trying to do to much. You should have a pretty smooth surface at this point and it’s time to let the concrete do it’s thing a set up a bit. Check over the next 20-30 minutes; when it’s set up enough that it’s firm to the touch (you don’t really leave a mark when you touch it lightly with your finger), break out the steel trowel. While it was important at the floating stage to be careful and always run at an angle in the direction of travel, here it is critically important – it will be much more difficult to recover (impossible?) if you dig an edge into the surface. For the steel trowel, I’d strongly suggest one with very rounded edges; sharp corners are too easy to dig into the surface with a momentary lack of focus. You want to run the trowel over the surface at a shallow angel with firm pressure. If you are not hearing the ‘scrapping’ sound, you are probably too early. Make another cup of coffee and wait a bit more. I like to work it with long circular arcs. The concrete that is. During this process you can get the surface very smooth – not me since I was still beset by my mistake on the pour with too much water – but in previous pours I’ve gotten a very good finish at this stage. Careful work up to this point will reward you when you get to the grinding and polishing stage, believe me.
Speaking of finishing – that’s what we’ll cover in the final installment. Try to contain your excitement.

Talk about a slump in the quality of content.
But don’t mind me. I arrived pre-stressed.
Ouch!
Interesting article that confirms I’d not want to DIY this.
Aint skeert!
It was an interesting screed.
Light touching, grinding, and finishing? Hmmm.
This is pretty cool. I had ignorantly assumed that concrete counter tops were installed like marble in slabs
Very cool. I have done a couple concrete counter/table tops but built the forms out of melamine. When flipped over for install they are smooooooth. Way smoother than my concrete finishing skills. Which suck.
You could always come a couple weeks early to HH, I’d find something to keep you busy.
/Bring your cement tools
Looks to be neat, PM, good job
Statement I’ve actually made during job interviews:
“I know the difference between cement and concrete.
I know the difference between a bolt and a screw.*”
*Hush yo moufh.
So a lady walks into a hardware store……………..
Her stance was too wide?
She bought a hinge.
Try to contain your excitement.
OK.
The counter looks good.
What I want to know is if PutridMeat is an expert and how much we can rely on him. He mentioned the trustworthiness of YouTube, but was curiously quiet about Reddit. Fortunately the Top Men (and Woman here) at Ars Technica have all our safety in mind with the recent moderator purge.
Reddit faces content quality concerns after its Great Mod Purge
Because if Reddit said it was OK to can that sausage I wasn’t going to check anywhere else.
I wonder how 4th grade educated peasants managed to successfully can their own food for 3 centuries before self-important twats with graduate degrees on reddit were there to teach them how to do so.
Id would venture that there was much trial and error to early canning, in so far as food-borne illness goes.
A sort of Darwinism, so to speak.
A Mason jar, also known as a canning jar or fruit jar, is a glass jar used in home canning to preserve food. It was named after American tinsmith John Landis Mason, who patented it in 1858.
I got into an argument with some zoomers on facebook about canning. They were horrified that actual average people were trying to preserve food. They were convinced the populace would be dying off left and right.
I pointed to the patent and said the tweenaged girls had be canning food for about 170 years without problems. My wife and her sisters were responsible for canning all the veggies they harvested from their garden from middle school right up until I stole here away at nineteen.
I have a friend in the SCA that specializes in medieval food preservation techniques. Those techniques are quite effective.
We dry canned potatoes this year (which is not recommended by the USDA or whatever gubmint agency puts out canning recommendations). We plan on not being dumbasses and smelling the potatoes when we open them. I am pretty sure we will be able to tell if they have gone bad using sight and smell.
Smooth moves.
OT… We knew she’s got the censors busy again, but who knew she’s knee deep in the fucking WEF?!
WTF, Elon Musk?
I thought she was knee deep in the hoopla.
Oh, I hate you. Almost as much as that stupid song.
*Everybody* loves my music links.
For some value, I’m sure there’s truth to that.
Uhm…I don’t know how to say this…
We Built This City is overhated. About the worst you can say about it is that it’s overproduced pop slop and aged poorly, just like the vast majority of overproduced ’80s pop slop. Compare it to, say, The Future’s So Bright, I Gotta Wear Shades, or Safety Dance and tell me what, exactly, makes it a uniquely terrible example such that it routinely tops “worst song ever recorded” lists.
It’s trying too hard and it’s not “rock and roll”, at least as they are implying.
“Safety Dance” isn’t trying to be anything other than what it is.
Also “Safety Dance” wasn’t sung by a band that sung “White Rabbit”.
I guess you could say Ms. Slick… fell from grace?
(•_•)
( •_•)>⌐■-■
(⌐■_■)
YEEEEEEAAAAAAAHHHHHHHHHHH
I wonder how much Townshend got paid every time that show aired?
White Rabbit also sucks, so not sure why anyone would be disappoint. also looking at the #1’s from 1985 – that may have been the worst year ever for music, even Dire Straits and Stevie Wonder couldn’t save it.
C’mon, Hype. Give Jan Hammer some love.
Good songs from 1985 – Everything from Brothers In Arms (Except the two that got played to death), Downtown Train (The Tom Waits original not the Rod Stewart Cover), Change It (SRV), Rebels (Tom Petty & The Heartbreakers) ,The Confessor (Joe Walsh), Phryzzinian Man (Wynton Marsalis) probably more but that’s what I got in my library.
1985.
Seventh dream of Teenaged Heaven. Love. Bad Moon Rising. Halber Mensch. Aint Love Grand. The First Born is Dead. Flip Your Wig. Meat is Murder. Head on the Door. Tim. Rum, Sodomy, and the Lash. Psychocandy. Rain Dogs. Thats just what I can think of off the top of my head.
1985 was a killer year for music.
???
1985 https://youtu.be/9AjkUyX0rVw?si=lsFA5Br1lNcj3iZ2
I think the Jefferson Airplane connection made it especially irksome to people.
Or what Sensei said.
YOU SHUT YOUR FILTHY WHORE MOUTH!
“Safety Dance” is a classic.
^this
I’d listen to any of those songs on repeat before I’d listen to Culture Clubs Karma Chameleon even one more time. Or Peter Cetera’s Glory of Love.
If you don’t like Safety Dance then you’re friend of mine.
No friend.
We can First…We can First…We can First if we want to, we can leave our friends behind. Cause your friends don’t First and if they don’t First well…they’re no friends of mine.
Fun too-local fact: TT met a guy around here who was convinced they were singing “…Tipp City*.”
*Charming small city a little north of Dayton in the next county up.
Not Just knee deep, she was totally deep when she did the freak with me.
https://www.youtube.com/watch?v=7yzulDOfFic&ab_channel=Cosmonauta2016
You will use any excuse to post that song, you monster.
And if this world runs out of haters,
We’ll still jave each other….
One of my wife and I’s favorite games is to insert, in a normal tone of voice, the words to a song into the conversation. Just to see if who can get an earworm into the other person.
Good times.
Long ago and far away I would have done this. Now I pay someone.
One the sidewalk outside 5-year-old Mikey’s house there were several initials and a bicycle tire track in the concrete . I thought this some kind of magic. No matter how hard I pushed Idown on my bike I couldn’t make my own tracks and no nail would do any more than scratch the concrete. I’m embarrassed to say how long it took me to solve the mystery.
When I poured a concrete slab I ran a bike across a corner. I felt stupidly proud of myself.
“ Once you’ve floated and vibrated to your hearts content, just walk away.”
That’s when the June bug invasion comes in from the patio door…
“Try to contain your excitement.”
Calming my tits using Sean’s proven methods.
Or, you could calm your tits with, and I quote, ” …long circular arcs.”
Sounds like PM has a lot of experience.
Long arcs implies he has moobs.
I’m one of those weirdos who likes the semi-industrial look of concrete countertops (possibly related to my being one of those weirdos who actually likes brutalist architecture), but for the cost and the pain in the ass involved, I’d just as soon throw up some cheap laminate and have done with it. That, and I’m on a pier and beam foundation, so I’d be concerned about the weight. Although I suppose it’s not any different from natural stone in that regard.
But does laminate let you embed mesh for a discreet Faraday cage?
Good point, but when the big one hits, my toaster, blender, and popcorn popper will be the least of my worries.
How many rounds of 9mm can you get for a frozen margarita?
Thats why I keep my phone in the microwave.
Ding!
Young Tres, fresh out of the Army spent some time doing concrete work. I’ll never forget this old hillbilly telling me, WRT to “soupy” concrete: “Just keep workin in with a float till the water comes to the top. Mud is like pussy- the more you play with it the wetter it gets.”
Truly a prophet.
*sharpens pencil. takes copious notes*
It’s also hard to find the g-spot in concrete.
One the one hand, I like to see an underdog winning. On the other hand, ugh, Duke.
My ESPN is still blocked. Along with ABC, FX, FXX, and whatever else is owned by the Disneyborg.
Yeah, when you mentioned that, I thought it might be just metro NY Spectrum. Then we tried to turn on the football game tonight…
Looks like DJ Ukulele wasn’t the problem at Clemson.
They looked just awful.
Doctor Grandma Jill has tested positive for the ‘vid and has mild symptoms. You’ll be “relieved” to know the president has tested negative.
Crowder does round table with his new comedian lackies.
I do not accept Jim Breuer and Bryan Callen as master comedians, but it’s interesting to get an insider’s perspective on how super political everything has become. Guys who weren’t really right wing not even half a decade ago are now considered far right and teaming up with a guy like Crowder. I find Crowder obnoxious in this environment as he seeks to wear more of his comedian hat and he’s no heavy weight like he fancies himself. At least he styled himself as a host here.
If Crowder’s life were a movie, he’d be in the act where he’s lost his way and surrounded himself with a bunch of rich and famous who aren’t the ones who got him where he was and his ego has ballooned all out of proportion. He’s lost his fast ball and doesn’t know why.
Also, Nick Di Paolo was at his best on The Artie Lange Show. Pair him with a fat heroin addict, and he’d gold.
You misspelled ‘Tough Crowd’ and ‘Patrice O’Neal’
Callen echoes something Nerdrotic has been saying. Hollywood studios are quietly ditching their DEI people. Callen says all the major studios have basically ditched them.
He thinks reality is starting to set in.
Ooooooh Tower of Power on Sept 30. I asked Lazlo to win tickets.
The Manhattan Transfer on Oct 3, in lovely and talented Bellefontaine (pron. “bell fountain”,) OH. 😃😊🎶🎙🎙🎙🎙
I paid for the tickets, unaware of any contests with them as the prize.
NO. FAIR. They come nowhere near us. Also, every street/city named Bellefontaine is pronounced Bellfountain. 😜
How else would one pronounce it?
Bell-fon-tayn’
I’m missing the distinction here they both read the same to me.
There is no U in Bellefontaine, which makes the entire difference.
“Pardon me. Where is the drinking fontaine, if you please?”/Teh Hype
But I will be in Bellefontaine! 😁
😛
OSU has an extension in Bellfontaine.
Hmmm… will have to ask Ted’S. about the actress Joan Fountain.
We’ve been to this theater once before – this past November to see Todd Snider. Charming, historic small city theater – “The Holland,” complete with 3D “murals” along side walls of the auditorium depicting a Dutch street scene…including windmills.
Posting this just for the intro that does a great mashup of how much fun the 2016 election was.
You will never have another political moment like that in your lifetime.
Gonna have to put a starting time or another clip. Seems to be a live feed and it’s moved on whatever you were linking to.
Forgot it would link to the middle of the stream, but it’s right at the start as the intro.
“ Careful work up to this point will reward you when you get to the grinding and polishing stage, believe me.”
Oooh, sexy talk!
Cool project, pm. Thanks for sharing. Though you are casting pearls before swine here.
Don’t know if anyone else is up and about right now.
I decided to finally paint my test 3D Mini.
Opted to try out Object Source Lighting. I did the effect on both the slime in the sewer channel on the base, and the lantern on his belt. I don’t know how well the camera picked it up. From some angles, you can’t even see the green on the mini where the slime glow lands.
You need Firsting in your life. That’s the only reason to be up at this hour.
https://www.dailymail.co.uk/news/article-12477397/This-biohazard-issue-Delta-flight-Atlanta-Barcelona-forced-turn-passenger-suffered-horrific-bout-diarrhea-pilot-said-affected-way-plane.html
Damn. That’s a new one. I will check my flight complaint privilege.
replacing the carpet was the best choice.
Ugh, luggage stowed underneath the seat in front…
Wake up Glibbies! Back to work. Ukraine needs more $.
🌞
https://m.youtube.com/watch?v=Kq7pBB9D7JQ
🎶🎶
https://www.youtube.com/watch?v=Bloc17ZoQlc
⬅ 😃
https://www.cbsnews.com/philadelphia/news/danelo-cavalcante-update-chester-county-prison-escape-sixth-day/
Day 6, and they still haven’t caught one miserable immigrant in a 2 mile radius. Mighty fine police work, Lou. 🍩
But by G_d they had everyone in DC on Jan 6 identified in a couple of days.
And nobody has ever been charged with killing Tupac or Biggie…
Morning all!
Today’s selections are from one of my favorite troubadours, Al Stewart.
First, the lovely, but utterly tragic, Roads to Moscow.
Then the quirky Terminal Eyes.
Share and enjoy!
👍
I’m trying to memorize Year of the Cat.
suh fam
I’m waiting to go to Texas
what’s goody
Good morning, homey, Beau, Sean, TO’G, Roat, U, and hayek (if the latter two are still awake and with us!)
Safe travels, homey. Hope you caught the song I linked for you yesterday from Uncle Shelby. 😁
Mornin’, reprobates!
Thanks for the wake up tunes, Sean and Beau.
Nothing like getting paged for a high severity incident right before bedtime. Could have been worse, at least the call didn’t rouse me from a deep sleep.
Good morning, ‘patzie! You haven’t been up all night, have you??
Heavens, no, took about an hour to sort things out. Director of Engineering was on the call, no pressure.
Reaper claimed his third. Rip Gary Wright.
“Don’t look back, something may be gaining on you”
/Satchell Page
Parkinson’s and dementia. Jeez.
First’s comin.