When messing around with various LoRAs, I found a few which tended to create additional unwanted figures within the image. After some testing, I found that it was the result of my habit of creating images at 1024×1024. When the width was halved, the extra people vanished. But I want 1024×1024 images. So what do I do?
I could reopen the images in photoshop and make them bigger, but why should I have to, the image generator supports the size I want? Well, Stable Diffusion supports upscaling in a variety of modes, but in my testing, I found that directly resizing resulted in poor image quality. There are a couple of ways of upscaling, and so I ran some tests. Those tests made my computer cry. After looking into what was going on, I found some of the workflows were asking for the machine to generate images at resolutions of 4096×4096 up to 8192×8192. This was because there were a number of nodes where it scaled by a factor instead of to a value. My monitor is only 2560×1440, so images that big don’t do me any good. There was no point in making the machine do all that work.
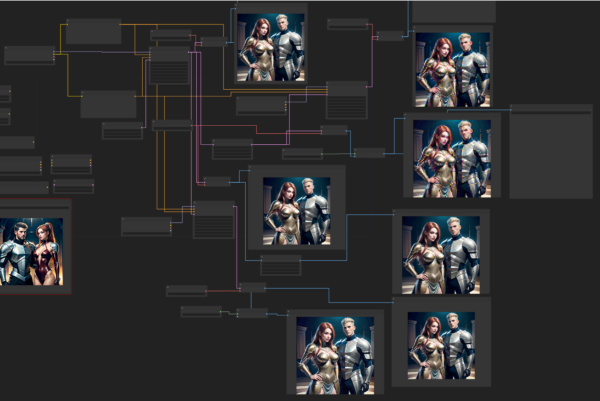
So, I refined the workflow to try a variety of methods to upscale the images without going too big. I ended up with a workflow that looked something like this:
It got convoluted as I tried to get all of the combinations of options. That rapidly multiplies into a large number of combinations. So I’ll go over what the various upscaling options I tried and what they were doing. Of those that I got to work, I had three. These are “Upscale Image”, “Upscale Image using Model”, and “Upscale Latent”. Being the most obvious, I started with “Upscale Image”. It takes an image as input and produces an image as output. Within ComfyUI, You have images either from loading directly, or off of a “VAE Decode”, that is, not counting the various upscaling nodes we’re testing. There may be more esoteric nodes which produce an image output, but I’m not digging for special cases just yet.
I needed an image to work with, I used the same prompts as in the previous VAE article, but set the size to 512 and used different sampler values. The image produced was thus:
So when I tested “Upscale Image” all by its lonesome, I fed it off the “VAE Decode” after the sampler. It has four options – method, width, height, and crop. Width and height are self explanatory. Crop is disabled by default, its only other option is center. So I assume that if the module gets an image bigger than its defined dimensions it will clip the edges to fit when set to center. I did not test this. The upscale methods are of the same types you get when changing an image size in Photoshop, and I tested them all. The results I got were similar to photoshop, but worse. That’s disappointing.
The next node to try was “Upscale Image using Model”. I haven’t dug into upscaling models that much, but they are also separate files that can be acquired and added to your collection like LoRAs, VAEs, and Checkpoints. I have four, some of which came with the software. The results of upscaling via model were all slightly blurry. I was not happy with the results I was getting so far.
The last node was “Upscale Latent”. It had the exact same options as “Upscale Image”. Unlike the first two, this node worked against the latent image channel. But if you remember in the first article, the latent channel in front of the sampler is just a brown field. Upscaling that is pointless, as we can ask for an larger blank latent. However, the sampler node puts out its own updated latent image. So we’d have to wedge this one between the sampler and the VAE Decoder. Lets see what the results are…
What in the unholy corrosion is that?
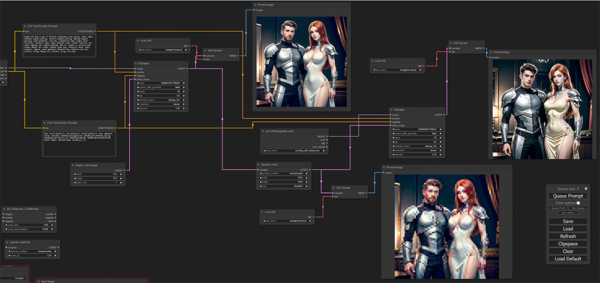
So are we out of options? Do we resign ourselves to upscaling in photoshop? Not a chance. We don’t have to accept the raw upscaled latent that came out of the sampler. We can feed it into a second sampler and use that funky image to make a new image at the higher scale. So, it’s time to lay out a second sampler. I cleaned up my workflow to have a more straightforward layout. Right now we’re working with this:
On the top left, we have removed all LoRAs, giving just a checkpoint feeding a positive and negative prompt and the first sampler, which gets a blank latent image. The prompt is the same one I used for the VAR testing, but the seed is different. It feeds a VAE Decoder that is using the old reliable orangemix and goes to a Preview Image node. Preview Image is a save image node that doesn’t write to your output directory. It allows viewing the work product without ending up with scads of failed attempts in your output. Off of the prompt and sampler nodes, you will notice additional output lines feeding the latent upscaling node and putting the prompts into a second sampler node. Since outputs can feed multiple inputs (but inputs can only take one source) I attached another VAE decoder and a preview node off the latent upscaler so we could see the garbled image that came off that.
This is where we finally start paying attention to the ‘denoise’ setting on the sampler. We want the output to resemble the input, so we can’t give the sampler a free hand. If we left the denoise setting at 1, the only thing the second sampler would pay attention to would be the dimensions of the incoming latent signal. The lower we tune that, the more the sampler sticks to the latent. Now, the latent we have here is pretty messy, having a lot of noise and artifacting as a result of the upscaling. So I ended up settling on a 0.7 denoise value. Since we are feeding the same text prompts to both samplers, it will still interpret the image in the same manner as the original produced them.
So, what did we get?
That’s not the same image. But we shouldn’t have expected the same image. We ran it through a second sampler, and gave that sampler permission to fill in the details that had been damaged by the upscale latent node. By resampling, we got additional details added into the image that a straight upscale would never be able to do. It does mean that the people have different faces and hairstyles, along with some new tassets for the lady’s gown. But there’s another thing we can do with this workflow. If you’re paying very close attention, you might notice that I’m suing a second checkpoint loader for the second sampler. I said in the first article that you couldn’t use two different checkpoints. Well, that’s partially true. A given sampler can only use one checkpoint. This is a whole second sampler, so it’s an entirely different run through the engine. It doesn’t have to use the same checkpoint as the first.
So I changed the second checkpoint loader to use a different checkpoint from the first. Eagle-eyed Glibs will note that the example workflow already shows this version of the workflow. What this allows us to do is change the entire art style of the piece. I had a few examples that didn’t really show off this feature as they were too close to the margin of error of the original feed, so I dug out checkpoints for comic book styles and old pulp covers. From the same sampler settings, I got very different resampling results.
Since that pulp cover checkpoint has been a pain to work with, I’m not surprised that it wrecked the background and added stuff that I can’t make heads or tails of. I’ve not used the comic book style one much, but it did mess up the arms in between the two figures.
Modification of existing images is a deep rabbit hole we’ve barely touched. We’ll have to touch on a few of those in future installments.






It’s been so long since I wrote these that I forgot what I wrote.
I like how it added a lamp where the original just had a glow.
That seems like an anachronistic lamp, but it shows initiative.
LARPers?
More seriously, I’m not too bothered about some types of apparent anachronism.
Unless the computer is gaslighting me.
What’s with the extra hands in the second to last one?
🤷♂️
It does tend to spawn eldrich abominations if you aren’t careful
How exactly does the fabric get sucked into her belly button? And the last guy has two right hands?
Superglue.
And are you mocking the differently abled? (Actually, I think there’s a random severed fist stuck to her hip with his hand not visible behind her.)
Cousin It says “hello!”
Did that walking hairdo send Thing?
gdi got my stupid addams family grotesqueries mixed up.
It’s paint, not fabric.
I’m sure it’s completely irrelevant to what you’re doing, but when I was fooling around with images I found if I saved a small image at a high resolution it could be enlarged cleanly.
LARPers?
Fancy dress ball?
“I told you that transporter was dangerous!”/Barclay
The change in graphic styles is cool if it could be made to behave.
I like how the AI still can’t manage hands, but it gets boobies right every time. Probably institutional sexism…
To be fair, it is a simpler shape.
Also, I could send you some nightmare fuel…
Well. not every time. But if you add a third boob it kinda just makes things more awesome.
+ Eccentrica Gallumbits
Damn it people. I just linked the superboob clip recently.
Did you see the pic on the main page?
It’s those eyebrows.
And the Severus Snape hair.
He has a ponytail.
First image: What is going on with her abdomen?
I think she may have come untucked.
The last image gives the villain hip-huggers with the associated whale-tail.
What’s that in English?
See how his belt is much lower than his waist? And then sprouting out from where his abdominal armor meets the top of his pants is his exposed thong underwear.
I’m not seeing it.
Perhaps it’s you.
Those are totally belt loops. It looks like the AI was using a fashion magazine cover from a certain time when they did the villain’s lower half.
More likely comic book art.
I see it now. Poor bastard has the mankini wedgie from hell…
I see it, but anyone who tucks there shirt into their panties is a weak bad guy.
I am more worried about the one with Gavin Newsome hair.
My theory is still that the AI thinks those two features go together regardless of that the actual situation is.
but it gets boobies right every time.
Too big.
Sue me.
Sure seems chilly in there.
Too big
*Q starts twitching*
If you average Brooks and Q, you get something just right.
Maybe they’re just not sized right for your frame.
Ghey.
Cartoonishly huge breasts, like cartoonishly huge asses, don’t jiggle my handle.
Taking advantage of my “between jobs” time, Im about to do a 4-wheel brake/rotor replacement on POS Envoy™.
Pray the rain stays away. I do have a garage, but it limits me on how much room I have on each side. So this is driveway mechanic time.
Good luck removing the rotors as you are in the salt belt.
Hopefully you have the two bonus holes in the rotor. Tighten a bolt into the hole and it pops the rotor right off. Why they don’t exist on all cars is a mystery to me.
Don’t forget to release the parking brake to get the rear rotors off.
I , uh, know a guy that beat the crap out of a Subaru rotor before noticing the parking brake shoe/drum setup inside.
You didn’t pay your brakes subscription? Those are unlicensed brakes!
Good luck.
https://www.phillyburbs.com/story/entertainment/2024/03/22/star-wars-movie-marathon-coming-to-theaters-skywalker-saga-lucasfilm/73067216007/
Sounds like torture.
Oh that sounds great, I’d love to watch 3 movies in one day.
I prefer to watch movies I like.
Someone wrote an article on attending the New York marvel movie marathon and it sounded just brutal to me.
I have fond memories of going to see the LoTR Extended Editions back to back on Trilogy Tuesday. We packed a cooler with sandwiches and left it in the car, went out between movies to eat some real food, and got to take home a collectable with single frames of film from the movies.
It’s nine in a row…
Or do you only recognize the original trilogy?
VHS or Laserdisc versions only.
Not really interested in seeing the other 6 again.
4-wheel brake/rotor replacement on POS Envoy™.
Are the calipers seized? that’s always fun. Especially when there’s a big wear ridge at the O D of the rotor.
Thank you UnCiv, while I don’t 100% understand all this it’s really fascinating. It’s interesting to see that contrary to popular opinion, AI is a lot more than just typing in a few words and then something magically pops out.
You’re welcome.
The next three get into inpainting* and outpainting**, which are more involved processes for the end user.
*changing something inside the image
**adding more image outside the image
If you are curious what the likely insurance limits are on the bridge and deaths in Baltimore.
https://www.igpandi.org/reinsurance/
Looks to be $2.1bn.
It’s going to cost more than that just to pay off the connected Baltimorians.
I believe the correct nomenclature is “Baltimorons”.
Out of curiosity, whose insurance? I am guessing that both Balmer and Maryland self insure.
My first thought was the shipping line.
That’s right.
Though the investigator might find the bridge to be at fault.
I don’t know why, but I was assuming a draw bridge wasn’t properly up.
I’ve been assuming a causeway…
But that’s just my biases.
It was a Truss Bridge
Lots of organizations which “self-insure” buy excess/umbrella policies. Self-insurance generally just means you have a big “retention” (effectively, a deductible) and get to run your own defense.
Nice write up UnCiv. Im delving into 3d modeling. Granted its a sword right now, but eventually want to get to characters.
I can make basic geometric shapes, but making good looking 3D models is outside my skillset.
Good luck. I hear practice helps. We’d love to hear updates on your progress.
Thank you UnCiv, while I don’t 100% understand all this it’s really fascinating. It’s interesting to see that contrary to popular opinion, AI is a lot more than just typing in a few words and then something magically pops out.
It’s not like Star Trek? You don’t just say, “Computer, I’d like an image of young Marilyn Monroe in slinky PJs”?
I haven’t tried – but I also have a policy against trying to make images of real people (alive or dead)
How about Steamboat Willie Mickey?
It failed to catch the art style… And gave him too many fingers
Iron Chef Mickey!
The prompt used was
Take a second look at the image – there’s a rowboat floating on that pot’s broth.
What the heck is up with wear on handguns? Doesn’t seem like normal holster wear.
https://nypost.com/2024/03/25/world-news/idf-uncover-weapons-cache-at-al-shifa-hospitals-mri-center/
Also good place for ferrous items – in an MRI! Obviously not working.
I think a lot of that is just the lighting. But those look to be old Norincos, probably third-hand…who knows what kind of life they lived before they ended up in a hospital in Gaza?
Hot off the Hate Crime Desk
The Utah women’s basketball team had to switch hotels after experiencing what head coach Lynne Roberts called “racial hate crimes” ahead of its first NCAA tournament game.
According to Roberts, the team was staying at a hotel in Coeur d’Alene, Idaho before a first-round game against South Dakota State in Spokane, Washington last week when the incidents occurred.
“We had several instances of some kind of racial hate crimes towards our program, and [it was] incredibly upsetting for all of us,” Roberts told reporters on Monday.
She added: “There is so much diversity on a college campus and so you’re just not exposed to that very often … Racism is real. It happens. It’s awful. So for our players, whether they are White, Black, green, whatever, no one knew how to handle it. It was really upsetting.”
——-
The details of the alleged racist incidents are unclear, but Gonzaga said that it is aware of “racially disparaging comments” to visiting players, adding: “Hate speech in any form is repugnant, shameful and must never be tolerated.
My initial assumption was that people were giving them shit about being too white, but another version of the story claims somebody was in a parking lot revving the motor of his pickup truck and using the dreaded “N-word”. No mention of confederate flags.
Fortunately, there were no fatalities, but we can only assume extensive grief counseling will be required.
“The details of the alleged racist incidents are unclear”
Funny how often that happens. You practically never hear what the actual incident was, just that it was horrible and bigoted and everybody is super upset.
Vinicius of Real Madrid is a major complainer about the racist hate he gets. Oddly, the racists seem to take no notice of Jude Bellingham, Aurelian Tchouameni or Antonio Rudiger, not to mention any of the black players on their own teams. Nope, only Vinicius draws racist hatred.
Biden says government will pay the full cost to replace collapsed Baltimore bridge and insists it was an accident
Thanks for the new bridge everyone.
Now I am convinced that it was no accident.
I would argue to not rebuild it at all, but no one would listen to that wild idea.
So, everyone who needs to get across the river should buy a schwimmwagon?
Or any of the other roads that do the same thing.
Not enough people can afford to buy roads.
“Baltimore has the best crack!”
-Hunter
I’m going to expect a hand written thank note.
Good to know that Biden is out there with the incident response team, keeping us apprised of the status of the ongoing investigation.
Buying votes. Again.
I doubt there’s many left to buy in Baltimore.
It just may take a while!
“This will be the first time the Starliner capsule flies into low-Earth orbit with humans aboard. NASA astronauts Butch Wilmore and Suni Williams are in the final stages of training for the so-called Crew Flight Test (CFT), a milestone running seven years behind the schedule Boeing said it could achieve when it won a $4.2 billion commercial crew contract from NASA a decade ago.”
https://arstechnica.com/space/2024/03/despite-turbulence-at-boeing-astronauts-are-ready-to-fly-companys-starliner/
Still trying to accomplish what SpaceX did years ago on a $2.6 billion contract.
I’ll give the astronauts credit. It must take real balls to go on a spaceflight in a Boeing product.
Elon Musk, Bond villain, KAOS agent, all around nogoodnik
“It is deeply concerning because it’s unregulated and headed by a private company,” Emma Shortis, a senior researcher in international and security affairs at the Australia Institute, told Bloomberg. “There’s no accountability on who has access to it and how it’s being used.”
First and foremost- Fuck you, Australian bootlicker.
Musk is obviously out there personally handing out Starlink terminals to the absolute worst of the worst, in an effort to destabilize democracy and the forces of righteousness. Soon we will all be his chattel property and slaves to his grandiose eviltude.
Is he bad enough?
I noticed.
excellent
Do they grow these Karens in a lab or something?
https://australiainstitute.org.au/expert/emma-shortis/
How exactly Elon is supposed to prevent Starlink terminals in the wild from being moved around, stolen, or resold, I have no idea.
I believe they broadcast their location either via GPS or via triangulation with the Starlink satellites themselves.
Likely. I guess StarLink could geofence certain countries and disable those terminals. I wonder if their ULA for the terminals gives them that right.
They geofence to my particular house for my residential plan, so I’m sure they could do the same for a national border.
There are a number of things going on here.
Starlink must specifically decide to cover a location by assigning the cell (about 15miles across hex grid element) for service.
By default they have just turned on every cell in the world, since the satellites have nothing else to do.
They are not allowed to sell terminals in countries that have not approved them for telecom service, but unless the country specifically requests complete blocking of signal (Nicaragua, China) Then the service is left on, and regular roaming service works. This is the loophole that the people are using.
As for the access in interesting places, like the border regions of Ukraine? I am sure that terminal locations in Donbas (GPS) are being fed to 5 eyes. Otherwise why would you provide network infrastructure to belligerents if listening to it didn’t provide more utility to your side.
The location fixing for residential vs roaming and maritime are cost tiers, and bandwidth allocation methods not technology limitations. Your home terminal will work anywhere in that 15 mile hex… it just won’t be scheduled in the neighboring hex unless you switch the location for service, or pay the mobile tier.
I was wondering how long this would take, though I was thinking he’d probably claim his family died in a bridge crash or something:
Biden claims to have taken the TRAIN over the Francis Scott Key bridge!
Says he has been over the bridge “many many times commuting from the state of Delaware either by train or by car.”
The bridge had only four lanes of traffic and no rail lines.
My WAG is that in his usual confused state he is mixing it up with the portal bridge boondoggle.
https://www.amtrak.com/portal-north-bridge
Thats the thing when you are told you must hit talking points and you aren’t in the most coherent state of mind.
He did say either by train or by car, so technically he’s correct.
“Mostly True”
– PolitiFact
Nah new tactic is to actually fact check the reports on what he said, rather than what he said.
“Biden claims to have taken a train on the FSK bridge, claims [insert media outlet]” – PANTS ON FIRE!!!, Biden was referring to a separate bridge (for no reason at all) and in fashion during a tragedy, right-wing media has pounced during the very time our nation needs unity -Poltifact
We can do a Glibs betting pool!
The bridge originally cost $1.2B (in current dollars, including cost overrruns) and took 5 years to build (if Wikipedia isn’t totally full of shit).
How long and how much for a replacement?
Imma go with 11 years and $4B
15 and $10B
And in 2040 will request an additional $20B as the project is still stuck in diversity development stage to determine its racists nature.
Optimist!
“We gotta make this job last ’til retirement, kid”
Hypothetically, I do only have fifteen years until retirement.
We can’t rename it after a slave owner, so at least a few years to fight over that too.
I’ll go with “never” gets rebuilt because it’s get stuck in regulatory hell driven by environmental impact analysis.
That won’t stop them from spending billions and billions of dollars.
Eh, Sparrows Point is a big distribution center with Amazon. I’m sure they can get some palms greased.
Amazon will move shit by UAV before the bridge gets built.
Presuming you would hold the purse and we would all fade away cause it probably won’t be in our lifetimes and you walk away with sweet, sweet glibertarian monies? Im on to you slum..
You wound me, sir.
I would never stoop to such
penny-anteknavery.It’ll take five years and a billion just to appoint the diversity committee to oversee the formation of the committee to review the design of the application forms needed to submit bids.
Hold on, is that for a straight up replacement, or one that handles trains and cars?
I’ll be surprised if they can get the paperwork done in 5 years. Expect the sudden discovery of sacred Indian rights, endangered species, and who knows what other grievances and grifters.
Incredibly, I saw that the French have almost finished rebuilding Notre Dame Cathedral (in 5 years), and it looks like they did a good job of it.
Redheads for Yusuf?
definitely
Another reason to bring back those manufacturing jobs to the US. Wouldn’t have had a container ship laded with Chinese goods if Trump was president. All the newcomers would have good paying factory jobs, too.
/sarc
Had another interview today. It was my 12th at as many schools in the past year. It went well. They strongly recommended I get qualified as a substitute teacher as it is way easier to get hired that way, or so they said. The pay is the same, but no bennies. There are many long-term substitute roles. Not sure why I have to take a separate class to qualify as a sub since I’m already qualified and have been a regular teacher in this state. Whatever, I’ve abandoned hope of finding logic in bureaucracy. I just jump through the hoops as fast as I can and hope for the best. Hopefully soon there will be at least one less math or science class being taught by a coach who thinks the earth is flat. And yes, that was a real situation I encountered at the first Florida school I briefly taught at.
In the interview, I explained that my approach to motivating students is to say that there will always be jobs for people who are good at math, and they pay well. Furthermore, whatever anyone wants to do in life (military, college, GED, etc), at some point they will need to pass a standardized math test at some point.
And in other news, I emailed some stuff to Glenn Greenwald last night, and I did not need to restart my wifi gizmo until about 30 minutes ago. What a strange coincidence. Oh yeah, and an hour after I emailed Greenwald, some rando gal from Jacksonville that I don’t remember contacting texted me. Whatever, if they continue to irritate me, I will be more than happy to draw more unwanted attention to them, them being certain government agencies. Mess with the bull, get the horns. It’s been three years since I figured out those morons were spying on me.
Huh, another coincidence. The office of my congress critter just called. The guy helping me with my discharge upgrade said I need to resend a form in PDF format. God, this is tiresome. Whatever. There’s always another form to fill out and another hoop to jump through.
Govt, duh!
If only there was some recent president who substantially reduced paperwork…
***
Trump Administration Puts Patients Over Paperwork by Reducing Healthcare Administrative Costs
Finalized policy projected to save approximately $8 billion over 10 years, increases access to life-saving organ transplants
***
https://www.cms.gov/newsroom/press-releases/trump-administration-puts-patients-over-paperwork-reducing-healthcare-administrative-costs
from NPR
***
Hari Sreenivasan:
During the campaign, President Trump pledged to eliminate two existing regulations for every new one. After his first year, he seems to be well past that mark.
There are dozens of regulations and rules once on the books that are now revoked, and there are hundreds of others that were set to take effect or were planned that are essentially frozen or withdrawn.
***
Most libertarian president since Coolidge.
I used to teach math at several Mathnasiums. Not a lot of hours or pay, but I found it to be interesting work, until I found something better.
There’s one near me, and I inquired within. They weren’t hiring at the time. I also applied to the one near where I used to live, but after the interview, I heard nothing more from them. Oh well, it was part time and only paid $17 an hour.
It’s interesting how it only took a few hours to complete the forms necessary to shove me into the insane asylum. Bureaucrats can move fast when they want to, which is almost never.
Normally, when leaving NSA, you have to watch a movie, pinky swear not to talk about fight club, and sign a bunch of forms. When I called them about that during my out-processing, they said they would take care of all the paperwork, no need for me to enter the building again. I guess they didn’t want me freaking out the normies.
Sorry to read last night about your Yossarian / Soviet dissident treatment at their hands.
Thanks. Unfortunately, the worst of it is still coming in future installments.
visual aid: https://www.youtube.com/watch?v=Kj6Mq5t8RQg
It turns that suicide intervention involves witch trial logic and being treated like a POW. Although Cartoon Network is the official channel of the insane asylum, so there’s that.
Oh yeah, and when I got released from suicide watch in the loony bin, I was prescribed extra strength sleeping pills (trazodone). You know, because they were so worried I was going to off myself.
¯\_(ツ)_/¯
I admit it’s nowhere near Evan territory, but it’s well in excess of the typical outrage porn story I see in the news most days.
https://www.msn.com/en-us/health/other/new-study-says-vitamin-b3-added-to-processed-foods-is-linked-to-an-increase-risk-for-heart-disease/ar-BB1iBVN4
Sure, blame the niacin and not the processed, carby junk.
cereal, flour, breads
There’s your trouble.
B vitamins are water-soluble, and the excess must be removed by the kidneys. Supposedly, it puts extra wear and tear on them. Fat soluble vitamins are the really dangerous ones. Excess vitamin D can cause dangerous levels of calcium. I forget what excess vitamin A does, but it is also bad for you.
Thats why you dont eat the polar bear’s liver.
You want to get pellagra, don’t you?
I’m assuming the road turns into ice. Still some people going mighty fast for conditions.
https://www.youtube.com/@TheOGTurn/shorts
Thought bubbles for first rendering:
“Is the alien growing in my abdomen showing?”
“Why is my left eye fucking huge?”
Cuchallain eye?
https://cafans.b-cdn.net/images/Category_1612/subcat_34487/Kendall,%20Dave%20-warp%20spasm%20Slaine.jpg
I’ve got some Slaine comics in a box somewhere.
Having been a little sour earlier today, this comment set has been refreshing. There was also this.
2 18mm bolts that hold the caliper bracket on wouldn’t budge with my impact (set @ 160 psi) and I broke a darling S&K 1/2″ ratchet using a cheater bar (3′ pipe)..
Today is just pads in the rear. Fuck the rotors. They’re not horrid anyhow.
Rain came in so Ill save the front for tomorrow. Sadly, even though it was minimal effort, I know Ill be sore in the morning.
Did ya at least spray them with some PB blaster or something?
For the home gamer maybe try mapp gas?
That’s an example where you want a real torch.
Kennedy has officially announced that female tech entrepreneur as his running mate. While I’m sure he’s got good reasons, IMO he’d be better off with someone that has name recognition. I think Tulsi would have been a great choice for him. (Although Tulsi is on Trump’s list, which makes perfect sense if you view Trump as 90’s democrat.)
She apparently was a big donor to his campaign.
And might be the SV equivalent of a starfucker.
Well, I see NBC has fired Ronna McDaniel. A rare example of “Can’t they both lose”, I think.
Although she will likely get a phat payout anyway, as I assume she had a contract.
Jen Psaki whistles all the way to the bank.
There was also this.
Skimming through, I stubbed my toe on this: Center for an Informed Public. Oddly enough, my immediate reaction is to assume the very last thing those people want is a legitimately informed public.
I’m sure they are completely sincere of wanting everyone to know goodfacts.
You’ll be informed exactly as we want you to be.
Although she will likely get a phat payout anyway, as I assume she had a contract.
In one of the articles I read, it was suggested that she should be kept on the payroll, but off the air, in order to protect the world from her badthink.
2 18mm bolts that hold the caliper bracket on wouldn’t budge with my impact (set @ 160 psi) and I broke a darling S&K 1/2″ ratchet using a cheater bar (3′ pipe)..
Heat and penetrating oil are your friends. Also a solid squarely aligned whack (or fifty) to the head of the stuck bolt can help.
Boy yes. Anything but applying excessive torque. By that point you may have compromised the fastener.
Do you need the special adapter tool? They rent them for free at the auto parts store.
My Nissan needed the tool, I was unaware there even was one as my previous vehicles did not.