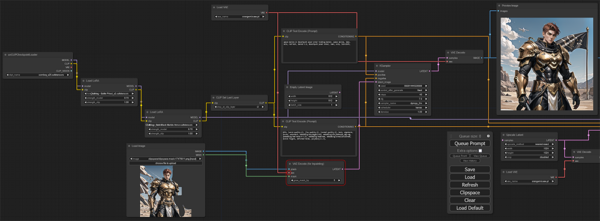
I’d wanted to cover this topic in the last article, but underestimated how much space was required just to talk about inpainting. This is a similar process, but on adding more detail outside the bounds of the original. As a reminder, the workspace left off set up for inpainting like so:
Just off that screen I have a second load image node that doesn’t have an inpainting mask. I could clear the mask from the existing node, but this other one is also already attached to some other nodes that I will need for outpainting, so we’ll just go with those. Here’s all the nodes we’ll eventually be dragging into this mess.
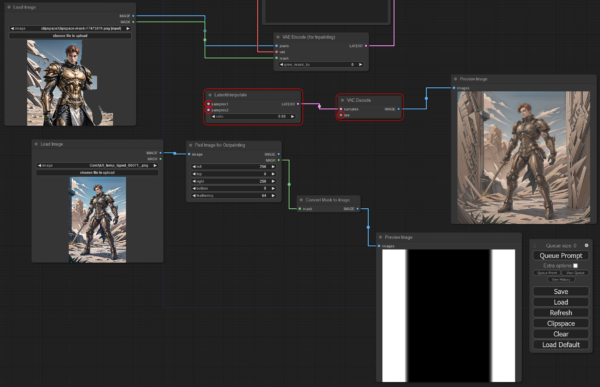
So, note that we’re not using the mask line from the loader. The mask will be generated by the next node in line – “Pad Image for Outpainting”. This node has four options – one for each edge, and “Feathering” The first four is just a value in pixels for how far we’re extending the image. Since we’re starting with 512 and going to 1024, we need another 512. I don’t need more sky, so I’m going a full 512 off the bottom and 256 off each side. Pad Image outputs an image and a mask. On the image, the extended regions are a flat gray, the mask is the padding region and a fade into the main image, ad determined by the value in the Feathering option. The images left in that workflow are from an earlier test where I only padded the sides. The preview image is of the mask generated, the two white bars being the masked region. The “Convert Mask to Image” node was added only so I could see what was happening under the covers, and does not impact he actual outpainting operation.
For reference, we’re starting from this image created back at the start of the previous article:
An Image and Mask sounds a lot like what we had from the Inpainting article. In fact, we are going to take over that VAE Encode node with the outputs from the Pad Image. This is still feeding the sampler. I want to change the prompt, because I care about trying to get the legs drawn in. So the positive prompt has been updated to “space marine in desertpunk power armor holding banner, space marine, 1man, solo, red hair, banner:1.5, desertpunk power armor, 1man, solo, loincloth, full body”.
Just letting it do its thing gives a result that’s… interesting.
As far as AI limbs go, those legs are not bad, except for the third one behind him. The background is also messed up. Changing the denoise value is worthless, because there’s nothing behind the mask to work with. There’s nothing obvious in the prompt, so lets grab a random seed and try again. After more than a few tweaks of seed and prompt, I started to realize the padding was simply too big. The original image was only a quarter of the total area, so the software wasn’t giving it enough weight as the source of the rest of the image. I decided to trim down the outpainting. 64 pixels a side, 128 on the bottom. With less freedom to operate, the output is better attached to the original. There’s some funkiness, but we can clean that up later on. I have some tricks up my sleeve.
Continuing with the incrementalism, we’re going to feed this output back into the load image node and add another layer of 64 and 128 pixels to the sides and bottom. Now we’ve got an image that’s 768×768, lets see if one more pass gets me something reasonable at 1024×1024…
It does not.
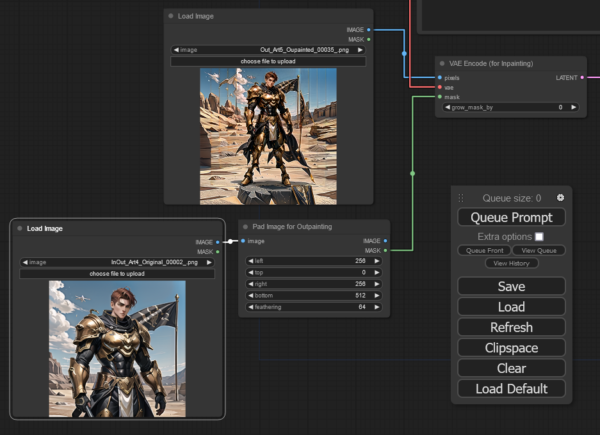
Time to go back to incrementalism. I see wonky legs, but the trick I referenced earlier might help. What is that trick? Resampling. But the last time we resampled we had a funky latent created by the upscaling node. That provided the noise to resample. Where are we going to get some noise? We already have a source in the inpainting mask, we just have to turn down the denoising. But the inpainting mask is currently set up to cover empty space. What I’m going to do is add a new load image node to pull in the output from that last iteration. I’ll then pull the image from the new load node and feed the vae encode, replacing the image out from the pad image node. I’m also going to switch the existing load node to go back to the original image and adjust the padding to the full 256/256/512. For this to work, we have to tune the denoise rating so that it has some respect for the original.
The adjustments to the workflow look like this:
Running it through the resampler with a 0.7 denoise cleaned up a lot of wonkiness.
But I do notice that the original image is getting pretty fuzzy at this point. We have to clean this up. We’re going to resample again. For this we don’t need the mask from the padding nodes, so we’ll disconnect that and replace the mask with the output from the top load node, switching to our most recent unwonky but fuzzy image. Now we’re going to pull in a node that was hiding in an earlier workflow. “Latent Interpolate” takes two latent inputs and outputs a merged latent at a ratio as defined in the node’s only option. I have this set to 0.5, and feed it the latent from the VAE encode. But it takes two latents. Well, we’re going to feed it a blank latent from the empty latent image node that’s been hanging around unused.
We could have masked the entire image on the load node, or created a solid white image that we converted to a mask, both of these are viable approaches. All of them do the same thing – it feeds a noisy latent into the sampler. As we want some of the original to be left, we have to tune down the denoise. After a few tests, I found 0.5 worked to maintain the banner and cleaned up a lot of the problems.
It’s not exactly the same as the original, since we introduced issues and then resampled. The resample changed details. It’s not a perfect outpainting, but it’s still very close. There may be a better way to do this, but I was still more successful than with the inpainting goal. You know what would help with that inpainting if only we could sketch something to guide the drawing… oh wait, we can.
Lets see if I can figure that one out. But we’re out of space for one article. And besides, that a revisit of inpainting.







Given the low engagement on the previous installment, I figure this series has run longer than the interest.
What is the ideal length of an article series?
Well, the afternoon links are up already, maybe a hint?
😭
I don’t even get my four hours?
gone
Looks that way.
My experience is three articles seems about right.
Also…
https://youtu.be/J8lRKCw2_Pk?si=tFDP8kKUIIAcARFW
This is a fascinating topic, but one that I will never have time to dive into. So, I’ve just been skimming through the articles.
The ideal length is just enough to get the job done. Which is a pretty useless answer I guess.
At any length. Thanks for writing them. I love seeing the minute differences in the images, even if I am never going to try to make them.
Same here.
Ayup.
The next series is already at 8 articles, and isn’t done.
Then there’s the series that is at 40 articles but they need a last little polish.
As for the image generation, there’s a lot of depth which I have not delved into, because it does have a learning curve that would eat up time I’d rather use for other things.
Same thoughts here.
However, I thank everyone that contributes. Having done them, even the simplest articles are a bit of work.
Getting the images together is more work for me than churning out the text.
Then again, I write out of compulsion.
“I didn’t have time to write a short letter, so I wrote a long one instead.”
― Mark Twain
I can write a ton of stuff in short order. Editing down to something digestible for someone to read on a lunch break is the challenging part.
This should help fix your shortage of Red Pens.
Quite helpful.
Mojo seems to be setting the bar.
I can’t write a doorstopper.
Agreed, you’re not even close. 🙂
No offense against Mojo, because a long-running serial gives us kind of an online magazine feel, and I really like that.
Well, when I get the cover art back from the artist, I’m going to release Prince of the North Tower on Amazon and serialize it on Glibs. Hopefully someone will buy a copy in the 40 weeks it takes to run its course here.
I’m looking forward to it. Heck, I may have to go re-read Beyond the Edge of the Map to get my head back in the world, but that’ll be fun.
Fun Fact, “Beyond the Edge of the Map” was the fastest I’ve written a book (one week), while “Prince of the North Tower” took me the longest (five years).
I’ve actually had the text of North Tower sitting around for a few years, because I wanted to follow up Edge of the Map with its direct sequel instead of a parallel story. “But On Unknown Shores” just isn’t moving. So I have commissioned the cover art, and will put out the finished work.
Correction – the working title of Dug’s next outing is On Unknown Shores The open quote is at the wrong spot.
Well, whatever new stuff you put out there, I’ll be reading it. I’ve enjoyed all your work so far.
I find this subject fascinating, but I find it to be over my head to the point where I’m not sure how to engage. My questions would be remedial to the point of being tedious.
I can only speak for myself, but my lack of engagement in most threads is because I’m at work when most of the conversation is happening. I make a point to try to read just about everything that is contributed to the site. I think it’s amazing that this community is able to exist because we have just enough people that are willing to regularly take their time to produce content.
I think we should all express our gratitude for it more often. It’s a big deal and a thankless job and you all deserve more credit.
I do it mostly for the conversation, since I never finish a thought that log verbally before people cut in.
I can at least finish a paragraph here.
Noon posts get fewer comments because east coasters stop fucking around and accomplish some work, and west coasters don’t comment.
/pours out some crepe batter for Jesse
It’s a complex subject. Can your AI illustrator save the characters and reproduce them at will, once you’re satisfied? Put them in different scenes and actions?
Not the tools I’m using, no.
It does not understand the concept of a person or a character.
It associates pixel elements to keywords and doesn’t understand what is actually in the image, as would be needed for that sort of work.
As I understand it that’s a limitation of the technology at this point. It can’t create a character, and then put that same character in 10 different situations. Is that correct?
Not easily.
I’ve thought of workarounds that require investing a lot of time and effort into creating something specific to that character and maybe inpainting them into a scene with characters created with other tailored models.
At that point, you may just want to hire a human…
So you can’t finalize your space marine and then portray him attacking an enemy outpost- bummer.
There do appear to be some other tools which can do something along those lines, just not the free one I run locally.
I suppose you could go to the effort to train a LoRA to produce just a specific design – but then you’re investing a lot of work in that one character.
And now we know why Walt Disney had an army of art-gnomes in the back room.
Because trying to build a large language model with 1920s tech was nigh impossible?
William Wellman couldn’t use CGI for Wings since it didn’t exist. He was going to use stop-motion, but discovered it was murder on the pilots.
Saw that. Right there.
Even in today’s Pixar movies, there are tons of people specializing in things like hair, water, other textures, and lighting.
Each of those things in and of themselves is a nightmare to simulate accurately. And just imagine the interactions between them.
A lion walks through a waterfall into and out of a cave – how many ways can you mess up long hair, short fur, water, light, and rock texture, both wet and dry?
Because machinima tools hadn’t been invented yet?
https://vimeo.com/5241163
There do appear to be some other tools which can do something along those lines, just not the free one I run locally.
As you say, baby steps. There’s no reason you can’t upgrade as you get more proficient.
I assume this tech will progress rapidly, but as of right now, I’m not too worried about being replaced as a visual artist. You can just tell me the legs are too long and I can employ an eraser and redraw. As we talked about last week, there’s a more direct route between two people without translating that into machine code, and that’s more efficient. For now.
“… there’s a more direct route between two people without translating that into machine code, and that’s more efficient. For now.”
That also applies things like asking a question of a human being at a business instead of fiddling with their not-quite-comprehensive app or web page to resolve an issue.
Those are the worst. Just let me talk to a human. If it was ready enough for a robot I could do it myself…
At that point, you may just want to hire a human…
In a somewhat parallel line of thought, I saw something not long ago in which a guy said people are going back to highly skilled humans who can turn the knobs and understand the process for prototype machining. Trying to program a CNC for a one-off test part is more time and trouble than it’s worth. They can go back and reverse engineer a program later if need be.
What? You can’t automatically generate gcode from a CAD file and have it work out of the box?
I’m shocked.
/not shocked.
My friend draws parts in Fusion (CAD), runs the model through a tool path program and then takes the g-code to the CNC mill. He can make one-off parts on the CNC as fast as using a manual mill.
UCS has a thing for guys in codpieces.
Any normal man uses AI to create deep fake Firsts. It isn’t as good as the real thing, of course, but it satiates them between real Firsts.
Thank you for another thoughtful contribution to the ongoing discussion.
He’s a lexicoprophiliac who gets off on shitting on other people’s articles.
No insult or shitting upon was intended.
Part of the reason there is low engagement around here is that people feel compelled to say nothing or stay rigidly on topic at all times.
What are you talking about? I’ve never seen a thread rigidly stay on topic. Not once.
After the first hour, no one’s talking about the content brought up in the article.
Two Stoic Fridays ago we stayed on topic. But that was a special case.
I have a ring where I push a button and it’s just Kinnath bitching about how awesome I am and he isn’t.
This place wouldn’t be the same without you.
To be fair, Bro made us all think what an asshole he is.
It’s a wonder why articles are mostly dead-zones in between link articles. A real mystery.
You’re free to contribute yourself and show us all how much better you’d do.
****Begins holding breath****
My statement isn’t an attack on anyone submitting articles. The fact that it gets read as an attack is part of the problem.
Read that comment back and think really hard about why people might interpret that as an attack. Ask yourself if it’s the speaker or the interpreters.
Here’s a First you could try. Self-reflection.
Because they are bitches? I already knew that.
People can make whatever excuses they want about time zones all they want. When people don’t feel they can comment freely, discussion naturally dies off.
People can comment freely.
People can also get called out on their assholery freely.
The Bro went off topic. There were a hundred posts that flooded in after that point.
You’re welcome.
https://www.engadget.com/the-fallout-tv-series-is-coming-to-prime-video-one-day-earlier-than-expected-140928124.html
Drops tomorrow.
Rumor is that Amazon already knows they have a bomb on their hands.
Don’t harsh my buzz.
If you’re getting excited for something from the studio that brought you Rings of Power, you have only yourself to blame.
I suppose it could end up being a pleasant surprise like Reacher too. The glib in me says to start at maximum cynicism so you have no where to go but up.
Bosch, The Tick, The Expanse…
To be fair, the later seasons of Bosch descended into wokery.
The season focusing on his daughter was fun, but still a bit didactic.
I’m apprehensive, because the show runner did West World, which I barely made it through 1 episode of, and is the brother of the guy who made a Scottish Bane fight a Batman with COPD.
😕
I only watched season one of Westworld because I had no investment in the synths as characters, and the arc of the humans looked completely wrapped up.
I was more invested in offering technical solutions to their IT troubles – which would have solved the malfunctioning Synths by the end of Episode 1.
Season one was great. Then it became Fembots Fight the Patriarchy. 🤮
The idea of AI becoming self aware and coming to grips with their enslavement and existence along side humans that see them as outlets for their worst desires is interesting without being turned into Modern Day Politics for a Modern Audience.
Also, Anthony Hopkins was a boss.
Season one was great.
Season 2 couldn’t pull off reusing the trick from the first season (unlike Mr. Robot).
I kept running into a case of “I don’t care what happens to these characters” when it came to the synths.
And I’ve noticed that when you have a scene with an old school actor and a no name newcomer, the newcomer gets absolutely crushed and all the weaknesses in their skills become aparent.
Sometimes I feel sorry for them, such as during the warhammer animation “The Exodite” where the poor cardboard girl had to share a scene with Clancy Brown. Or when Stallone had an early guest spot on Kojak. Neither stood a chance.
None of the secondary cast in Westworld evoked similar sympathies.
To be fair, why would you care about the synths? Only one of them had any personality.
I’ve seen many things I’m a fan of get butchered in adaptations. I find it easier to be prepared to be disappointed beforehand rather than get my hopes up.
A bomb? I thought it was getting glowing reviews.
Related: I started a fresh FO4 on my Steam deck. A wounding pipe rifle dropped early for me. That damn thing shreds everything!
I’ve been thinking of playing again. But my game is so heavily modded that it’s a pain in the ass any time something gets updated.
On my game on the PS4 I never even completed the main quest and am like level 212. I have brought back a thriving Commonwealth with great settlements. 🙂
Hrmm…
“Wounding” adds a bleed effect?
After a while I keep a full auto pipe rifle just to spray any pray anti-ghoul work since I have so much ammo it’s basically currency at that point.
Sometimes I try anything other than a stealth sniper, but I end up in that playstyle out of reflex.
The effect stacks and bypasses any resistances. High rate of fire melts anything, including robots.
That’s just broken…
Is this coded dirty talk?
I totally railed that Mirelurk Queen.
With your “wounding pipe rifle”?
You sick bastard.
Huh… I can’t imagine trying to play it on a Deck when I have a PC in the other room. The stick layout just doesn’t appeal to me… did you play it mainly with the controller before, out of curiosity?
(And I’m replaying New Vegas at the moment as a “straight up” run for a change [typically since I beat the game back in the day I indulge in a little console commands character editing right off… .50 Anti-material rifle with explosive bullets is just too fun not to have most runs….)
So convenient and comfy to play on the couch with the deck. And my PC is like 12 years old. LOL.
Yup. PS4.
LOTRO has stopped working, right when WoW has reached out to me.
God help me.
Peak Florida Man can never be reached. This is one man’s attempt.
https://arstechnica.com/security/2024/04/how-to-hack-the-jacksonville-jaguars-jumbotron-and-end-up-in-jail-for-220-years/
Looks like a disguntled outgoing former employee.
Who isn’t the most upstanding of citizens to begin with.
You’d think he’d try to stay “under the radar” given his life choices.
Why didn’t somebody think of this sooner?
The Biden administration will require more than 200 chemical plants to cut their emissions of toxic chemicals as part of a broader effort to reduce cancer cases.
The Environmental Protection Agency (EPA) finalized rules Tuesday that it said would dramatically reduce the number of people facing elevated cancer risks because of their exposure to air pollution.
The number of people who have elevated cancer risks because they live within 6 miles of a chemical plant would drop by 96 percent, the EPA said. Cancer cases within about 31 miles of facilities that release toxic pollution into the air are expected to fall by about 60 percent under the rule.
That’s because the new regulations on 218 chemical plants are expected to cause them to reduce their releases of toxic pollution by more than 6,200 tons per year.
Chemical plant emissions have been heretofore completely unregulated. Only Joe Biden cares about us and wants us to be safe.
Future headline from Salon, Vox or The Atlantic: “What Happened to All the American Chemical Plants”
Spoiler: 5,000 words without a single correct answer.
Hey, their model says it will work. If it doesn’t work that just means those greedy kkapitalists are flaunting the law!
My model says that their models are never correct.
My model says that their models are never correct.
My model says that their models are never correct.
So the system moderated my comment and multipled yours?
The Glib AI has already started selecting favorites. I am the chosen one.
God of the Squirrels seems a bit like the C-3PO/Ewok relationship.
You would say that, common Ewok! Bow before my shiny golden, effeminate, heavily grating glory.
Can they just get it over with, declare climate a national emergency and reclaim their COVID powers for full lockdown. If no one can go anywhere or do anything, emissions will be down!
Then once they’ve reduced enough of us carbon units they can let China build their robot slaves.
Author, Rachel Frazin. In her own words: “I cover energy and environment policy for The Hill: that’s everything from climate change to gasoline prices to toxic chemicals to renewable and fossil energy. I have been covering the environment and energy for four years and also spent nearly a year on The Hill’s breaking news team.
In addition to my work here, I am currently co-writing a book about PFAS, a toxic and pervasive class of “forever chemicals.”
I’m originally from South Florida. I studied journalism and political science at (the very cold) Northwestern University.
Wow. No education or background in science (Political Science is not science). No background or education in economics. There is so much begging the question going on here I seriously doubt she has any critical thinking skills.
“The number of people who have elevated cancer risks because they live within 6 miles of a chemical plant would drop by 96 percent, the EPA said. Cancer cases within about 31 miles of facilities that release toxic pollution into the air are expected to fall by about 60 percent under the rule.”
‘People who have elevated risk’ and ‘cancer cases’ are two very different measures. Projected drops mean jack-shit. Those distances are arbitrary…Piearesquared says the area of a circle increases exponentially thus the density of any radiating stuff (light, shock waves, water sprinkler water, concentration of FOREVER CHEMICALS, etc) diminishes at the same rate. Why 6 miles? 31 miles? It all looks like gibberish to me.
I am sure that to Rachel this jumble of mysterious magical symbols and language is very impressive. I dont blame her. This is an indictment of the education she received. How the mighty have fallen.
Of course, in the end this is all by design. The frontal assault on the enlightenment continues. Everything that removes modern life from Heinlein’s natural state must be crushed.
I cover energy and environment policy for The Hill: that’s everything from climate change to gasoline prices to toxic chemicals to renewable and fossil energy.
Everything I know about the cesspool comes from swimming in the cesspool. There are no other relevant points of view regarding the cesspool.
Peter Higgs, physicist who theorised Higgs boson, dies aged 94
He will be massed.
https://news.yahoo.com/peter-higgs-physicist-theorised-higgs-164814905.html
Boooo!
He charmed the world with his theory and now he’s gone. Very strange.
Another victim of climate change
A Long Island doctor who was headed to upstate New York to see the solar eclipse with her family fell out of a moving trailer on a highway and died, authorities said.
Dr. Monika Woroniecka, 58, a pediatrician at Stony Brook Children’s Hospital who specialized in immunology, was riding in the 2024 Airstream trailer along with members of her family on Saturday for the last 20 minutes of their trip to see the eclipse, the New York State Police said in a news release. Woroniecka’s husband, Robert Woroniecki, was driving the pickup truck that was hauling the trailer.
The wind blew the trailer’s door open as the family was headed west on Route 12E in the town of Brownville and Woroniecka was thrown from the trailer, police said.
The wind blew the door open and she was sucked out. Okay.
Sounds legit.
I hope they hid the box of wine.
Or her family was sick of her shit and gave the wind some assistance.
Couldn’t afford a helicopter.
The door wasn’t properly latched. It blew open. She stupidly tried to close it while the trailer was moving.
my best guess given that description.
That was my first thought, but I decided the more salacious foul play angle would play better.
Sounds plausible, likely tipsy too-reached for the handle, trailer swayed, and right on out she went.
Certainly a Darwin award candidate.
It’s an attached trailer that she is riding unsecured inside. The door opens on the highway and she tried to shut it. In the process for whatever reason she was ejected.
“specialized in immunology”
Obviously killed by Pfizer or the Clinton’s.
At least it wasn’t the ATF this time.
A likely story.
It is against state law to ride in a “house coach trailer” such as the family’s Airstream while it is hitched to a vehicle traveling on the road.
Huh. The state was saved the expense of prosecuting her.
The party of science!
https://notthebee.com/article/i-wish-i-was-half-as-confident-as-sheila-jackson-lee-is-when-she-says-going-to-the-moon-is-possible-because-its-made-mostly-of-gases
Rep. Sheila Jackson Lee: It’s “almost impossible to go near the sun,” but the “moon is more manageable” because it’s “made up mostly of gases”
There was something about Kamala saying that women’s NCAA couldn’t use brackets until 2022.
Do you know — OK, a bit of a history lesson — do you know that the women’s teams were not allowed to have brackets until 2022?” Harris said in an interview with Spectrum News in North Carolina at a clean energy event. “Think about that, and talk about progress, ya know, better late than never but progress.
“We love March Madness, and even just now allowing the women to have brackets and what that does to encourage people to talk more about the women’s teams, to watch them, now they’re being covered. This is the reality. People used to say, ‘Women’s sports, who’s interested?’ Well if you can’t see it, you won’t be. But when you see it, you realize, ‘Oh, we’re talking about star athletes who are incredibly gifted … It’s nice we are finally giving women in sports that kind of platform. I find it so exciting.’”
… I suppose I give humanity too much credit because I get surprised at how dumb people get.
Sounds like a very finicky process.
It seems like the best approach is let AI do most of the work, then have a human artist clean up the resulting image. This sort of thing shows up a lot in manufacturing and is part of the vaunted Toyota Production System.
***
Autonomation describes a feature of machine design to effect the principle of jidoka (自働化)(じどうか jidouka), used in the Toyota Production System (TPS) and lean manufacturing. It may be described as “intelligent automation” or “automation with a human touch”.[1] This type of automation implements some supervisory functions rather than production functions. At Toyota, this usually means that if an abnormal situation arises, the machine stops and the worker will stop the production line. It is a quality control process that applies the following four principles:[2]
Detect the abnormality.
Stop.
Fix or correct the immediate condition.
Investigate the root cause and install a countermeasure.
Autonomation aims a) to prevent the production of defective products, b) to eliminate the need for speculative (over)production of defect-replacements, c) to focus attention on understanding the problems, and d) to ensure the problems do not recur.
…
Shigeo Shingo calls autonomation “pre-automation”.[3] It separates workers from machines through mechanisms that detect production abnormalities (many machines in Toyota have these). He says there are twenty-three stages between purely manual and fully automated work. To be fully automated machines must be able to detect and correct their own operating problems which is currently not cost-effective. However, ninety percent of the benefits of full automation can be gained by Autonomation.
***
I guess I did learn a few things from all those years working in factories.
Arizona Supreme Court rules state must adhere to century-old law banning nearly all abortions
In a historic decision Tuesday, the Arizona Supreme Court ruled the state must adhere to a 123-year-old law barring all abortions except in cases when “it is necessary to save” a pregnant person’s life.
The law, which can be traced to as early as 1864 and was codified in 1901, also carried a prison sentence of two to five years for abortion providers. There is a 14-day stay on the law.
Arizona’s near-total abortion ban will be one of the strictest in the nation, placing it alongside Texas, Alabama and Mississippi, where there are abortion bans in place with almost no exceptions.
In its decision, the court said, “Physicians are now on notice that all abortions, except those necessary to save a woman’s life, are illegal,” adding criminal sanctions may now apply for abortions performed after 15 weeks of pregnancy.
Love Is Blue
Well, they never repealed it, so it is still the law.
Correct.
Many states had laws on the books that Roe “invalidated”. In most cases, the states did not repeal the laws. So, when SCOTUS rejected Roe, all those laws became valid again.
This is probably the first of many cases like this.
I just looked at my ’69 Airstream. The hinge is on the trailing edge of the door (suicide door style), so if it comes open, the wind will slam it open and pin it back against the side of the trailer. Why would you do that, instead of putting the hinge on the leading edge, so the wind will hold the door nearly closed (something something differential pressure)?
yeah.
Any attempt to close that door will be totally unsuccessful. Just reaching out to the door knob will put your body out into the airflow. I can fly!
It’s in the name!
The door wasn’t properly latched. It blew open. She stupidly tried to close it while the trailer was moving.
*nods*
Pick up your cell phone. Call the driver. Pull over and fix the issue.
To be fair, she won’t make that mistake again.
To answer a question posed in the AM links:
***
There are special blessings that we make whenever we witness particularly wondrous natural phenomena. Eclipses, however, are not listed among the wonders for which we make a blessing.
The Talmud tells us that a solar eclipse is a bad omen for the entire world, which runs according to the solar calendar, and a lunar eclipse is considered a bad sign for the Jewish nation, who calculate the duration of months according to the cycles of the moon.1 Thus the Lubavitcher Rebbe, of righteous memory, points out that eclipses should be opportunities to increase in prayer and introspection—as opposed to prompting joyous blessings.2 In fact, there are those who have the custom to fast after seeing a lunar eclipse, because it is a sign that we really could and should be doing better.
***
https://www.chabad.org/library/article_cdo/aid/1394441/jewish/A-Blessing-for-a-Lunar-or-Solar-Eclipse.htm
Meh. Just throw a politician into the volcano and get on with life.
Any attempt to close that door will be totally unsuccessful.
Exactly. The harder you pull, the harder it pulls back, as you bring it into the airflow. It’s 2024. Why didn’t she call her husband on the phone and ask him to pull over?
“I’m a doctor, not an engineer”
“I’m a doctor, not a
n engineerflying squirrel”“That trick never works!”
::finally gets this week’s payroll approved:: I’m still a bit mystified by the AI’s apparent difficulty with legs (maybe limbs in general?) It was doing so well (except for that extra one, of course,) and then our hero seems to have had a horrible, disfiguring injury.
In other AI news, the financial institution I work for has launched an AI phone teller/member service rep. I haven’t worked up the nerve to call her. The temptation to “mess with her head” might be too great.
“Suthenboy, keep your opinions to yourself.”
Wife just complained. She is watching some show…I dont know what. I said that these imaginary worlds always seem to be populated by ridiculously attractive people with a perfect mix of ideal diversity all in the prime of their lives. It has such a creepy ‘Logan’s Run’ feel to it for me. Yeah, modern ideas about eugenics are really just ancient ideas. All groups/tribes/culture have some way of removing the weak or undesirables from outright murder to coming of age rituals to rites of passage to initiation tests.
Funny to me how the results always look like the leader’s/authors/casting director’s idea of PILF’s. I wonder if they themselves are aware of that.