It was decision time for my truck. The paint started peeling on the doors and hood. Those parts now matched the roof, so I had that going for me, which is nice.

Crappy paint
Roof was bad when I got her
Knowing this was coming, I had been saving money. Took the truck to get an estimate and the quote was $8,000. Now I had to decide to paint it or trade in for a newer one.
Pros for keeping her:
2nd gen body looks the best for Dodge trucks (other makes were not considered)
Diesel+long bed+manual transmission is really hard to find
I’ve done a lot of work on her and know the history
She runs and rides perfectly
Newer truck would be a bit of a gamble
Cons for keeping her:
$8,000 is a lot of money to dump into a 20 year old truck
20 year old truck with 350,000 miles=potential for more problems later
Newer truck would be more reliable
my truck + $8,000 should get a real nice upgrade
$8,000 is a lot of money to dump into a 20 year old truck
It might not have been 100% logical, but I decided to get her painted. Dropped her off March 21 2021. I was nervous. Told my wife the last time I remember being nervous about anything was when she had gallstone surgery. She told me she calls my truck “the other wife” for a reason.
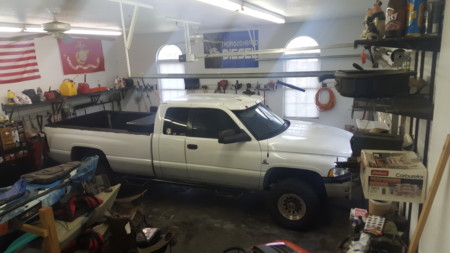
It took them four and a half weeks, picked her up on April 15 2021. She looked GOOD! I honestly wasn’t sure what color the silver bottom was because when I bought it, that paint was already destroyed and was three different shades of silver in splotches.
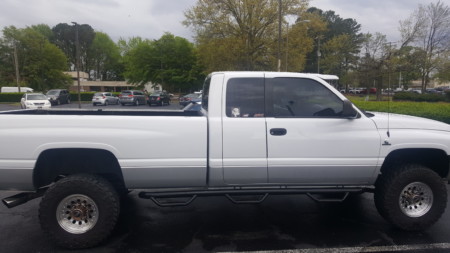
Gorgeous!

I had pulled the grill, it was cracked with bubbling chrome.
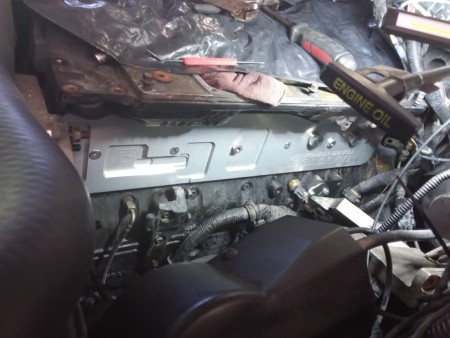
Drove home and put her in the garage. I had a few “minor” projects planned:
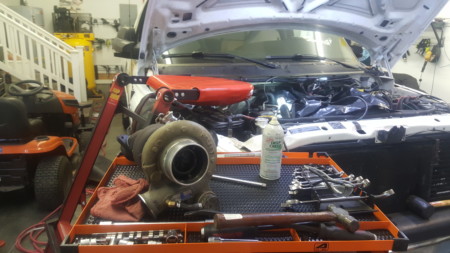
Looks like a 20 year old turbo
Rebuild the turbo, it had oil leaking past the seals. I also wanted to replace the exhaust manifold.
Hardest part of this was actually removing the turbo from the engine, I did it in two steps. First the turbo and then remove the exhaust manifold from the engine. I got the rebuild parts from Turbo Labs of America and followed their YouTube instructions. Took my time and everything went back together like it should. I also put a new waste gate on, sometimes the old one felt like it was staying open and not spooling up the turbo properly. The new exhaust came from Power Driven Diesel(PDD), it is a three piece and flows better than stock.
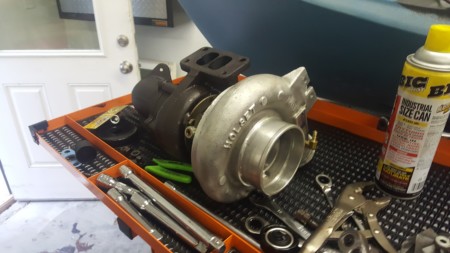
Purty
Replace the inter cooler boots, I had a boost leak.
This was pretty straight forward also, except I didn’t take good pictures of the line routing, so I had to do a little trial and error and while I had them off, I wanted to put a better flowing intake elbow on.
Replace the tappet cover, it had a pretty substantial oil leak.
This is pretty involved, you have to remove all the hard fuel lines, they come out in two bundles and then you have to pull the VP44 injection pump. To do this rotate the engine until the keyway is pointing straight up so it doesn’t fall out. Then push it out of the gear with a puller and remove. After that the tappet cover is accessible for remove and replace. I went with a billet one from PDD because the stock one is very thin and I have heard of way too many people redoing it because the stock one won’t seal anymore after removal.
New Tappet cover
Reseal the vacuum pump, it also had a leak. (notice a theme?)
I used a suction pump to empty the power steering reservoir(it’s attached to the vacuum pump), then unhook all the power steering hoses. There is one bolt holding it to a bracket on the frame and two bolts going into the timing cover. While the intake elbow is off, it fits right up past the engine. Then tear down and rebuild is pretty simple. Thoroughbred Diesel has a good tutorial on YouTube.
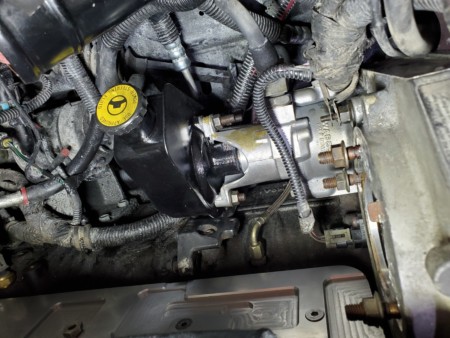
Vacuum Pump and Power Steering
Put in stronger headbolts to support future horse power upgrades.
I bought PDD headbolts that are supposed to be able to support 500hp.
First you have to remove all of the rockers from the valves. They need to be put back into the same place they came from so I laid a garbage bag on the floor and laid them out in order. Then I started replacing the bolts. There are 26 of them and there is a pattern to follow. It starts in the middle and works its way out from front to back. Remove a bolt , clean the hole with brake cleaner and compressed air. Get the new bolt ready with ARP lube on the threads and washer, then thread it in and torque it down to 125 ft-lbs. Everything was going fine until I got to the 10th one.
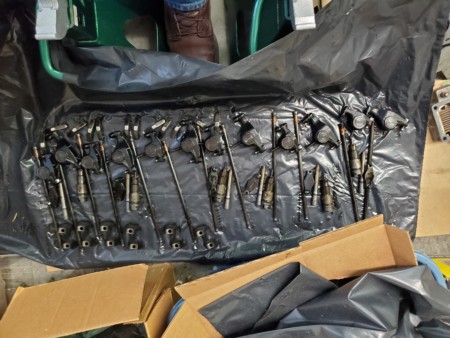
Parts collection
I was getting close to 125 when I heard a loud CRACK! Then the bolt would tighten and spin loose. I tried another bolt and got the same result. This was on a Saturday evening so I had to wait for Monday to call customer service. When I talked to their engine builder, he said “That’s rare, but it happens”. He told me a HeliCoil would fix it, but to do that I would have to pull the head.
I had never pulled the head on a vehicle before, that sounded scary. I read a few write ups on forums and watched a few YouTube videos. I also read the FSM (Factory Service Manual). Nothing looked beyond my abilities, so I decided to go for it.
Part III will cover the head removal and everything it took to get her back on the road.
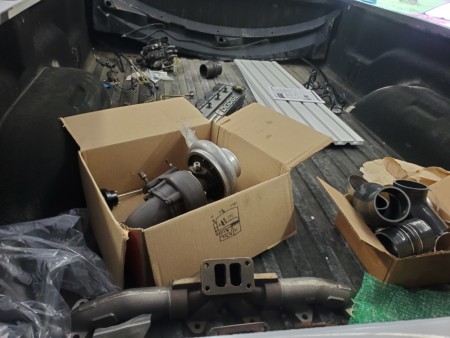
More parts in the bed than under the hood
I was expecting you to paint it yourself.
I suppose setting that up safely would cost more than $8k.
It would have been cheaper, but I am not a painter and really wanted it to look nice.
Krylon, and plenty of it. It’ll look great. Trust me.
I once saw a 1960s jeep for sale that had been painted red with a paint brush. I wish I had bought it.
A buddy of mine in Bible college bought a gallon of Rustoleum shiny black paint and re-painted his shitty 70s rice-burner one warm Friday afternoon in late April. It was hilarious, and as the saying goes, “Far from good, but good from afar.”
If you remember from part I, I could barely make a valve cover look decent.
$8000? Wow.
What did you do with the box? From the one pic I think, maybe, I see spray in bedliner?
It has a bad spray on bed liner.
I am going to Raptor line it next year.
I put a BedRug in mine.
I don’t haul dirt or rocks, so it’s been great. Keeps gear from sliding and banging around. Great for furniture, etc.
Suuuure. That’s like the pickup version of shag rug in the van. Hey baby, come check out my truck bed.
If the pickup’s a rockin’…
Does that trap water at all?
Seems not to. Dries fast, too. I have a tonneau, so that helps.
The paint turned out great!
And $8K is sales tax on a new one. Looking forward to the next installment!
It used to look better in pictures than in person.
Now it looks so much better in person, the camera can’t really show it.
I can’t even get a paint quote on my 96 Suburban. Nobody wants to do it unless it’s an insurance job or a show car.
I had to call many places to get 2 willing to give me an estimate.
The other place quoted $11,000, I don’t think they really wanted to do it.
Did it include body work, or was that straight up prep & paint?
Minor dents and dings, no rust or major damage.
The paint was in such bad shape, they took it all the way down to bare metal.
I believe you can still get a Maaco job for under $1K, and can make it look really good if you do your own prep work.
But that is where all the labor costs are.
It’s single coat enamel, so it won’t last near as long as a proper multi-stage.
I got a lifetime warranty on this paint.
Also, I’ve had friends go to Maaco, they’re good enough for my Saab, if I repaint that thing, but not good enough for the truck.
“$8K is sales tax on a new one. ”
Reading that made me physically ill.
The best is when you snap a head bolt AFTER you’ve already pulled the heads and reinstalled.
I went with studs when I put it back together.
There was nothing wrong with the headbolts, but I was scared it would happen to me again.
Wow.
I like to think of myself as moderately mechanical (I’ve replaced clutches, brake disks, rebuilt a power steering pump, etc.,) but this is way beyond my ken. Certainly interesting, though.
It’s not too bad until you get to the modern diesels with EGR valves and all of the other assorted emissions bullshit. The older ones are all fairly similar in design.
This one has no emission controls, and a Cummins is much simpler than a Duramax or a Powerstroke.
modern diesels with EGR valves
Bypass and tune. Reminds me I need to get that done on the wife’s Jetta.
For those of us who are not gearheads – what is an EGR valve, and what effect does it have?
It’s an emission reduction thing, I think.
Holy crap, I went to see if I could find where it ports back into the engine of my Accord. I couldn’t make heads or tails of all the crap going on under there. I’m sad.
Exhaust Gas Return, it sends unburnt fuel back into the chamber to get burnt with fresh fuel.
These can clog and cause problems when there is nothing wrong with the engine.
These can clog and cause problems when there is nothing wrong with the engine.
Yes sir. My Escort had that issue. Easy fix though.
Thank you, sir.
More
https://www.myturbodiesel.com/d2/1000q/egr-system-clogging-TDI.htm
Not just unburnt fuel, but dumping exhaust gas into your intake manifold and dirtying it up.
Roughly speaking, they’re a disaster.
My diesel trucks have all been “deleted” and retuned.
Thanks EPA!
Exhaust Gas Recirculation.
It pulls in some burnt up air back thru your engine during partial throttle (lean condition) in order to cause the engine to run closer to ‘stoichiometric’ which means cleaner emissions.
Important for reducing ozone, more than particulates.
So $8K is about a year’s worth of payments or maybe even fewer, on a new truck?
Last time I looked at new F-150 the numbers were getting pretty big, a 2K repair job didn’t sound so scary. My ’99 rusted out but only a 100K miles, ran like a top. It went to Fairbanks, AK to live a year ago with no problems.
Dodge quit making a diesel with a manual transmission in 2014, so if I got a new one, it wouldn’t be newer than that.
It’s almost impossible to find a 4X4 long bed diesel with a manual transmission anymore.
It’s almost impossible to find any pick-up with a manual nowadays.
Like Grumman’s wood-working, this is fascinating reading that inspires me to continue to pay someone who knows what the hell they are doing to do these things for me.
I don’t think my wife would let me spend the money to have someone else do this.
The parts themselves are pretty steep.
*looks at $400 water pump sitting in a box waiting to be installed. Oh, and the $75 vacuum coolant refill kit that is all but mandatory these days*
*Stares at heavy duty trailer hitch gathering spider webs in garage
Here’s the part that pisses me off. The water pump is working fine. It turns on when it needs to and off when it needs to. The engine temperature stays exactly where it should.
However, the microcontroller on the water pump is only intermittently connecting with the ECU, and so there’s a code that keeps popping. I’d gladly drive around with that code for years since I know it’s not impacting the actual operation of the car, but I can’t pass inspection with it throwing a code like that. A car that is 5 years older won’t even have a chip in the water pump to cause this failure, but this one does, and it must be replaced by June or else.
Can you replace it with a chipless pump?
Do you have a code reader? Easy enough to clear nuisance codes.
I was wondering at the $400 pump.
Technology is great in a lot of ways, but things like that suck.
The water pump on my FiL’s Chrysler New Yorker? $17. Putting it in? $300; ten years ago.
You had to drop the engine to get to it and remove every other accessory.
You must have a massive vacuum cleaner if it needs to be liquid cooled.
Whoopsie.
Own. Goal.
From the replies. There are a lot of people out there begging for authoritarianism.
“You’ll know the disinformation because it will sound like the excrement spewing forth from the legacy media outlets”
Or:
“The horror! You’ll have to think critically about what you’re being told!”
So how will people distinguish misinformation if it’s given the same platform as genuine news?
I manage to filter out CNN.
Now since we are in the middle of a disinformation war, couldn’t the President block the sale using the war powers act?
Because that act makes the president a dictator.
Do I really have to share a country with these people?
For now.
How about this plot twist. The deal goes through, he changes his mind and decides we do need to fight disinformation. And to that end, he hires Donald Trump to be the final arbiter of what is considered disinformation.
Dude – there is a
Chinese Wall“Firewall” between sell side equity research and investment banking this reason among others.(For whatever reason, the historical meaning of Chinese wall and some racist connotation have been implied so now everybody uses firewall. But for decades it was Chinese wall.)
It’s racist because it says “Chinese” in there, duh.
Excluding Chinese is the proper policy. Gotcha.
That is a daunting project which you are handling well. Considering your care In disassembly and repair, you will be fine pulling the head. Use care not to grind or scratch the surfaces between head and block, and cover the block to keep debris from falling in. Those are my two pieces of advice. I would imagine any instructions you find would say the same.
It’s already back on the road.
I’ll send in Part III this weekend or early next week.
“What’s the torque spec on this?”
“Tighten it until it breaks then back a quarter.”
Looks good, Ron!
nice
Thanks, I prefer German torque settings:
Gutentight
That works great for virgin sockets.
To do all that, I would have yanked the motor at the start.
ps- I hate diesels.
Not necessary with a Cummins.
Inline 6 gives you a lot of room to work.
Nice job, Ron. And you make it sound easy.
Thanks, I didn’t go too far in depth, but it was not easy.
Great work so far Ron. The paint job looks great.
I’ve dabbled in diesel repair while helping others “upgrade” their stuff. Banks make great turbo performance parts and are made to work well with existing controls and OEM parts.
I haven’t done this extensive amount of work on my own vehicles as I have no alternative driver. I plan on staring my project this winter once the garage is complete. I hope to have the garage completed, work areas and storage sorted, the tools and accessories purchased, and finally the lift installed by first snow.
Then I’ll have all winter to start the planning and disassembly of the Father in law’s 40 Chevy.
His looks a lot like this one. https://www.autozin.com/1940-chevrolet-coupe-14421104-largeimage
I won’t be doing the traditional hot rodding with stupid chrome wheels and paint job. Just powertrain, suspension, and brakes. Steel wheels and hub caps but with more modern tires. I’ll have to see what will be needed to convert to a 12V system. That sounds more painful.
That sounds like a good project.
PS Chrome wheels are not stupid.
I’m talking about the cheapo ones put on every hotrod from 1980 to today. I like a good chrome wheel, but not for everything. See what I think looks stupid below.
https://mfpclassiccars.com/chevrolet/165515-1940-chevy-coupe-street-rod.html
I’m not a fan of modern wheels on a classic car.
Those look out of place.
Ugh I’m not ready for 80s weather yet. ?
Thank g-d the forecast is calling for a dive to 70 by 5pm.
It’s 80 here, but a rainstorm is supposed to roll through later today.
Meanwhile, in the land of the permanent winter, our three day blizzard should be wrapping up in a few hours. Currently 23. Down to 16 overnight. Not supposed to get above freezing until Monday.
Shit is getting real old.
64F, and very breezy, here at the beach. You’re work from home; move out here to (NYC) paradise.
By 80s, I assume you mean the 1980s, and so because of global warming, I assume you mean you are not ready for cooler weather.
You prefer disco weather?
Meanwhile I took the opportunity to test my central A/C. Glad I did.
Air handler fan won’t turn on. Compressor runs.
It’s 20 years old so I’m hoping it’s a simple fix and readily available part. Otherwise I’m going to get hurt. Also want to get it scheduled before it gets too hot.
*Sensible chuckle*
Elon Musk is literally attempting to own the libs.
That’s awesome, Ron. Well beyond my skillet, but great to follow along.
Skillet = skillset
Looks like basic typing is beyond my skillset too.
Glad you like it, but stripping the head bolt took me out of the frying pan and into the fire.
I sauté what you did there.
It’s going to chafe Swiss’s ass
Swiss is gonna get steamed at what you’ve cooked up.
He’s going to cast an iron glare and pan this whole thread.
Naw, he’ll glaze over and ignore our stale puns
It is more of a searing glare.
I can’t refurbish a skillet either.
Gentlemen, your clever plans have been busted.
What about single F2M hosts?
I don’t think my wife will object if we put a young, attractive woman in the spare bedroom.
You should definitely try it and report back to us.
I think you’re allowed to call her a Putin-lover if she objects. Maybe wait to deploy that until absolutely necessary.
There’s a TV sitcom waiting to happen!
They have those on pornhub?
Such Misandry Is simply unacceptable!
Don’t horn in on the UN’s action.
They should start a site called OnlyRape.
The blue helmet special.
I had never pulled the head on a vehicle before, that sounded scary. I read a few write ups on forums and watched a few YouTube videos. I also read the FSM (Factory Service Manual). Nothing looked beyond my abilities, so I decided to go for it.
A man after my own heart. That’s what I do for most things around the house. I’m not in this league for automotive work or repair, but I’m a lot closer than I was. At least my wife is finding me handy.
At least my wife is finding me handy.
Somewhere, Red Green swells with pride.
Nice work. Impressed.
Modern stuff (post ‘67 or so) frightens me. I look at an oldie and can tell what everything is and what it does. New stuff is just a hopeless mess of tubes and wiring and black boxes to me. Smart move having someone else do the paint. I painted mine – probably three times before I got it all right.
Thanks
I used to have a ’73 Charger, but after moving three times and blowing the tranny while poor, I gave it to my nephew.
$20 is $20.
Same as downtown.
I realized that right after I hit post.
It was such a hanging curveball that I assumed you did it on purpose.
I was getting close to 125 when I heard a loud CRACK! Then the bolt would tighten and spin loose. I tried another bolt and got the same result. This was on a Saturday evening so I had to wait for Monday to call customer service. When I talked to their engine builder, he said “That’s rare, but it happens”. He told me a HeliCoil would fix it, but to do that I would have to pull the head.
Ouch.
I look forward to part III.
Ain’t gonna lie, that hurt my feelings.
But you immediately accepted it and said “this is good.” Right?
That’s right, I made no judgement of good or bad.
Actually this was about a year ago and I was just beginning to actually follow the philosophy.
I know it would not bother me now as much as it did then.
https://www.cbsnews.com/news/germany-arrests-blackout-kidnap-plot/?intcid=CNI-00-10aaa3b
along with hundreds of rounds of ammunition,
Yup, that’s good enough for civil war.
Eh, more than the Bundeswehr has.
*shouts bang! bang!*
That’s like 5 or 6 whole boxes!!!
“cause a long blackout across the country”
They could have just waited a month or two for that to happen.
It’s funny you say that.
I just finished this terrific essay on the LNG situation in Europe.
tl;dr: Hold on tight, Euros.
Biden has a once in a generation chance to bring the US a fuck ton of money and kneecap some hostile countries in the process. But of course the dipshit won’t take advantage of it.
1) one of my teachers drummed it into my head that you always always label your numbers with units, otherwise someone else is just guessing what you’re saying. It’s stuck with me.
2) is demand for NG static or does it fluctuate hourly/seasonally?
I think it depends on the energy mix. Nuke plants only really work as a steady, baseline production level. It takes a long time for them to adjust, so NG is used for increased demand, seasonal or otherwise (same with coal – instant on).
Europe going away from nukes was really, really dumb.
Yes. So were we.
Well, Minne still has two plants going, so not everyone went full retard.
There are actually more than I thought across the country.
7 on that list scheduled to be shut down, with four that were supposed to be shut down last fall.
The FBI is operating in Germany? I did nazi that coming.
They learned it from Gretchen Whitmer!
https://www.axios.com/arizona-iced-tea-price-inflation-billionaire-81e8077d-b90c-475d-89f0-f3e7e9b78320.html
That’s kinda neat.
Perhaps bittersweet.
I remember them being expensive 30 years ago. I havent been in the single serve ice tea market in decades, so hadn’t noticed the shift.
You have very specialized markets in Ohio.
I find that article well timed
20-oz bottles or 23-oz cans currently available for 3/$2 at my neighborhood Walgreens! ?
Still $0.99 in the North East. The cans only are $0.99, the bottles have increased in price.
They have also continuously improved the packaging (less Al per can by better design) and the sugar is the only other significant cost adder besides marketing and distribution. The $99 price point has taken care of the marketing aside from a few plackards around gas stations and delis.
[rant]
You fucking stupid agency fucks.
We already did all of this analysis four years ago, and that course of action was Rejected because it cost two to three times as much with less flexibility and less transparency.
Stop wasting our time by reinvestigating the nonstarter options after we’ve got the hardware for the workable solution already in the datacenter!
[/rant]
It’s like you’ve never had a change in agency leadership before. Your analysis was under the OLD leadership, it is no longer the same thing with the NEW leadership.
But did you file your TPS reports?
I don’t do QA work. So I don’t do TPS Reports.
We already bought EVERYTHING! A shitton of it will not convert to the previously rejected option. So more expensive becomes a fuckton more expensive. Stop wasting our time on this trash.
Oh, and of course they want it yesterday.
No, I don’t have your information already. We rejected it four years ago. The data is buried under four years of additional work.
They’re cronies of some high-up politician.
Actually, no.
I know all the people I’m insulting in thie tirade.
JI’s right, it’s a need to make their mark on the turf rather than do what is best for either the agency or the taxpayer.
And yes, JI, I have been through multiple changes of agency leads, this scent marking still pisses me off every time.
Dianne Feinstein’s memory fading and she may no longer be fit to serve, senators say
What a cunt.
and I’ll put my record up against anyone’s
“Mr. and Mrs. America turn ’em all in!”
If my wife was dying of cancer and I had to fly from DC to Cali to see her, there is no doubt I would quit my job.
And that is without the benefit of millions in the bank.
Those people are inhuman.
Sociopaths
That was my first thought.
Then you should have resigned.
Diane Feinstein has never in her life been an intellectual force.
I’m sure her husband appreciates her making time in her busy schedule for a visit.
“Newer truck would be more reliable” I think you’re making an assumption that isn’t necessarily true. I think you made the right call keeping her going.
I probably should have said “would probably be more reliable”.
This truck has been plenty reliable considering age and mileage, so I agree.
I do too! Avoiding modern diesel emissions systems seems like a no brainer to me.
Thanks for the article Ron!
Question:
Why did you do the paint first, and all the mechanical work second? Seems like if you do the mechanical work first, you don’t have to worry about beating up your new paint job.
Making it look good distracts him from all the anguish he gets from doing all that work.
There is that.
I guess I didn’t plan it all that well.
I was waiting on parts when the I got the estimate, and when paint shop called with an open slot for my truck, I didn’t want to put off the painting in case something took longer than planned.
Which it did.
Makes sense.
I have to admit, the freakout over Elon’s latest troll is even more hysterical than I would have anticipated.
And I think Sean is spot on here.
I’ll give him this, he provoked an enormous number of people into standing up, dropping trou, and showing everybody their shit-smeared assholes.
He deserves an award just for that alone.
Aaaaaand like clockwork, the swamp pounces!
Just a coincidence, I’m sure.
Funny how quickly that happened. I’m sure Pelosi’s stock trading is on the list somewhere.
Jesus. That’s disgusting., Same comment to SN above…
Really are about to go down fascism lane, huh?
Check out this guy with his no salt/no rust privilege!
/grumbles about Minnesoda winters. It is snowing again today.
I’m astonished at all the clean older vehicles I see here. My neighbor’s F-150 is 15 years old and there isn’t a speck of rust on the thing.
It was a shock moving to Arizona and seeing 15 year old cars without a speck of rust. Of course, they didn’t have much paint on them either.
I was in Panama City Beach, FL and I saw a Chrysler K-car convertible where the clear coat had actually melted off like butter, and was slowly going down the side of the car like yellowed grease. To get like that probably took 30 years. I should have taken a picture. Combo with f sea salt and sun? God only knows.
I miss some things about living up north, but salt is not one of them.
My first truck was a 2000 from PA.
I spent way too much time and money trying to save it before I traded it in on this one.
This one came from TX and I accidentally drove through salt once(I was told VA doesn’t use it), but that has been painted over with POR 15and it’s all good now.
After this mornings article about the ACLU getting a court to order trans women into women prison, this was quite timely
https://www.corrections1.com/transgender-inmates/articles/doc-2-women-at-nj-prison-pregnant-after-consensual-sex-between-inmates-MayIqHycHqdm9KXr/
2 women inmates pregnant at pregnant at women’s prison.
Soooo…….
Birthing people and impregnation people?
THE PENIS IS EVIL AND SHOOTS SEEDS WHICH CONTAMINATE THE EARTH WITH THE RACE OF BIRTHING PEOPLES…
I always wonder (assuming they’re not murdered in the womb) what becomes of the children of such circumstances?
In most cases the baby goes to relatives or foster care after just a few days. There are a few prisons with “prison nurseries” that allow the kids to be near mom for a few more years.
https://www.nbcnews.com/news/amp/ncna894171
I see.
I assume the authorities try to foster the child within the family.
Caged has the main character being pregnant as a plot point and is definitely a film worth seeing.
Compassionate early release for being pregnant, right? It’s inhuman to give birth while incarcerated. That’s just like slavery.
Ordinarily I’d say “who cares what/who/how you ‘love’ and how you dress and what you call yourself? You do you.”
But with laws, definitions of protected classes, and court decisions penetrating further into our personal lives, including those of children, it’s becoming more important to be precise in our language.
“Trans” is too vague of a catch-all term.
1) For some, it’s merely how they dress, an affectation, or how they identify. It can flip back and forth at will.
2) For some, it’s hormones they take or block. Swimmer Lea Thomas is an example here, although she also dresses the part and identifies as female.
3) For some, it’s top surgery. Or bottom surgery. Or both.
Another issue is that a transman is not the same as a transwoman, so again “Trans” is too vague for legal use.
If a man declares he’s trans between verdict and sentencing, does he get to choose which gender prison he gets? Or MUST it be a womens prison? What about a transman who gets sentenced but doesn’t want to go to a men’s prison? Does s/he get a choice?
It would help if the prisons weren’t run by the inmates…
This is lovely.
How’s about we deliver a bunch of weapons to the people of Shanghai, too?
The video/audio recordings of the screams from the skyscrapers at night is jarring. These are human beings!!
https://youtu.be/fxMTYU71O5M
Wow. I don’t even know what to make of that.
But don’t let Justin Trudeau see it…. that guy doesn’t need any more ideas…
Saw this elsewhere.
Was told the police were clearing out 500 homes for use as quarantine quarters.
Advantage of communism??
Am I a bad person for smiling at this? (With volume on)
https://m.facebook.com/100000255186526/posts/5351357198216067/?d=n
No, that’s terrific.
I ran across this one the other night. So perfect.
And Hong Kong too.
Sorry. Wrong place.
Heh
Lol. Excellent trolls.
Heh, that’s great.
I was at a thing a few years back and chatting with some younger guy:
Me: “so, you going to school around here?”
Him: “yeah…”
Me: “cool, which one?”
Him, somewhat snottily: “you know, the good one”
Me: “ah, MIT, cool”.
Totally worth it for the look on his face.
(I wasn’t even lying – MIT is the good one)
“Yeah. I wouldn’t worry about it though, it’s not a big college town.”
the wife is MIT grad. It is hilarious running into people from Harvard when she is around. Because when you run into someone who went to Harvard, just like vegans and troons, they are going to tell you within 5 minutes. Her reply is usually,
“Oh, I went to MIT. Harvard was my safety school.” in this completely serious, deadpan where she’s not even ribbing them, just stating the reality. I’m surprised I haven’t seen one of ’em stroke out.
Living in Boston for many years now, the gulf between Harvard’s reputation and the students I have met is vast.
Because when you run into someone who went to Harvard, just like vegans and troons, they are going to tell you within 5 minutes.
Well, you know you ran into someone from Harvard after they tell you. The ones who don’t tell you, you don’t know, so . . . .