In August of 2020, we were staring into the face of endless lockdowns. With most of my hobbies on hold, I felt the need to learn and do something new. So, I bought a classical guitar. And I have been tinkering with it ever since – mostly open tunings; all finger style.
But eventually, every aging boomer feels the urge to play a power chord through a 1-Watt tube amp (we’re trapped at home, so rational limits apply). My wandering eye brought me to many cool guitars available for purchase. I nearly bought an electric guitar on several occasions. Instead, I started looking in to building guitars (two new hobbies for the price of one).
This body and neck came from Precision Guitar Kits in Vancouver, Canada.
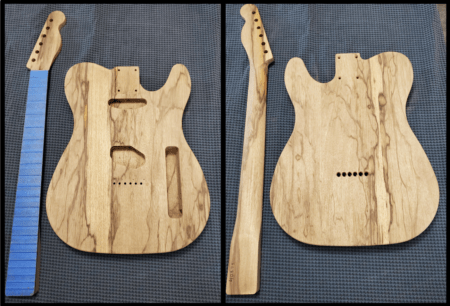
I choose not to go with a traditional ash body and maple neck. Instead, I wanted a highly-figured tonewood so that I could put a transparent finish on the guitar and highlight that figure.
This guitar body and neck are made from black limba and the neck has an ebony fretboard (under all that tape). Limba is an African wood related to mahogany. Note that all limba wood comes from the same tree. The boards are sorted after milling, and any board with black streaks becomes “black limba”. Likewise, any board without black streaks becomes “white limba”.
In comparison, limba is somewhat lighter than genuine mahogany (from South America) which is somewhat lighter that African mahogany. Similarly, limba is not a hard as genuine mahogany which is not as hard as African mahogany. Cost wise (as far as this guitar kit goes), limba is on par with genuine mahogany which is a bit more expensive that African mahogany.
Limba (under the trade name Korina) is best known as the tonewood of Gibson’s Modernistic Series of the late 1950s—the Flying V and Explorer. Limba is a warm, resonant, and balanced tonewood that also yields great clarity, definition, and sustain.
Classics Gibson Les Paul Jr., Les Paul Special, and SG guitars were made of solid mahogany (with mahogany necks). Mahogany’s tone is warm and somewhat soft, but well balanced with good grind and bite.
Thus, this guitar is “fenderish” in style and scale length, while being “gibsonish” in tonewoods. It should be interesting to see what the final tone of the guitar is.
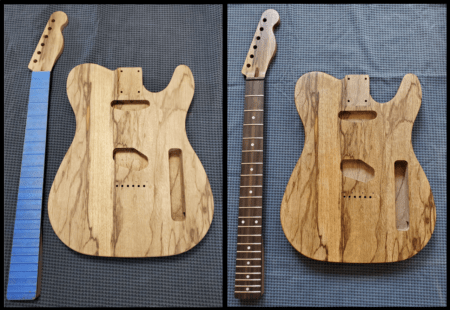
Limba is somewhat porous. So, it is necessary to fill the grain before finishing the wood. The photo above shows the guitar after filling the grain (I forgot to grab photos before I got started). The photo below is a close up of the rosewood grain filler that I used. The “white” parts of the guitar seem to have larger pores than the “black” parts. The rosewood filler stands out nicely against the light-colored wood.

The limba itself has dark streaks in the grain. Rosewood was the darkest grain fill that I could get from Stewmac.com (they didn’t have ebony in stock at that time).
There are three basic options for finishing the body and neck of the guitar:
The modern way: Plastic – Polyurethane. Poly is easy to apply. Requires no special tools. Has minimal Volatile Organic Compounds (VOCs). Produces a hard and durable finish. And when you are done and have a high-gloss finish, your wood looks like plastic. My classical guitar with white ebony tonewood looks like wood-grain plastic up close under bright lights. Pretty much all modern guitars of modest price are finished in polyurethane.
The old school way: Nitrocellulose lacquer. Nitrocellulose lacquer is made by taking cotton and treating it with sulfuric and nitric acid, generating an acidic pulp, which can be strained to produce a watery resin. The resulting resin is then combined with a number of fast drying solvents to produce the finished lacquer. Applying lacquer requires skill; a paint booth with ventilation; and personal protective gear. More than a dozen coats are required with sanding between coats. But the resulting finish is gorgeous. It is also prone discoloration and checking over time. Old guitars have yellow lacquer and checking. Old guitars are cool; therefore, yellow lacquer and checking must also be cool. High-end electric and acoustic guitars are finished in nitrocellulose lacquer. For a few extra bucks, you can get a new guitar relic’d so that it looks old.
The really old school way: French Polish. French polish is a process not a material. Shellac is added in extremely thin layers with constant buffing. French polish requires much skill; but shellac itself is inexpensive, quite tame (denatured alcohol is the solvent), and can be done in pretty much any room with some minor ventilation. High-end classical guitars and classical stringed instruments (violin, viola, cello, etc) are finished with French polish.
I choose to go with none of these ways (not completely anyway). I am finishing this guitar with shellac. I picked two different shades of shellac. I used lemon (on the left below) for the body of the guitar. I used super blonde (on the right below) for the neck. While the shellac looks quite different in the jar, there is actually little difference in the final color of the body and the neck.

Using the same basic process as the Walnut Panel Chest that I described recently, the overall process is:
- Sand with 320-grit sand paper to get a smooth surface. Then put on two coats of 1/2-lb cut of shellac. Let it dry, then repeat.
- Sand with 400-grit; then two coats of shellac.
- Sand with 600-grit; then two coats of shellac.
- Sand with 800-grit; then two coats of shellac.
- Sand with 1000-grit; then three coats of shellac.
This is a grand total of 11 coats of shellac. This produced a nice satin finish. I could make it shinier by adding additional coats of shellac and buffing it out. But the finish that I was going for was “looks like wood, feels like glass”. Held at an angle, the surface of the guitar does reflect light like a piece of glass.
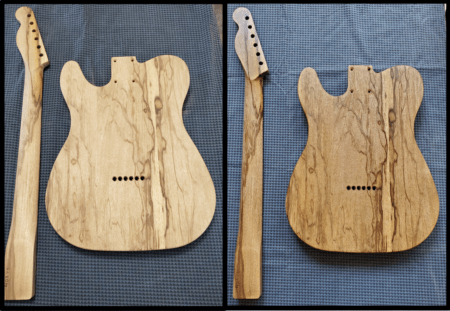
The Final Result
The photo on the left was taken in the kitchen under “daylight” LED lighting. The photo on the right was taken in the dining room under natural light from the windows (slightly overcast day, no direct sunlight).
This is how I solved the problem of being able to apply shellac to all sides of the guitar while the shellac was not dry on any given side. This photo was taken after the first two coats (and taken under the kitchen lights).

For those that want to dive into it, here are some resources on applying lacquer to guitars and/or shellac to wood.
Paint and Lacquer and Part II and Part III
Applying A Quick and Easy Shellac Finish
My mind went to expecting an acoustic guitar. But that is a pretty advanced woodworking project compared to electric.
I’m out of it today, because I mistook this for “they cut down the same tree over and over again.” instead of “it’s one species, providing two different marketting types of wood”
I suppose if it’s a coppiced tree…
I read it as “they keep cutting off branches and they keep growing back”.
Pollarding?
Sure, lets go with that.
I didn’t like it when I wrote it. Couldn’t come up with anything better. Oh well.
So when are you going to post a link to video of you jamming out on that badass axe?? ???
Some day. I need to figure out how to capture audio/video and edit for online viewing.
I am halfway through installing the hardware. That will be the second article.
Then it will be making a custom nut; stringing up the guitar; and doing the final set up.
At that point, I will need to figure out how to get a video.
Very nice work, kinnath!
Thanks for including the finishing links. I have mostly used poly for my woodworking projects, but the French polish is intriguing!
How did you choose the company that supplied the kit?
Thanks.
I have used poly on a sewing table that I created for my wife. But, I really don’t like it.
I love the shellac though.
All those poor bugs.
Wait, how exactly do they harvest the shellac from the bugs?
Shellac is secreted from female lac bugs when they lay eggs.
In certain seasons of the year, these insects swarm in huge numbers on the trees, settle on branches, and project protrusions into the tree to penetrate the bark. They suck up the sap and absorb it until they feed themselves to death (called the feast of death amongst the indigenous peoples). At this same time, propagation continues, with each female lac bug laying about 1,000 eggs before dying.
The sap is chemically altered in the lac bug’s body and is then exuded onto the tree branch. On contact with the air, the excretion forms a hard shell-like covering over the entire swarm. This covering forms a crust over the twig and insects. As the female lac bug is exuding the ingested sap she is preparing to die and is providing a fluid in which her eggs will mature under protection.
The trees are covered in raw shellac. It is cut from the trees and refined (killing eggs in the process).
Thank you.
I’ve used shellac for woodworking before but never for finishing guitar bodies. I’ve never even seen one advertised with it, although that probably has more to do with poly’s ubiquity and ease of application for production. I’m curious to hear if you think it changes the tone. I believe it’s softer than poly, so theoretically you may get more resonance.
I’ve seen some reviews of modestly priced classical guitars. The reviewers (highly trained classical guitarists) will note that poly sounds “muted” and/or “heavy” compared to French Polish on their expensive guitars.
The 11 coats of shellac on my guitar is still quite thin compared to a couple of coats of poly. Probably won’t make a difference to my ears. I just like the look and feel of shellac.
I’m guessing their French Polish guitars tend to be much older and more broken in, which may account for the audible differences. As I said below, there is almost no science behind this stuff. It’s almost entirely based on people making unmeasured observations with their ears. That’s why I usually just roll my eyes at these arguments.
It’s a measurable phenomenon, just not with the typical set of ears.
It would be relatively straightforward to put a mike on two differently finished but otherwise identical guitars and perform a spectral analysis of the sound.
But that would settle the argument and take all the fun out of it.
As I noted below, I used shellac for appearance, not tone.
I have also learned, after stubbornly refusing to believe it was worth twice as much, that shellac primer for painting is gold.
Shellac is pretty easy to fuck up. It doesn’t last long in liquid form. Old shellac won’t dry properly and will leave a sticky mess.
Thick cuts of shellac can be difficult to get to dry as well. Again leaving a sticky mess.
But a thin cut of shellac is dirt-simple to work with. Goes on with zero brush or pad marks. Dries almost instantaneously.
Yeah I haven’t tried it yet as a topcoat, but for priming (wood) it’s the best. Kilz is basically for drywall only.
How did you choose the company that supplied the kit?
I have a long-term goal of building acoustic and/or classical guitars from scratch. Except, I was looking for precut fretboards to eliminate intonation problems.
I found these guys on google when searching for fretboards. I liked what I saw for electric guitar kits and decided to buy one.
My goal is to be making my own acoustic instruments for later in life when I don’t have kids my young kids around since I’ll need a hobby. I have now built or modded enough electrics to be pretty good at it. These kit builds are fun. I’ve got a hardtail frankenstrat that I use for slide that I put some gold foil pickups in that’s pretty cool and I just finished putting together a thinline tele that I relic’d. I love this stuff!
The finished product looks good.
thanks
Wood filling is interesting. I suck at woodworking and have a limited concept of how that should work. Would like to see a detailed description.
Basically,
1) make a paste
2) smear it one
3) let it dry
4) sand it off.
Repeat until smooth.
You have no idea how much screw up I could engender if I tried that.
Actually, it’s kind of fool proof. Put too much on — just sand it back off. Of, course you could get carried away with the sanding.
it’s kind of fool proof
*slumbrew has entered the chat*
I did a gunstock with a boiled linseed oil product. The process I followed was to wet sand the stock with the oil, so a slurry of sanding dust and oil was worked into the pores. I don’t recall exactly, but I believe a rag with just the oil was used to dissolve the dried slurry and clean off the wood at the end.
French polish starts with pumice and shellac. You are simultaneously sanding the wood and filling the pores with pumice and wood fibers at the same time. Eventually, you stop using pumice and just use waxed shellac or unwaxed shellac and oil to complete the finish.
Neat.
It’s not my place to comment on another man’s wood.
I haven’t built one from a kit, but a few months ago I got an older Gretsch Electromatic from a friend (Les Paul style electric) and replaced the pickups, tuners, bridge, switch and volume and tone pots, and repainted it. I set it up myself, and it actually plays and sounds pretty good. Interested to see what you’re doing for the electronics.
Article two. Hopefully in the not-too-distant future.
Mostly Fendor Road-Worn series parts and Fender Custom Shop NoCaster pickups.
I splurged on the electronics.
Nice!
Have you heard of Tonerider pickups? I just put some of their vintage strat pickups in one of my high-end axes. I’ve probably had 8 different sets in there over the years and never been happy even with some more expensive ones. The Toneriders are $100 for a set and are absolutely killer. I was so happy with them that I through in a set of their PAF’s in a PRS clone I have and they’re really great too.
Barely getting started on electric guitars.
I stuck with Fender Custom Shop for the first build.
We’ll see if there is a second build after I get through the first one.
There’s always another build…..
Fun lunchtime read. Thanks!
you are welcome
I enjoyed it as well. I love seeing people with talent perform a task.
And in other DIY projects…
DISTILLING OREOS INTO A DRINKABLE LIQUOR
You left off the fermenting part. If you try to skip stright to distillation, you’ll be disappointed.
“The team first blended bags of the cookies, mixed them with water and fast-acting yeast, and let the mixture ferment.”
I said you, not the team. I did look at the article before teasing.
I know you’re more thorough than that.
I’ve seen that done before
Anything with starch or sugar can ferment and be distilled.
Steve Smith may have some competition.
Reddit users spot ‘werewolf’ as mysterious human-like beast caught on zoo camera
It’s just a furry. Shoot to kill.
Id want to have a couple beers with a Furry before I shot it. I have lots of questions.
STEVE SMITH OFFER INVESTIGATE CREATURE. BY INVESTIGATE, MEAN…
Thanks to the editors for the perfect lead-in photo.
STEVE SMITH GLAD HIM CAN HALP!
😉
I know what he is singing.
Here are two pictures from one of my favorite guitar players. This concert was incredible.
https://scontent-bos5-1.xx.fbcdn.net/v/t39.30808-6/285130068_7501741476563706_4987814672437004717_n.jpg?_nc_cat=108&ccb=1-7&_nc_sid=a26aad&_nc_ohc=kV9UC1rhyu0AX9U2lq3&_nc_ht=scontent-bos5-1.xx&oh=00_AT8wYEWmjdIFlgzCWoB4NmRxzJF2XsNGUoCPkEew39Yifw&oe=62A480AA
https://scontent-bos5-1.xx.fbcdn.net/v/t39.30808-6/285088779_7501741479897039_6960390820378126560_n.jpg?_nc_cat=109&ccb=1-7&_nc_sid=a26aad&_nc_ohc=7iCI2VkuGgkAX_evk2m&_nc_ht=scontent-bos5-1.xx&oh=00_AT9pyzGCVWEEKesnGG_ttLR6PxAkJdq4BKnFWhe567cctg&oe=62A463CB
Let me know if the links don’t work.
Yellen Defends Pandemic Spending as Inflation Persists
“Republican lawmakers, who have spent months blaming President Biden and Democrats for rising prices, gleefully seized upon the admission as evidence that the administration had mismanaged the economy and should not be trusted to remain in political control.”
https://www.nytimes.com/2022/06/07/us/politics/inflation-yellen.html
Ahh yes, Team Red is gleeful about a cratered economy. I assume we can now say Team Blue gleefully seizes on dead children to push gun control.
No, you have it all wrong. When Team Blue does it, they’re plainly stating facts and speaking truth to power. Even though they have all the power.
I saw this from Yellen somewhere else:
Sure, makes total sense. Gosh, we’re so lucky that we get such brilliant people in these positions. We’re truly unworthy of their genius.
OTH, Japan is all in MMT.
Japan Adopts View That Huge Government Debt Doesn’t Matter
https://www.wsj.com/articles/japans-debt-debate-is-it-heading-for-a-titanic-crash-11654600541?st=u4ukpze6nooonek&reflink=desktopwebshare_permalink
They pioneered the lost decade and negative interest rates. Might as well go big on MMT.
There’s a way for a dollar denominated world to avoid inflation stemming from the dollar…
Kinnath,
Great work!!! Does the fret board get any kind of staining or protection?
I don’t have much patience for sanding, did you do it by hand or orbital?
The fretboard will need oil. Something that I have yet to buy.
I used an orbital sander to get most of the grain filler off. Everything after that was by hand. The guitar was pretty damn smooth when it arrived.
The first couple of coats of shellac with raise the grain, so there is some effort required to sand it. After that, sanding is very minimal between coats.
My issue has always been that I like the look and feel of the wood grain, can filler be too aggressive and alter the grain contrast too much after staining?
The filler is meant to keep the stain consistent and not all go to the most porous parts of the wood correct?
The filler is used to make a smooth, level surface so that the final finish is smooth and level.
There are many ways to fill the pores in the wood (watch the French Polish video for a labor intensive way to do it).
I specifically choose a high-contrast color grain filler to highlight the grain pattern in the wood.
I think the Guitar Paint/Lacquer videos above used epoxy to fill the pores. This was then painted before lacquer was applied.
Epoxy would make me nervous. You’d probably only get one shot at that. You’d have to wreck the body trying to get it off.
Professional luthiers showing just how easy it is. Take with grain of salt.
The fretboard is ebony. Already smooth as glass coming from the shop.
Ebony really is the best fretboard wood. I read there’s been a shortage and it might be hard to come by in the future. Stock up now if you have any other projects in mind.
Ebony really is the best fretboard wood.
I love it on my classical guitars.
I am loathe to admit that I tend to jump into new hobbies with both feet.
But there are six fretboards in a box sitting on the table right now and six more arriving by UPS later today.
I am somewhat committed at this point.
Nice! I wish I had more time and money to just play around with building these. I’ve really had to stop myself. I finally splurged about 6 months ago and bought one of my dream guitars. I found a really good price on a used Duesenberg Starplayer TV. I have a really good example of each of the main types of guitars you’d expect, strat, tele, 335, PRS (instead of a Les Paul which I’ve never loved) and a Rivolta Combinata for P90 tones in addition to my aforementioned Frankenbuilds. If I’m being honest, anything beyond what I already have is vanity.
Very nice, Kenneth.
That grain is purty.
thanks
I just skimmed the article. One of those urine sample jars looks kinda dark. You may want to see a Doctor.
*narrows gaze*
There is no cannibalism in the British Navy…
Utah attorney says he’s wrongly accused of cannibalism amid reelection bid
I just start with the assumption that every person in politics is involved in a cannibalistic child sex trafficking ring and I consider the burden of proof to be on them to show they’re not. Needless to say, I have not voted for many years due to politicians lack of interest in providing the basic evidence to prove me wrong.
An in between way, not well suited to home applications due to it being somewhat equipment intensive, is to use catalyzed urethane finishes.. These generally look like lacquer but don’t have the extended drying time or brittleness that lacquer does. It’s put on in thin coats but is then UV cured in minutes instead of days. Many fine, high-endy, guitar manufacturers have gone to this method. Hard, fast-drying but doesn’t look like a layer of plastic.
For raw or sanding sealed neck backs, multiple coats of hand rubbed Watco Danish Oil. Multiple coats produce a satin-to-semi-gloss sheen. It goes grayish eventually but only the player can see it, right?
Generally speaking, epoxy resin is used to get that super-glossy look on furniture and stuff. Don’t know if they use it on instruments.
One of the things guitar players always argue about is resonance, the ability of the wood to vibrate naturally. It provides the instrument with the overtones and harmonics that give it it’s character. Generally people tend to be opposed to epoxy because the hardness theoretically reduces resonance. If you go on guitar builder forums you will find endless heated debate on the subject. I usually roll my eyes at these things. There are too many factors contributing to a guitar’s tone to scientifically prove that any one factor is what is making the difference that you THINK you hear.
Spoken like a dude that doesn’t own pure silver, cryogenically finished speaker cables that enable you to hear the heartbeat of the artist who recorded the music.
https://www.vogueaudio.com/product-page/silver-strand-speaker-cables
Unfortunately, the cable that you truly need has been discontinued.
If anyone ever tries to tell you that the quality of a cable affects a digital signal (as would be transmitted here with an ethernet cable) you should punch them as hard as you can in the nads. You will get an identical picture with a $3 HDMI cable as you would with a $300 one.
There’s a reason I linked to that cable, and specifically the user reviews. It went viral as the cable was being sold for $500.
Shopper connects to Jesus via Denon link cable
There was a $16K set of cables for sale on Amazon once upon a time. I think it was SilTech, which is amazingly still in business.
PT Barnum was right.
If you can convince someone to waste their money on something like that, you absolutely earned that money.
OMWC and I have had some fun discussions with “cable lifters”. Below would merely be entry level.
https://upscaleaudio.com/products/audioquest-fog-lifters-set-of-8?variant=31971903864892&utm_source=google&utm_medium=cpc&adpos=&scid=scplpshopify_US_4500539473980_31971903864892&sc_intid=shopify_US_4500539473980_31971903864892&gclid=CjwKCAjw7vuUBhBUEiwAEdu2pM9gGyzw6Mi5PxDFrY1VRP1oiqyCybmUzkqcy0TOY6LqmgSveZfPkRoC4UgQAvD_BwE
LOL. I forgot about those left-handed smoke shifters of the audio world.
Uhhhhh, that is not in fact how “RF energy” works.
How dare you accuse me of having inferior cables that didn’t go through a cryogenic finishing process like some common street trash. I only use the platinum version that they only sell to you if you can prove your pedigree by showing proof of your pure Caucasian blood, diploma from an Ivy league and highest level of NPR/PBS donorship.
He had no conception of tone….
Thanks for the info.
I will be sticking to shellac. I like the low-tech solution.
Make sure to comment on your observations on shellac in your follow up piece. I’m curious. I’ve used poly on a number of bodies and I don’t get the push back against it. It has almost no downsides. It doesn’t crack, it doesn’t usually discolor, it’s hard enough to protect the instrument without being so hard as to prevent vibration, it’s super easy to apply and gloss up as much or as little as you want, it’s commonly available and it’s cheap. I guess it’s just too common so it’s boring and guitar players love being contrarians. Probably why there’s a lot of glib guitarists.
If I was painting the body before finishing, poly would be fine.
There is a real difference in the appearance of hardwood finished in shellac and poly. That’s why I am using the shellac.
There may be some benefits to tone. We’ll see. But that was not the reason I choose shellac.
How many danishes does it take to make a half pint of oil?
I usually coldpress three or four Danes to get a pint.
I love this place.
Beautiful work.
If you have not, watch Red Violin.
I will keep that in mind.
I like listening to classical music on authentic period instruments. This is my go-to for calming down.
https://www.youtube.com/watch?v=pzlw6fUux4o
If Tres ran the meat department.
I LOLd
Busch is even too briar for my tastes. Milwaukee’s Diet Beast FTW !
Is this remind Hype that he’s a quitter week? First Trashy reminds me of my aborted Glibcrostic programing, now kinnath reminds me of the
halfquarter-finishedbarely started bass gathering dust in the closet. Nice work kinnath.You are welcome.
Cisco has apparently decided they have enough Meraki business so no problems making it more difficult to deal with their sales support. No longer email contact directly to initiate an email conversation, must use their web form.
I was already not a fan when they forced us to use e-mail addresses as Login Names. I can guarantee it’s faster for me to open a new ticket, and then reference it calling in over spelling my e-mail address multiple times as they try to type it correctly.
Flathead County, MT Crime Update
Which of you is this?
11:11 a.m. A 62-year-old man yelled “f*** you” when he was put outside to sober up.
Fake news. I’m only 54.
Was his name Tater Salad?
2:27 p.m. A man who lost his job for drinking decided to try to cope with it by drinking more.
LOL!
Daily Quordle 134
6️⃣8️⃣
4️⃣7️⃣