Any self respecting glibertarian has heard of a VPN before. Maybe you know some of the major providers like NordVPN and ProtonVPN. Where people often get confused, though, is about that little program on their work computers that they have to connect to in order to access certain apps on their corporate network. They’re both VPNs, but they seem very different.
The confusion is in what kind of thing a VPN is. A VPN isn’t a solution. It’s a technology used to build solutions. VPN stands for Virtual Private Network, and it does exactly that. It takes devices that aren’t plugged into (with a wire or through a Wi-Fi signal) a certain private network and connects them as if they were plugged into the network. As you can imagine, giving such access to a device halfway across the Internet is a security threat. From a corporate perspective, you can end up exposing very sensitive data if the wrong person is able to VPN into your network or even if the wrong person is able to read the information being transacted between your network and a remote employee. From a personal perspective, a malicious person could access the Internet posing as you, take your photos and financial docs, and more.
VPN technologies solve this through encryption. Your device, when configured properly, exchanges some authentication with a VPN server and then builds an encrypted tunnel between the two. You then have e2e (end to end) encryption between your device and that VPN server. Nobody in the middle can figure out what you’re sending between one another. In a corporate setting, this is ideal. A sales rep can, during a site visit to a customer, access confidential documents from their corporate network via the customer’s guest network without the customer being able to see those documents. This also has benefits in the personal setting. The NordVPN and ProtonVPNs of the world allow you to connect your device to their servers, preventing your ISP from knowing how often you click refresh waiting for Bro to finally catch up with the latest article and post his First. Of course, you have to trust NordVPN or ProtonVPN if you use them, but there’s no getting around that*. Somebody has to know what site you are visiting in order to actually serve that site to you.
*Tor improves on this issue, but it’s a bit outside the scope of this article
This article focuses on a use case that’s kinda in between the corporate and the privacy use cases, and it gets some of the benefits of both. When I’m out and about with my cell phone, I want to route my traffic through my home network so that I get the benefit of the security, anti-tracking, and ad filtering appliances on my network even when I’m connected to a cell tower or a coffee shop wi-fi. I also have a couple network appliances (and would like to add more) that would be useful to have access to remotely. For example, my antenna DVR can technically be configured to stream remotely, but it’s much easier and robust to access via VPN. Eventually, I want to rip all of our DVDs and BluRays and store them on network attached storage. The ability to queue up any movie in my library from anywhere in the world is a huge perk. I also eventually want to get some home automation set up. I refuse to buy into these massive cloud based automation systems, but with a VPN, I can run an app connected to my automation hub on my local network and get all the benefits (remote management) of the cloud systems without my light bulb having to check in with Chinese communist party headquarters before turning on.
I already have a Raspberry Pi hooked up to my network. In fact, due to where the fiber comes in from AT&T, the Raspberry Pi resides on my nightstand in my bedroom. Given that my wife and daughter are currently relaxing in there after a long morning, it’s a good thing I’ve enabled remote access via SSH. SSH is just a way to get access the command line terminal of a device from a different device. In this case, I’m typing on my laptop in the living room while the Raspberry Pi is hooked up in my bedroom.
Raspberry Pi 4 – It’s a fully functional computer that fits in your hand.
I’m following this article, which walks through setting up the VPN server on the Raspberry Pi. I’ll also have to configure the client app on my phone, but the hard part is getting the server set up. Employing my lawyerly issue spotting skills, there are a few hurdles that I’ll have to overcome, including the fact that I don’t have a static IP address, so I’ll have to enable dynamic DNS. This will allow me to use a URL (e.g. www.trashyhomenetwork.com, just to make one up) to connect to my home network, even when AT&T changes my IP address from time to time. I also need to punch a hole in my router’s firewall to allow the VPN traffic into the local network.
Dynamic DNS
Your main IP address from your Internet Service Provider is much like the address on the front of your house. If you send or receive a letter, the address tells the postal service where the letter is going to or coming from. However, unlike the USPS, your ISP may come tear the numbers off the front of your house and replace them with different ones. There are reasons for this, but it’s a bit of a pain in the ass if you want to access your home network from afar. The ISP doesn’t notify you or change things on a known schedule. Therefore, we have to find a different way to access our home networks from the Internet. The way to do this is through the Domain Name System. At the very simplest, DNS is a rolodex. You give it a name (e.g. www.glibertarians.com), and it returns an address (e.g. 114.72.12.59). Dynamic DNS is a service that periodically (every few minutes) updates that address . For example, if trashyhomenetwork.com is associated with my network, some device on my network sends a Christmas card every once in a while to the Dynamic DNS server. If the return address on the card has changed, the Dynamic DNS server knows to update the rolodex. Then, when I use my cell phone to connect to trashyhomenetwork.com, I get the latest address, even if the ISP has changed the numbers recently.
I’m using the free tier of noip.com to setup my dynamic DNS. I registered for an account including the 1 free hostname, and I wrote down my credentials and the hostname for the next step. I’ve sort of hinted at what I did next, but I’ll explain in more detail. Many routers are able to be configured to plug into the most common dynamic DNS systems. Mine is not. It runs a firewall, and that’s it. Everything else is passed over to the Raspberry Pi or to my Aruba managed switch because fuck AT&T. It doesn’t really matter which device is used to send the Christmas cards, so I chose to set up the domain update client (DUC – i.e. glorified Christmas card sender) on my Raspberry Pi. The main requirement is that the device be running all the time, which my Pi is. I followed the instructions No-IP provided.
Well, except for one thing. I own a custom domain that I use for my email, and I wanted to use that domain instead of the default one provided by No-IP. It’s much easier to remember www.trashyhomenetwork.com than to remember trashynetwork.dyndns.org or whatever domain No-IP gave me. I entered my custom domain when configuring the DUC, and then I edited the DNS records on my custom domain to redirect home.trashyhomenetwork.com (obviously this isn’t my real domain) to trashynetwork.dyndns.org (obviously this isn’t the real domain given to me by No-IP). None of this paragraph really matters for the purposes of this article, but it’s a useful feature if you own a custom domain.
VPN Server
The next step was to install the VPN server. PiVPN is a project that’s out there for doing exactly this task on a Raspberry Pi board.

PiVPN incorporates the best of Raspberry Pi and OpenVPN
It walks you through an installation process, which I didn’t bother to screenshot because the linked instructional article already screenshotted it. I made sure that the installer properly detected that the Pi board had a static IP address (which is important when we punch a hole in the firewall in the next step).
As an aside, the Pi board only has a static IP address within the local network. My entire local network accesses the Internet using a single, dynamic IP address provided by AT&T, but through the magic of a technology called Network Address Translation (NAT), each of my devices has its own IP address within the local network. Think of NAT as a mail stop at an office building. The USPS delivers the mail to the office building, but the local mailroom then converts to using a different address (the mail stop number) to make sure it gets to the right cubicle. It’s important that the VPN tunnel, once it makes it to the office building (my local network), is able to be tied to the correct cubicle (local network IP address). That’s done by setting a static IP for the Raspberry Pi board. Mine is set to 192.168.1.2.
There was also some configuration to be done to connect the PiVPN software with the Pi-Hole software. Pi-Hole does a few things for me, but for the purposes of this article, I’m going to describe it as an ad-blocker. By plugging PiVPN into Pi-Hole, I can get ad-blocking even when I’m not connected to my home network.
Pi-hole is worth setting up even if this VPN stuff isn’t for you
I didn’t have to do anything except select “yes” when prompted about connecting the two software packages. Easy peasy, ad-blocking is a breezy.
Port Forwarding
This is the part that can be a bit tricky. I didn’t screen shot this section either, because it’s very router/firewall specific. Taking a broad view, one of the main purposes of firewalls is to keep weird requests from the Internet from actually making it into your home network. By and large, you’re sending requests from the home network, and if there’s a request coming to you from the Internet out of the blue, something untoward is going on. Of course, a VPN connection request from your cell phone is exactly that kind of request that comes from the Internet out of the blue. As a result, we need to open up a limited hole in the firewall. The main parameters in a port forwarding request are the port being used (this is just a number. Default for VPN is 1194), a protocol type (this was configured when we set up the VPN server. UDP is faster), and a destination IP address inside your home network (192.168.1.2 to point the VPN requests to the Raspberry Pi). Once I applied that change to my router, it took hold immediately. I had done the next two steps before I came back to do this one, and once I hit “Apply”, it took all of 5 seconds to connect my phone to my home network.
Client Addition
There are more sophisticated ways to manage who is able to access the home network via VPN, but for a simple home network like this one, manual provisioning is fine. The command to issue is “pivpn add”.

Give the client a name, provide a password, and it generates a configuration file.
Then you can send the generated .ovpn file to the client device and the OpenVPN client software (downloadable from the app store) will ingest that file to make the VPN connection. All you have to do is enter the client password.
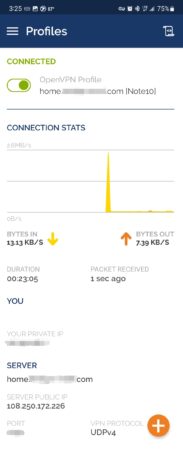
Connected via OpenVPN client on my phone
Once the client is connected, you should be able to access your your devices on your home network as if you’re at home.
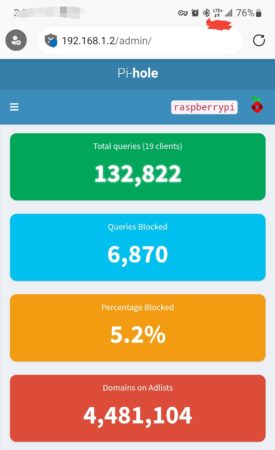
I can access my Pi-hole admin page with my Wi-Fi turned off. This means the VPN is functioning properly.
Conclusion
This may not be the most impressive thing ever done on a computer, but it is a good foundation for more private and secure Internet usage. Now, instead of my phone having to rely on its own security and privacy features, it establishes a pipe back to my home network and uses my dedicated ad-blocking/privacy appliance to reduce my exposure. I also have access to everything behind my home network’s firewall, which opens up a whole new world of possibilities. Currently, the only useful service I have is being able to watch my DVR from anywhere, but my next project may be to buy another Pi and add a cloudless home automation hub to my home network.
This was an intermediate level project, IMO. You can just accept the defaults on everything without understanding what’s going on, but if your setup deviates from the script, you really need to know what you’re messing with. Particularly, pointing my custom domain to my home network and setting up the port forwarding were a bit off-script for me. The rest of the steps had good installation guides a search away. I don’t think I encountered anything that threatened to break my network, but I did end up having to endure a few annoying network resets as I investigated whether my particular equipment supported dynamic DNS. I eventually determined that it didn’t, at least not in the way I wanted it to, so I pursued the Pi option described above.
Next step for this particular project is to set up an outgoing VPN from my home network to NordVPN or ProtonVPN. I’ll wait until I’m motivated to pay for one of those services and then I’ll start experimenting.
I like it! I did just get a second hand Pi4, and am setting it up as a mini PC running Ubuntu. This is also interesting.
That’s a lot of effort to hide your weird porn fetishes
Firsters don’t need porn. Or to use our hands. The psychic connection to a First is enough to trigger an orgasm through sheer force of will.
Weird. You should really just try porn
You’ve clearly never had a Firstgasm created purely by the power of a First and your psychic connection to it.
I’m a gentleman, I always Secondgasm
So, I stare at a voodoo porn box, that allows me to talk to ghosts.
I call it my ‘pooter.
/In all seriousness, I find computers, and “tech” in general, really boring. I am an analog kinda guy. I have been known to throw away what are probably perfectly good printers, and I go through laptops about every 18 months. So, I buy cheap, and use lots of thumb drives.
*drops handfuls of innocent-looking thumb drives in zwak’s driveway*
Thanks Trashy. I went SiliconDust over Tablo as I’ve been using their hardware for about two decades at this point.
Also for NAS entertainment I prefer Kodi over Plex. Plex does more, but it’s a pig and not open source. However, Plex plays better on devices outside the home, but not a priority for me.
Interesting. I’ll take a look at that since I’m getting ready to build (buy) a server for that.
I would do this, but teenagers require me to have a more robust parental control system that I can conveniently manage. For the moment, Netgear with the built in Circle app is doing the trick.
I simply don’t have the time to directly manage the white lists and black lists. They do it for me and I just check on it from time to time.
Oh, and Apple devices with parental oversight as a secondary measure.
My parental control was having kids before the internet existed.
Consider yourself fortunate in that regard. It’s a pain in the ass even for the technically savvy.
The adults who raised me gave me access to the internet and all forms of media at a young age. There were no restrictions, and I was able to hone myself into The Firster that I am today.
Kids aren’t as fragile as they’re made out to be. A 10 year old watching some lesbian porn or Michael Myers slash up some babysitters isn’t going to damage them.
I will never let my kid do any of this now, thanks for the heads up Bro.
LOL.
My son texted me the other day to ask if I would please drop the filters on his account.
He’s 22.
I laughed my ass off that he didn’t notice until he tried to get a drink menu at a restaurant!
My parental control is called birth control
NP: r u still in CO?
Yep.
Ft Collins, correct?
Robc is there, I’m in Arvada, Q is in Monument and RN is in Aspen.
Sounds like meetup time to me.
We’re heading back to the plains on Friday for a week. Then back to the RFV for me until mid-August, I can slide over to the other side of the mountains for a weekend or similar.
Yeah I’m still in FoCo. I’m down for a meetup. My parents live in Monument so I make that trip from time to time and the wife and I are usually down for a Denver trip as there are actually good restaurants there.
My god I can’t even imagine having access at that age to everything they do today.
Pihole allows you to import dynamic lists built and maintained by other people. They’re not perfect, but they do a decent job at parental control. Granted, I don’t have a rutting teenager poking at the seams in the armor.
‘rutting teenager poking at the seams in the armor.’
That’s a distributing visual.
There have been at least 7 people at my church since beginning of the year that have been on the prayer request list for blood clots, with lungs being a particular problem. Besides an odd surgery or injury, nothing else is being prayed for at the same frequency.
Am I just aware of it because of all the attention shone on the clot shot, or is there a massive increase in blood clots?
Hard to say, my SIL had bad blood clots long before Covid,
The rise of the nanny employer
I was just telling someone how annoying it is that a lot of folks seem to look to their employer as a stand-in for their parents. It’s not enough to go to work just to work. Article is paywalled though, can’t read it.
Is that why so many people feel the need to have their employer validate all their personal beliefs?
Some people need their employers to do it, some need Glibertarians to do it.
I WANT TO TALK TO YOUR SUPERVISER!
My employer is pretty good at not abusing the notion that we “live for them”. Current multiple projects with ridiculously optimistic deadlines might stretch the limits, though, if they don’t return to reality over the summer.
Paywall – summary?
This one shouldn’t be.
Fack! I click in the first time and it’s the full article, and then they cookie it away or IP block it or whatever. Happened for both links.
I took a damn pdf of the thing and uploaded it here: https://www.glibertarians.com/wp-content/uploads/2022/07/Nanny-bosses-are-starting-to-annoy-some-employees.pdf
Ignore the “subscribe to read more” shit. It’s all there, I think.
It’s a bit of a mess, but I get the gist.
Yeah, fuck off with all of that.
I completely ignore my company’s nudges at “wellness”.
Google search the article title and click thru to non paywalled version.
I’m not sure which is worse. The feral mutt he raised. Or breaking confidences of an adult friend with a child.
Some point to the growth of “workism” – the idea that work has become a kind of religion, fulfilling workers’ spiritual needs and shaping their identity. Accordingly, a job should provide more than just money but self-actualisation, purpose and nurture too.
I don’t know what this shit is, but kill it with fire!
Wrong. Wrong, wrong, wrong. WRONG. It may do some of those things incidentally, but YOU need to get a life on your own, not because your employer gave you one.
If it was meant in the “Enjoy what you do and you’ll never ‘work’ a day in your life” sense I would agree, but I tried to read it and, never having been in the corporate world (I don’t count delivering pizza’s for Dominos and being a stock boy at a woman’s clothing store *waggles eyebrows*), I just don’t get it. I think If I ever had to get a desk job at some huge company it’d be as if I moved to a different planet. Maybe it’s the difference between a job and a vocation.
I just don’t get it
Sitting behind a desk is mind numbingly boring and usually not at all fulfilling. People make up excuses and delusions so they don’t have to confront the fact that they have wasted the bulk of their life shoving papers from one corner of the desk to another. I don’t think there’s anything to get beyond that.
*shrug*
Moving to a desk job was the most satisfying career move I ever made. I hated every job I had before then. I mean, really hated.
Diff’rent strokes….
I spent 20-ish years working physical jobs while (usually unintentionally) learning skills that would translate towards a desk job. My desk job is my reward, and I like what I do. In the blue-collar world, I’m guessing my attitude/experience is fairly common.
I’ve never heard of anyone having clots until recently. I’m with you Mike S.
I hadn’t worked that long in blue collar jobs, maybe 3-4 years, but I’ll take the desk (and associated pay) any day. I almost transitioned like you’re saying, but weren’t back to school and got my masters instead. My line of work is extremely satisfying- I get to design all sorts of interesting structures, sometimes things no one has ever done. It’s like being a kid with building blocks, except I can design what shapes the building blocks come in too.
Obviously not everyday is that fun, but neither is working a blue collar job where people think you’re an idiot.
Trashy, depending on your long term goals, you may want to explore other career options.
It’s the huge corporation part not the desk part that would be alien to me. I spend a good deal of time in my office, drawing plans, making estimates, and such, but I only know of the corporate world from movies, TV and listening to you people talk/bitch about it.
Trashy, depending on your long term goals, you may want to explore other career options.
Yep, this is front of mind. However, I was more referring to others who seem more bored than me and more unfulfilled than me but completely unable to admit it to themselves. Maybe it’s endemic to legal and other operations roles, but they all seem to need to embrace the corporate nanny culture when they don’t find fulfillment in their role.
For me, I can always hop back to engineering if I get too bored. My first path is trying to move into more strategic work in my field. The day to day decision making can get monotonous, but I really enjoy the strategic/analytic work.
THIS is what I struggle with at my current employer.
No, my work is NOT my family – I have a family.
No, I don’t want to be a part of the C***** life – I have a life.
No, I don’t think you get to censor what I say online, or at the bar – if I represent you 24/7, maybe you should PAY me 24/7.
Then again, I signed a contract saying they could collect my pee (my precious bodily fluids) anytime they want…
Yikes. My company is way more hands-off than that and for that I am thankful.
^^ this.
Also, I don’t need my company to take sides on political issues, I don’t need my company to put extra road blocks in my career path due to my skin color and gender, and I don’t need my company to discriminate against me due to my vaccination status.
This shit absolutely demoralizes me. Why bother putting in extra effort to a company that may like me as a worker, but despises me as a person.
Awesome article! Good friend of mine is all over this as well and it makes a lot of sense. He got me turned onto Proton stuff, though I know it’s not perfect. Wish I could be tech savvy…
Good luck finding a pi in stock. They’ve been in short supply.
This is very cool. I only skimmed for now, but will come back. I’d very much like to set up a protected home network. Thanks for taking the time to create this guide, trshy!!!!11
I want to remote desktop from the living room into my work PC in my bedroom but it seems to be disabled on the work machine by my company. I gave up. Everything surrounding this topic gives me a headache.
Some sort of KVM setup?
Assuming you’re not referring to the Linux technology – I don’t run Linux – yeah, I’ve done that before with two machines in the same room. But in this case, no, the machines are in two different rooms. They both go through my router so I figure there must be some way to remote desktop into each other but I’m not motivated enough to figure it out.
But when I try, I just get “cannot connect to blah blah blah.com” yeah thx that helps 🙄
Was thinking of something like this
https://blog.briancmoses.com/2021/01/pi-kvm-an-inexpensive-kvm-over-ip.html
Oof. Most of that is gibberish to me.
https://archive.ph/Hx1Gc/e5a5855531055f642c4eeb1eea2a4a70a71c0ad8.webp
NSFW.
https://archive.ph/XuFUX/b2af35e1f471bcde99cf606d49b96152a8692254.webp
NSFW.
https://archive.ph/2HYYq/9e5e977325eeee3fde60c97c38dca495e1cd33f3.png
NSFW.
https://archive.ph/xSLqQ/9f945cae7d172e5121531cc29295cf8129f6d77f.jpg
NSFW.
Somewhere in the multiverse, Jim Jaramusch and David Lynch are a filmmaking duo like Merchant/Ivory or Powell/Pressburger. .
And then Davind Cronenberg and John Waters show up….
I would watch both of those. Down by Velvet, and a Scratch and Sniff ExIsTeNcE.
Daily Quordle 164
7️⃣5️⃣
6️⃣4️⃣
Daily Quordle 164
7️⃣5️⃣
6️⃣4️⃣
*joins parade*
Daily Quordle 164
4️⃣5️⃣
7️⃣6️⃣
Daily Quordle 164
4️⃣6️⃣
5️⃣7️⃣
Daily Quordle 164
3️⃣4️⃣
5️⃣6️⃣
quordle.com
Morning y’all.
https://www.msn.com/en-us/news/crime/police-asking-for-public-e2-80-99s-help-in-obtaining-cellphone-video-of-july-4-parkway-shooting-that-injured-2-officers/ar-AAZgQN4
Both struck with .40 cal from a very long distance. Seems so improbable.
https://youtu.be/J6sIK2KnhH8
🎶🎶
https://www.nj.com/news/2022/07/watch-nj-cops-race-to-rescue-driver-from-burning-car.html
Fat people are harder to rescue. News at 11.
That’s just weird. His door happened to be broken too?
Hey buddy, stop doing that.
https://ktla.com/news/local-news/man-pretending-to-be-officer-kidnaps-13-year-old-boy-he-hit-with-truck-in-van-nuys-lapd/
Adding insult to injury!
That’s a creepy story.
As a child I almost got run over by a truck when I was on my bike (he got my bike, but not me, slow speed). The driver kept offering to drive me home, which I was thankfully smart enough not to agree to. He ended up passing my parents to get me a new bike.
https://www.msn.com/en-in/news/world/canada-set-to-throw-out-13-6-million-doses-of-oxford-astrazeneca-covid-19-vaccine-here-s-why/ar-AAZhXTy
How do you dispose of that much poison?
Normally they dump it in the ocean.
Or did we stop doing that?
Incineration generally works best unless they want to give the fish myocarditis .
So… what happens when we inhale the smoke? And does it smell like Cargill?
Done properly, incineration reduces everything down to its base components.
Of course some CO2, but dont tell Greta.
https://myrepublica.nagariknetwork.com/news/boris-johnson-to-resign-as-conservative-party-leader/
Wow.
https://abcnews.go.com/International/wireStory/uks-johnson-defiant-opponents-time-86353032
Johnson is an incompetent, goofy, flopsweating disappointment to the Brits and to the world. Good damn riddance.
Just wait until you see their next PM.
*snort*
There is no dignified way to admit “defeat” to Joe fucking Biden.
At least the Brits get another so-called Conservative. This person might be singing a different tune if Boris going away meant Corbyn or some similar lunatic coming in.
Yeah, nothing to see there. The election was completely above board. Forced out is a stupid characterization too, looks like Johnson got talked into resigning by an absolute squish which is fitting actually.
::curiously explores source of first link:: Ummm…Sean, are you climbing Everest and you didn’t even tell us??
Fine, imported links. Nothing but the best for you folks.
🎶 I’ll take the high road, you’ll take the low road 🎶
suh’ fam
whats goody
Daily Quordle 164
8️⃣6️⃣
7️⃣5️⃣
quordle.com
Daily Quordle 164
5️⃣3️⃣
6️⃣4️⃣
Quordle is asshoe.
Who wants a martini?
South African Gin Is Made With Elephant Waste
Unless it’s made of waste from 20 year old Natalie Portman I want no part of something like that. Come to think of it, I’ll pass on that too.
Good morning, Stinky, homey, Tulip, Sean, U, Teh Hype, and (somewhere up the page) Lack!
Last night’s rain mean tonight’s Dayton Dragons tickets are for a doubleheader! 😃⚾⚾
So…when it rains tonight, will they make Friday’s game a tripleheader? 🙄
Mornin’, GT!
Doubleheaders are too much. Went to one back in the old days when the big boys played scheduled Sunday doubleheaders, Mets-Giants in May 1964. Left in the 7th inning of game 2. Got home, the game was still going. Giants won in 23 innings.
23 innings?? As Kenny Mayne used to say before ESPN sucked, that would be some kind of record.
The only time they try doubleheaders here is after a game has been rained out, and the plan is to start a little earlier and play two seven-inning games…which is all well and good until the score is tied at the end of seven…
Mornin’, reprobates!
Good morning, ‘patzie! How are you this (::checks outside window, sees some sunshine::) fine day?
Splendiferous! But we sure could use some rain.
Da boids are having a grand old time feasting on the berries in the backyard. Need to get some pix when I have time.
::checks radar:: Looks as if there’s a fair amount in your general vicinity, maybe to your south? If you get any of that, maybe da boids can more easily get demselves some woims!
Philly metro, nothing up here. I really shouldn’t complain. 🌞
Wunderground has been changing it’s mind about when and how much rain we’re going to get, on a minute-by-minute basis. Demmed annoying.
Good morning to all the Glibs, wherever you are.
Every morning I get up early, fully ready to keep up with the Glib pace for the day. Every day I find myself falling farther and further behind. I hate to admit it but it seems that things that don’t get done don’t seem to matter. There is no more catching up. Still, had my coffee and saw a deer at the end of my driveway.
Mornin’, 4×20.
it seems that things that don’t get done don’t seem to matter
Coffee, wildlife, good friends, family… These things matter. Most everything else is noise.
Good morning, 4(20)! Don’t worry about keeping up. Set your own pace.