
Introduction
- I think the word “post” is ambiguous in the context of this forum so I’m not going to use it. Content is “articles” (including fiction, photo essays, etc) and comments.
- Similarly, the word “forum” is ambiguous. The Glibs website is a forum. But there’s also the Glibs Forum (aka chatroom).
- In addition to the two above sites, I also have bookmarked Tonio’s article on how to edit your article in WordPress.
- The yet-to-be-published authors don’t have access to the WordPress Dashboard, and thus can’t submit or edit their own article. Virgin authors are referred to the Leads/Submissions tab at the top of the forum. An editor will
thrash you mercilesslywork with you in a kind and supportive fashion until your article is ready to go. - This article describes the use of the WordPress Classic Editor. The WordPress Block Editor became available on Glibs after this article was written, but is covered briefly at the end of this article.
The Process
Tonio’s guide is the gold-standard source of what to do to compose an article that gladdens the hearts of The Powers That Be. But I’ve been hankering to add my own viewpoint. These are the steps I follow:
- Create a new article.
- Enter the title.
- Type or paste the text of your article.
- Enter the Excerpt.
- Upload your illustrations.
- Place, size, and caption illustrations.
- Select a Featured Image.
- Hide Featured Image on post and turn off the Sidebar.
- Choose the Categories.
- Preview and Proof.
- Submit for Review.
Create a New Article
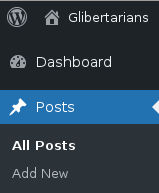
When logged in, go to the Dashboard by clicking on:
- Glibertarians (at the upper left corner)
- Dashboard
- Posts
- Add New
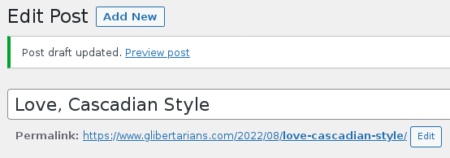
Enter the Title
In the example below, the article title is “Love, Cascadian Style.” This text box is not labelled. Append DRAFT to the end of the title so that TPTB know not to publish it if it’s accidentally submitted.
Type or Paste the Text of Your Article
Always choose the WordPress Classic Editor if asked, unless you have special requirements (covered at the end of this article).
Tonio’s article covers this in-depth, particularly gotchas with pasting text from word processors. But even Tonio is not perfect. One of the omissions from his guide was that you have to click on the Toolbar Toggle control (highlighted in the illo below) to unlock the second row of controls including the critical Paste as Text and Clear Formatting.
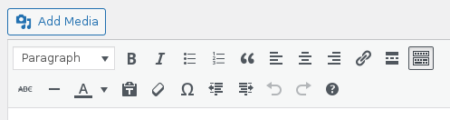
The section headings in this article are the Heading 3 text (click the word “Paragraph” to access text styles) , which is about as large as you need for most articles. The article Title should be the biggest text on the page.
A special note about tables, ie spreadsheet-style text: While you can manually compose them in HTML (as DB does because he’s just that geeky), it’s generally easier to get the table right in your word processor or spreadsheet, then export the table as a JPG file and place it as an illo. You have much better control over the appearance that way.
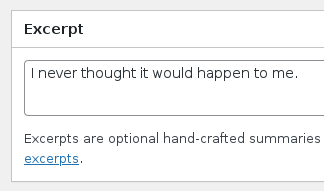
Create an Excerpt

The Excerpt is the text that appears on the Glibs main page, aka “feed.” The Excerpt appears next to the Featured Image, which is covered below. The Excerpt should either describe your article, or contain an attention-grabbing quote from the article.
Upload Your Illustrations
Always upload the highest-quality available (big file size, high resolution) version of your illustrations. WordPress automatically compresses uploads to save server space, and the better the quality of your original the better the compressed version will look.

Prepare you illustrations by editing them in Microsoft Photo Editor, which is the basic photo editor app included with Windows. The illustration above is an old wedding snapshot. Despite the photo flash, it’s a bit underlit. The people to the right are distracting background elements which takes our eyes away from the subject of the photo. First we crop the photo using the Crop tool, then we click the Filter tool and choose Enhance; this automatically brightens and sharpens the photo. We don’t fix the color balance because we want to preserve the fading of the photo print for reasons of authenticity.
After you edit your photos, use Save As to save a new copy of the photo with a descriptive name such as “Mr and Mrs Hobbit – Cutting the Cake fixed.” In this case, “fixed” refers to the cropping and enhancement. Best photo management practice is to never overwrite an original photo with an altered image; we are not the FBI, here.

To upload illustrations, click on:
- Add Media (blue button in illustration below)
- Upload files
Follow the instructions to upload your image(s).
If the file names of your illustrations are just a date and time stamp (as in the example below), do your fellow Glibsters a solid and enter a Description that others can use to search for your illos. Media Library Search feature looks at File Name and Description. Search does not look at the Uploader By field, even though you can see that when you click on an image. Please note that anyone with Media Library access can add Descriptions to files at any time.

We do not recommend setting Captions in the Media Library; set captions using the in-article Display Settings (see below). A caption added in the Media Library controls will be the default caption each time an illo is placed in an article. While this can be overridden in the Add Media / Edit Media controls, it’s a PITA for others to deal with if they use your picture at a later date (encouraged). FYI, if you change a Caption in Media Library, that will also change the caption for previously-published incidents of the picture that relied on the Media Library caption; that’s why it’s best to leave this blank. Also, alt-text isn’t what you think.
Place, Size, and Caption Images
Tonio’s article covers this in detail. Several addenda:
Before placing illos, makes sure there are at least three blank lines where you want to place your illo; put the illo on the middle line. Failure to do this may make it difficult to add text below the illo as WordPress is funky that way. Also, white space makes your article look better. Then you can use the image edit control to add a caption (optional) and to resize the illo.
The best-looking illos are one-half to two-thirds of the page width, and generally 400 pixels or less in height. There are exceptions to this rule such as Mars rover panoramas, photos of the Washington Monument, etc. As you scroll through an article you should always be able to see text (including title and headings) above or below an illustration, ie you should never be able to see just the illo with no text (captions do not count as text here). That makes the transition from text to picture to text go smoothly. The one exception is, of course, articles that end with an illustration, but you should still be able to see text above the illustration whenyou scroll down all the way to the bottom.
Centered alignment with no text surrounding (left or right of the illo) is the most foolproof. You can experiment with other alignments, and flowing the text around illustrations, once you become more proficient with WordPress.

Once you add an illo to your article, you can resize it using the Size control (illustrated above). If the preset sizes don’t work for you, choose Custom Size and manually change one of the dimensions by typing in numbers, the other dimension will auto adjust to maintain the aspect ratio of the illo. Please note that resizing done with the controls above does not affect the original image in the Media Library, it only affects the instance of the image within your article.
While it is supposedly possible to move illustrations around within an article, using the image drag-and-drop controls often ends in tears. When in doubt, delete the problem illo from your article, save the article (which you should do before every major change, anyway), then add the illo back in again.
WordPress also offers an Edit Original control which lets you crop and flip illos. Use of this control is not recommended. It was hinky in earlier versions of the website and has not been tested post-upgrade. Do your fancy editing outside WordPress.
Select a Featured Image
The Featured Image is the illustration that appears on the Glibs main page, aka “feed.” The Featured Image appears next to the Excerpt.
While you are not required to have interior illustrations, ie those that appear in the article itself, you should have a Featured Image. If you do not choose one, one will be provided for you by the Art Department who are notoriously bitchy about that; rather like the quality of representation you get from a public defender.

Featured Images must have a aspect ratio of 16:10 which is a wide rectangle (called a “landscape” images in print media). WordPress will automatically crop Featured Images to 16:10 rectangle surrounding the center of the illustration. WordPress is totes Procrustean about Featured Images. That can lead to some interesting results for images which are squares, or tall rectangles (aka “portrait” images). Please note that both Photo Editor and Paint have preset crops for Widescreen (16:9) which is close to the Featured Image aspect ratio; crop your image to Widescreen format and you’ll only lose a little bit from each side when WordPress auto crops the image to Featured Image dimensions.
There is no preview for how the Featured Image will appear on the feed.
Consider the illustration below which is a screenshot of the Glibs feed for a Morning Links article. WordPress automatically cropped the original to 16:10 to comply with the Glibs template spec for Featured Images. So, WTF is going on here? Obviously, it’s a young couple getting frisky outdoors, but why is this relevant to a links article?
The original image uploaded to the media library (below) is a tall rectangle. When we see the entire image, the sight gag based on the sign becomes apparent, and we can see the admonition to “become ungovernable.” (The diagonal black line in the upper left of the illo, and the green patch in the upper right, were both in the original file uploaded to our media library.)

So, how do you fix that? If you’re brave you can use Microsoft Paint 3D to manually pillarbox the image. Paint is the basic image editor app that comes with Windows; this isn’t PhotoShop-level magic. Start by using the Paint Can tool to drop a solid color into the workspace. White works well because it’s the same color as the Glibs webpage background so the pillars disappear. Black also works as a pillarbox color for many images. Drop your illo into the workspace using the Sticker feature; be sure your illo fills the entire vertical workspace and is centered. The image below is pillarboxed using bright blue pillars (not a color you’d normally use), and was cropped slightly to eliminate the round corner in the original.

You can also request that Glibs editors do your pillarboxing for you. Write to your editor like you’re Mallory Archer’s building superintendent asking for a Christmas tip.
Website trivia: At the time Tonio wrote his article, the aspect ratio for Featured Images was 16:9. It’s since then changed to 16:10. Also, WordPress would resize (distort) tall or square images before, now it simply crops them.
Hide Featured Image on Post
and Turn Off the Sidebar
Locate the Extra Settings controls in the Classic Editor sidebar and make it look like the illustration below.
Sometimes you want to use the Featured Image as an interior illustration, too. But it’s much better to manually place a copy it in your article using the Add Media control. If you don’t check Hide Featured Image on Post, the interior image will be maximum page width and cannot be resized.
The Sidebar causes uncontrollable reeing among the commenters, and forgetting to turn it off is a total n00b move.

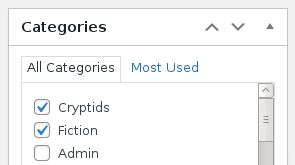
Choose the Categories
Categories appear in both the feed on the main page, and in the Title block inside the article. This is fun mostly because the category keywords I want are hardly ever on the list. “I am Lame” is automatically selected as a default. De-selecting it is optional.
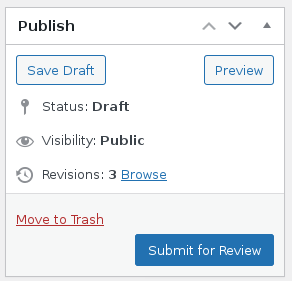
Preview and
Submit for Review
Actually, I click on “Save Draft” and “Preview” frequently as I’m editing the article. The Preview tab does not auto-update as you make changes. To preview recent changes, close the Preview tab, Save Draft, and click on the Preview button to generate a new preview. Often the time spent tweaking an article will be equal to the time you spent composing the article and doing basic illo placement. Editing times will be longer in the case of complex articles with many illos, or if you’re trying to do fancy layout.
When it all looks good remove DRAFT from the title and submit! Submitting your article moves it to the Pending folder which locks you out from editing it. If you need to make changes, email your editor and ask for the article to be reverted to Draft.
About the New, Fancy Editor
We now have access to the new WordPress Block Editor, aka Gutenberg Editor. Don’t panic, you can continue to use the WordPress Classic Editor. But now you know what to do if you are presented a choice of editors, or if the editor looks strangely different.
Embedding videos no longer works in the Classic Editor, as we discovered the hard way after the upgrade. If you do need to embed videos in your article you should compose and edit your article using the Classic Editor, then switch to the Block editor to do your video embedding. Major Gotcha: If you do embedding in an article with the Block Editor, then open the article in the Classic Editor, that will FUBAR the changes. Once you go Block, you never go back.
The Block editor offers a lot of features that are not available, or are unreliable in the Classic editor. Most of us will not need those features since our articles are basic text, links, and illos. We will try to make Block editor resources available in the coming months. We encourage our writers to experiment with this if they are so-inclined, but you’re on your own for the moment as far as support.
Editor’s Note: This article was expanded significantly by the editor, but Richard very much deserves credit for getting the ball rolling on a long-overdue update to the original “Working with WordPress” article. Anything you like about this article, thank Richard for; anything you don’t like, yell at the editor. I’d also like to thank the indispensable R.J. who took an initial stab at supplementing our original WordPress guide with a particular emphasis on illustrations; his work served as a basis for many of the additions to this article. -Tonio
My Firsts don’t need no tips.
Pls. put a link to this
postarticle under FAQs/Resources.I will ask WebDom to do this. But, in the interim, please bookmark.
My goodness. Expanded indeed. In terms of quality there was nowhere to go but up.
The original title of the bare-bones article was “Should you write an article?” which is why the subtitle is “Yes. The answer is always yes.”
The original idea was that this article would run first with the example article “Love, Cascadian Style” shortly after. Scheduling issues decided otherwise which is why that bizarre little composition appeared out of nowhere.
Many thanks to Tonio and R.J. for the fleshing out.
Yeah, I’m sorry that circumstances ruined your joke. Thanks for taking one for the team.
AND BY TAKING ONE FOR THE TEAM, MEAN . . . .
…I don’t have to outrun STEVE SMITH, I only have to outrun you.
STEVE CATCH YOU LATER. HIM HAVE STAMINA.
That was all Tonio. R.J. has been on sabbatical.
Whoa there, buckaroo. A chatroom is a real-time text-based conversation. “Forum” is, in general, interchangeable with “bulletin board system”, which is a threaded, asynchronous conversation.
This reminds me of the painful experience of a mail-list that attempted to convert to a forum only to fall back to being a mail-list, and the mordant jokes about such.
The Forum is something you read using one hand.
This is probably a stupid question, and probably irrelevant as I doubt I’ll ever submit anything, but can you just write an article in HTML locally and then dump it into the editor as-is, or do you have to do it this way?
I tried that once. WordPress FUBARed all my beautiful formatting.
I write mine locally in Word, and copy and paste it into the editor. Everything carries over fine except the links (if any), and they may have fixed that.
Not recommended. WordPress recognizes a subset of HTML. To Richard’s point, it will jack up. I suggest submitting as text with no formatting, and using to indicate where you would like your photo to go, etc…
That’s what I do (did). Tonio knows that old people didn’t understand any of what Richard so painstaking outlined. Tonio has been a savior for the post 60s generation and I greatly appreciate that.
You could, theoretically, but I don’t know how well that would work. The WordPress Classic Editor has both a Visual tab (GUI), and a Text tab (HTML). The Text tab shows, and allows you to edit, the HTML directly, but I rarely do that and only to manually add &NBSP when the GUI won’t let me.
My links posts I compose directly in the GUI. For my fiction pieces, and the works of other writers who can’t/don’t edit their own stuff, I paste the text using the Paste as Text control (strips all formatting except line endings), then re-produce all the bolding, etc. If you import text with formatting, WP adds annoying SPAN tags around each paragraph and generally FUBARs the text. This is covered in detail in the original guide.
Well, I *did* say it was probably a stupid question… Whoops. Scrolled right past the link in this article because I assumed it was a link to the “A Call For Articles” sidebar-stickied guide.
As said, I probably won’t ever submit anything, I was just curious. Thanks for explaining… again.
You seemed willing to write about Calyx vs Graphene…
I rough-drafted a piece on my many privacy schizo bugaboos, but it become unwieldy at 2000+ words and vacillated between too dry and too preachy. It’s a pretty tech savvy bunch here anyway, I figured anybody that cared either already knows or can find out more easily than listening me prattle on like a manic street preacher.
I’d be happy to read your wild gibberings as a baseline for further investigation.
Eh, maybe I’ll try to revive it eventually, but I wouldn’t count on anything. Like Mr. Humungus, I too dislike subjecting myself to any more scrutiny than is necessary. If I listened to my mental filter I probably wouldn’t even post comments here tbh.
By the by, if I type “become” when I meant “became” just one more time I’m going to save you all the trouble and just fucking lynch myself.
I am pro-Pat, it’s good to see you commenting again.
Sounds like your letting yourself off a little easy there Pat. /s
I hope you continue posting here, I like more voices rather than fewer.
You guys are too kind. I very much missed this place while I was gone, and it’s been nice being back, despite the circumstances.
Generally, 1,000 – 1,200 words is the article length that works best, but there are exceptions, of course. Like the behemoth above.
But I’d be glad to look at whatever you have. Sometimes splitting longer articles in two works. For a two-parter we’d like both submitted at the same time.
So short?
Each part of one of my stories average 3,000 words 🙁
For a two-parter we’d like both submitted at the same time.
Oh.
Well…
I’ll stick to my plan of submitting my FreedomFest write-ups as I finish them. There’s too much for one article.
Oh.
Well…
Yeah, me too… guilty as charged.
I was figuring on more like 800 words, but it’s still a little long-winded. If it ever takes coherent shape I’ll send it over. Thanks for the advice, and for your work in keeping this place running.
Since I publish weekly on Thursday night, I aim for 250-400 words. Any more and people moan about it. Night shift should be short-form, opposed to the intellectual daytime articles.
Thank you. There are some great tips in here. I’ll curious about that new editor, I’ll have to give it a shot.
Thanks Richard. I started experimenting with the block editor this past weekend. It’s funky. I am still trying to embed TUBI videos. I also noticed that links made in the classic editor do not appear as links after the upgrade. I haven’t done much exploring but it seems limited to drafts in progress.
I’ve only written 3 (or was it 4 articles?) for Glibs. It is hard to put yourself – and your thoughts – out there to be exposed to such a clever bunch. And writing humor – good lord is that even more difficult.
And writing humor – good lord is that even more difficult.
You nailed it, then. At least, we all laughed and laughed.
(Sorry, just yanking your chain. Some cheap shots are just irresistible.)
My older brother – I shit thee not – went to Second City Improv school in Chicago. He is one of the least funniest people I know. Of course _he_ thinks he is extremely humorous which makes it even worse.
I suspect the same is often said of me once I’ve left a room.
Not to rag on my brother – I do love him like well a brother – but writing good comedy is difficult.
Have no fear. If a dork like me can squirt verbal diarrhea on the page and not get banned, a fine, upstanding Humungus would have no problems at all. Don’t psyche yourself out!
This is actually a pretty generous audience from my authorial experience.
Just pretend everyone is reading your article naked.
Well, that’s just the truth. /Toobin
Not all of us. I wear my article reading gloves, for instance.
That’s a very helpful article.
Thank you, Richard.
You’re welcome!
“Once you go Block, you never go back.”
snigger
I posted my email address on your article page last night.
Got it! You’ll be hearing from me soon. (Cue ominous music.)
I was figuring that as some sort of Mondrian reference.
*sees what you did*
Then there are entries about how great white space is, which is of course racist, unless you also mention how they are unaccountably taking up space that used to belong to black and brown letters.
I’d rather have the thrashing. If it’s done by a bearded ursine man.
Bookmarked.
This is wonderful! I am rapidly running out of excuses for not submitting something.
Alt Text is exactly what I think it is. A text replacement in the case an image file is corrupted or not located!
…and special thanks to Neph for explaining the difference between true alt-text and an image title attribute (which is colloquially, but wrongly, called alt-text here).
…I make a fine technical point and you threaten me with wedgies. Neph makes a fine technical point, and you shower him with praise.
Oh… I have been threatened with wedgies as well.
I’m just a charming bastard from time to time.
Sarcasm, disguised as praise.
Ackchyually, alt-text is also used for visually impaired reading modes and SEO as well.
Yeah, I’d say the impaired reading mode would fall under replacement for an image file. Never dealt much in the SEO world (which is probably for the best).
Strictly speaking, the image file may still be rendered by the browser, but the screen reader will just reproduce the text.
As often as Google changes their algo, I have no idea if alt-text is even that meaningful for SEO anymore. It was once.
SEO? Are we supposed to guess?
OK… Semi Erect Organ.
It’s actually worse, if you can believe it: Search Engine Optimization.
search engine optimization
So what you’re saying is it’s really Subprime Escrow Organization.
*puts new tape over computer camera*
To be perfectly honest, I created a table in LibreOffice Calc, and then copy-pasted it into the editor. LibreOffice did all of the HTML. I had to make some minor tweaks to it, but LibreOffice did the heavy lifting. I may have even copied from LO Calc to LO Writer, and then copied *that* and pasted it into the WP editor.
(I write my articles in Notepad with basic HTML and fine-tune once I paste it in the source view in WP)
(tell me you started working with web sites in the 90’s without telling me you started working with web sites in the 90’s)
I had a Geocities page around the turn of the century. Then I wanted to do some stuff that the Geocities editor didn’t let you do. So I borrowed my dad’s copy of Microsoft Frontpage. Then, as one does, I found out that the HTML produced by Frontpage was unusable gibberish that didn’t even render properly in IE, let alone any standards-compliant browser. Sifting through the gibberish spit out by Frontpage is how I learned HTML. Thanks, Microsoft!
So you trun out indecipherable HTMl that doesn’t even render in IE?
The best way to learn how to do something right is to first learn every possible way to do it wrong.
My website nowadays is static and only a handful of pages, so my HTML is stupid simple, but still probably wrong depending who you ask. I cleaned up the CSS quite a bit over the years. It was spaghetti when I started.
Now it’s linguini?
More like fusilli. Just like the Seinfeld episode, I pulled it out of my ass.
I compost in LibreOffice, then I add extra carriage returns in notepad, and paste it into wordpress, set attributes and post.
I’m very lazy.
LOL
Who knew, right?
I do initial drafts in Google Docs, just as a way to make sure it’s saved regularly. Then copy and paste it into the WordPress editor to clean it up and try to set up a layout that I’m at least able to deal with when it posts.
I read the terms of service for google docs and have never used it since.
At the time I read them, section 11 gave them the rights to do whatever they damn well pleased with anything and everything you put into a google doc.
Thanks Richard, Tonio, and R.J.!
I’m using the block editor for my first FreedomFest write-up. The draft is done, it has illustrations. I’m reviewing and tweaking.
I’ve discovered that the block editor, once you get the hang of it, makes moving images around much easier than the classic editor.
Test, test. I keep getting Server Internal Errors when I try to reply to DEG’s 11:44 am comment. Is it my comment or the site?
Seems ok. Must have been a hiccup.
Who knows. I’ve found when I get those errors… sometimes I can repost the comment and they will go away. Sometimes I tweak the comment and the error goes away. I have no idea what is going on since I don’t have access to the server logs.
Testing
I call shenanigans. This is NOT my process as I am no longer allowed to come up with my own titles anymore.
3. Profit!
You’ve left out the monetization plan.
Excellent idea. Pay a subscription fee, and you can change your title.
That’s always “collect underpants.”
Daily Quordle 204
5️⃣4️⃣
6️⃣3️⃣
A good day
Kamala Harris unboxes the evidence from Trump Raid.
“This is Hillary’s box!”
She’s better looking than Kamala.
And her laugh isn’t as annoying.
But I like the video anyways.
Thanks for the tips.
I swear I changed the tags on my latest article, but they either didn’t stick, or the editor switched it back to the default in punishment for not having a featured image. Thoughts/suggestions?
I don’t know. Sometimes I think our instance of WordPress is in the initial stages of evolving into Skynet and, lacking better means at the moment, is trying to kill us all with frustration.
Great, even skynet thinks I’m lame.
They thought this cunte was going to help the FBI’s image?
Former FBI counterintelligence agent Peter Strzok joins Morning Joe to discuss the FBI’s search of Mar-a-Lago, Trump’s defense of bringing classified documents to his Florida residence and GOP reaction to the FBI’s search.
I’d say this is a pretty good encapsulation of what the FBI represents.
Winter is coming.
Better get those coal plants on line, Germany.
Dumb fucks.
Just spoke with someone who has been living in Germany for several years and moved back to the States.
His take?
They’re completely and totally fucked and the German people are too subservient to do anything about it.
Coming soon to the US of A!
Whatever they do I hope the solution is final.
Liberal World Order is worth it.
RC Dean and others with a medical background.
I have a relative that has high BP, and lately has been having issues with a high heart rate with little exertion. Her FITbit recently indicated several Afib episodes. She went to the family doctor and he didn’t see it when he was examining her. He is requesting a heart monitor for her.
The question or issue I have is how long should she wait for this monitor? She can’t get it before the end of August, but if this is a potentially life threating situation this seems like too long to wait.
Any insight would be welcome.
Age, height, weight?
So many things here. How high is high?
But yeah, If she is having trouble walking up the stairs or something, there could definitely be something amiss. GPs aren’t the answer. See if she can get in with a heart specialist.
Age 51, 5’6″ weight over 200 lbs. High is over 100/180 prior to getting on medicine. There is occasional bouts of a racing heart rate and flutter. My concern is that there is a immediate issue that cant wait 2 weeks.
The doc wasn’t interested in the Fitbit data? I know it’s not a medical device exactly, but, it is something, especially combined with a patient’s report. Seems like a referral to a cardiologist would have been more fitting? /No medical background
No doctor here but did she get a EKG?
Also would suggest a blood pressure machine for home use. My own blood pressure raises dramatically when I’m at the doctor’s office – only to drop to a very healthy range when I’m at home.
The last physician I saw immediately picked up on that with me as well. “White coat syndrome” he calls it.
Yep. I used to bring in two weeks of numbers to forestall the fucking lecture.
I don’t like to rag on GPs, but they have completely lost the plot. One reading means nothing. Literally. But they are under such stupid time pressure to see patients it’s really no wonder.
“Less salt, more whole grains.”
Yeah, no.
Yeah. Still doesn’t matter to the docs I’ve had. They still want me on the damned meds.
I call it medical anxiety. Now I have quit looking at the numbers on the after action report. At this point what difference does it make.?
If there’s any questions, get a second opinion. Referral or self referral to a specialist would be my choice.
Not a doctor.
Not a doctor, but I think Gustave’s advice is good.
I was thinking the same thing. Set up a cardiologist appointment asap. I have no idea how easy or hard that might be.
I would do that. This is something sudden and that should be looked at right away. When you call, just ask if they require a referral.
Just call. Some specialists will take self referrals and some want a referral. Either way, involve the GP or find a different one. My experience is that specialists often just want to handle a specific task or incident and fo not want to handle longer term or ongoing management.
I hope for the best.
When I had prostatitis – not recommended – over a decade ago getting to a urologist was like pulling teeth with my GP. And I had to wait 6-something weeks to see the specialist – six very horrible and painful weeks to get some antibiotics.
I had a bout of idiopathic epididymitis – also not recommended – for which I sought treatment at the aforementioned physician. The guy’s a crusty old badger, but he’s a hoot. He literally asked me in these exact words “Have you been banging any whores or anything like that?” He gave me antibiotics and a referral to a urologist. Thankfully the antibiotic did the job, because it was 4 months out to see a physician assistant at the urology clinic to which he referred me. None of their MDs would even see a cash-pay patient, and the 3 other urology offices I called were not accepting new patients. There may possibly be a shortage of pecker checkers.
Funny you should say that. I’m on 3 BP meds, and one of them is also for a high heart rate. My doctor recently retired and in the process of finding a new one, I ran out of the heart rate drug. Not realizing there are withdrawals and a substantial rebound. I had 4 or 5 days of heart rate over 120, anxiety, loss of appetite, insomnia. It was not pleasant. But I went to someone new yesterday and got refills, and all is well. This sort of thing is not to be played with.
Is the heart monitor ordered by the doctor? I’d just buy or borrow a FitBit for a few days and take that data to the doctor. In my case, I check my own BP pretty often and use that when we make decisions. Usually in an office setting you’re nervous and the reading isn’t going to be typical, plus your BP and heart rate will fluctuate wildly throughout the day.
The person I’m referring to had the same issue when she went off the BP meds, similar situation. She recently went back on then started to get better with lower BP. This Afib result is something new due to the feature just being added and her getting a fitbit for this purpose.
The question would be whether they ran bloodwork on her.
Heart damage generally shows up with some fairly standard tests.
And cardiac stress test, unless contraindicated or not recommended.
Thanks for the sanity check everyone.
I had others telling me to get her to an ER, kick in doors, and other hyperbolic reactions. I wanted to research my self as well as get some third party unbiased options prior to me giving advice.
Good luck. I hope she gets it figured out and on a plan to fix it.
RC Dean and others with a medical background.
Dude, I’m a lawyer who works in a hospital. Sorry, can’t help. But I have no idea why it should take that long to get a heart monitor. Because it shouldn’t.
One thing that might speed things up is to ask the physician if the “standard of care” for heart monitors is to have the patient wait a couple of weeks. “Standard of care” is magic language that puts physicians in fear of malpractice lawsuits.
Noted
I had my loan sold about 5 times before I decided to pay it off sooner with savings. At that point we were paying extra per month and making one extra payment per year. Finally the bank decided that they were not making enough form us. The new bank note holders did everything possible to encourage late fees and missing payments.
They got rid of the big payment book from my original bank and sent a bill each month. Each month it came later and later till it had to be sent out in the same week or be late. We were going to electronic payments, but it was a PITA. Then we would get a congratulations letter around the holidays or randomly indicating we could miss a payment with no penalties (in the small print there was a fee and interest that would be charged for the privilege).
Noted. Thank you.
If you are/she is that concerned, I’d trot myself into the ER where they take women with heart concerns very seriously. They’ll put her on an EKG, draw blood, and get a referral to a cardiologist (who is probably difficult to see). If she’s lucky, the most popular cardiologist will be on duty and be able to see her and then she is his patient.*
*I say this because I have a very popular cardiologist. He is popular because he is awesome and also very good at his job. My aunt could NOT get in to see him at all, as he was not accepting new patients. Then she went to the ER, he was on call. Boom, she’s his patient and she can see him now.
If that is not desirable, then I second the second opinion suggestion.
My mother lived with intermittent afib for years, controlling it with meds. The Holter monitor didn’t catch it at first, but finally did when her afib became worse, and she was put on medication. Just within the last 2 years, she had atrial ablation, which is the surgical treatment for intractable afib. I do not believe it will kill you, but it will make your life miserable. Usually when you can’t breathe, you’re miserable.
If you are/she is that concerned, I’d trot myself into the ER where they take women with heart concerns very seriously.
Depending on your benefits, be prepared for a substantial bill.
In my case, I knew what it was, but they did not listen to me. I had called my doctor for an appointment, and the nurse told me to go to the ER. Very frightening when Dr. Google has assured you you have an ulcer and the cardiac team pounces on you immediately upon checking in.
Thanks for the insights.
I should say, I do not believe AFIB will kill you. I did not mean to say that atrial ablation might not kill you.
This is an odd day – a good friend of mine would have had his 50th birthday if he hadn’t been hit by a car. Chris was kinda-sorta the grandfather of the local punk rock scene. He threw countless parties – with live music in the basement! – at his house, was always generous with drink and cigarettes, and really good with kids. As a teenager he even married his then pregnant girlfriend, even though the child wasn’t his. Raised that son as his own.
He was a tool ‘n’ die guy – in Georgia driving home from some late night job with his son, who was apprenticing. Accidentally nicking the bumper of his car against a guardrail, he went to pick up said bumper, and get hit by a car, driven by a man on a suspended license. One police stand-off latter and the hit ‘n’ run driver was arrested. Chris was transported to the hospital. His wife drove there, thinking Chris was going to be alright. He had been in so many scrapes before – but, sadly, he was dead from wounds sustained by the impact.
His funeral here in GR was the most packed I had ever been to – so many tattooed freaks, his extended punk rock family – came to pay their last respects.
So sorry LH. What a tragedy.
Sorry, brother.
Sorry to hear that. Sounds like he just had very strange rhythms, but he stomped on the terra. The 8th was the birthdate of my childhood best friend who was shot and killed several years ago. We had lost touch in our early teens, but it still made me very uneasy. His killer got off at trial.
Sorry.
I should have added that he died almost two years ago. Right now there are lots of FB posts among his old circle of friends, a sort of post-death birthday remembrance.
Weird how the ghost of that scene still lives on even though so many have moved on from it. I had to get out in my 30s – too much drinking for a guy with a kid and a mortgage to make.
We just crossed a year since my oldest childhood friend was killed in an accident. It’s a weird thing – we hardly ever saw each other, but when we got together it was like no time had passed at all.
He was a great dude, too. His memorial was packed.
Sorry.
Wow. That’s maturity beyond his years and magnanimity beyond most mortals. Sounds like a hell of a good guy.
My condolences.
12. Profit!
Thanks for the very in-depth article. Bookmarking this for my first solo article.
Climate Change May Finally Reveal Loch Ness Monster, Bigfoot and Other Cryptids
STEVE SMITH HEAT UP HIKER BEHIND WITH CRYPTID FRICTION.
I wonder if it’s too late for me to become a cryptozoologist…
Seems like I’ve heard of this before… Oh yeah, ManBearPig.
I’m trying to figure out if I’ve successfully paid off my mortgage.
In the meantime, here’s a Random Catushka
I’m trying to figure out if I’ve successfully paid off my mortgage.
Congrats?
Thank you.
I was at $1800 and figured I should try to get rid of that debt.
And now you can write an article on how you paid off your mortgage.
“I piad more than the minimum every month, and it paid of the loan in seven and a half years.”
Not a very long article.
You write fiction, spice it up some.
You did a great job, UCS. You will be amazed how comfortable it is to live rent free with only taxes and insurance, which are a BIG DEAL these days. I paid off my first house in 8 years, with an 8.5 % mortgage. Good things began to happen after that. This house was pay as I built, 2 years worth of sweat equity.
Congrats, now avoid the credit cards unless you pay them off every month.
Well that would be a pretty short article:
1) Buy less house than the banks say you can afford and/or are willing to lend you.
2) If possible do a 10-15 year mortgage (don’t ARM unless you are very confident), but a 30 is OK so long as…
3) There is no pre-payment penalty – put all excess funds (for your personal definition of excess) towards pre-payment.
As long as you did 1) and keep a stable income, it will be gone in a fraction of the loan term.
I got a 30 year fixed rate no prepayment penalty, and bought a house only slightly over half of what I was prepapproved for. I also got the loan preapproval done before shopping for houses, which the bank and the realtor remarked was not the way a lot of people did it, but the realtor appreciated the approach since it meant I wasn’t wasting her time with looking at houses I wouldn’t have a chance of closing on.
I was continuously floored by the amortization schedule. It was astounding how much interest you ended up paying on a house. And how much you ‘saved’ by paying it off as quickly as possible. No, I’d rather pocket that $150,000 thank you very much.
By my calculations, I saved about $200K in interest payments not made.
You should write an article on how everything has already been written.
So let it be written, so let it be…. written again.
That’s my story, except for the Re-Fi from a 30 to 15 year after the rates dropped significantly. The 15 year monthly payment was nearly the same after.
I went from a 30-year at 5.875 % (with about 18 years left) to a 15-year at 3.5% to a 10-year at 2.5%. I don’t remember if I calculated the savings on the first refi. But the second refi wipe out about $90,000 worth of payments at the end of the mortgage when I am supposed to be retired and living on a fixed income.
Congrats!
Thank you.
SQUEEEEEEEE!!!!! So cuuuuuuuute!!!!!
Of course, a gray kitteh can wear just about any color and look fabulous.
And mazel tov re: the paid off mortgage!
I still owe on the roof.
The new baby rhino started trying to explore last week.
I figured you’d like the cat, but I didn’t have any context in which to share the image.
Cute cat pics are always in context.
Nice.
I don’t think I’ll see that milestone for a long time now now.
I have been crazy aggressive at paying down the loan. Because my only goal right now is to be out of debt.
I did that, was on track to pay off a30 year in 15, then I moved and my finances are now fubar by comparison. I am expecting/hoping for inflation now.
😧
I was making minimum payments because my interest rate was so cheap and I was doing better with my spare cash on the stock market.
I escrow tax and insurance. I got a lower interest rate from the refi company when I refinanced if I escrowed. Sure.
Well…. the mortgage company screwed up the property taxes multiple times. That pissed me off and I have started paying extra to get out from them sooner. I can’t get a lower interest rate by refinancing in these conditions.
*looks at brokerage account*
Yeah, I can’t seem to even break even on the stock market.
Now that your mortgage is paid off, what are you doing with the excess?
You could tell us in an article.
coke and whores?
Paying for the roof.
Plastic crack.
cheap and I was doing better with my spare cash on the stock market.
Did that with a car; ‘safe’ bond fund returning ~5% steadily, had the cash on hand to buy the car outright, but financed at 1.9%, stuffed the cash into the fund. Still couldn’t stomach the debt and paid it off much quicker the 5 year term, but still effectively got something like a $1500 discount on the car by doing it that way.
My first new car I got a loan for. I paid the loan off immediately. I wanted the loan on my credit report in hopes that it would help my credit rating. I’m not sure it actually did.
A different type of debt improves your credit score when the loan corresponding to that debt is not paid off. Once it’s paid off–no help. The mortgage for our previous house was converted to HELOC and for more than a year, until we took a mortgage for a new house, my credit score was noticeably lower than before. Apparently, a HELOC is not considered a different type of debt, unlike a mortgage.
I had my loan sold about 5 times before I decided to pay it off sooner with savings. At that point we were paying extra per month and making one extra payment per year. Finally the bank decided that they were not making enough form us. The new bank note holders did everything possible to encourage late fees and missing payments.
They got rid of the big payment book from my original bank and sent a bill each month. Each month it came later and later till it had to be sent out in the same week or be late. We were going to electronic payments, but it was a PITA. Then we would get a congratulations letter around the holidays or randomly indicating we could miss a payment with no penalties (in the small print there was a fee and interest that would be charged for the privilege).
My loan was sold only once so far – immediately after closing and before my first payment. I got a letter from the credit union asking if I wanted to refinance immediately afterwards… and still before my first payment.
I am experiencing something like this now. Bend new loan, won’t let me pay online, even though they do have a payment system, and ‘accidentally’ included the signup paperwork in my first bill from them.
Previously I had everything auto debited. What a waste of my time and (stamp) money.
I’m still sticking with the minimum monthly payments, and sending the rest into brokerage accounts. Considering I’m under 4% interest, I’m hoping that the returns through inflation/market/interest outpace what I would have saved in mortgage payments.
Hell, even after I pay off the mortgage, insurance and taxes will still be about half of what my current mortgage payment is.
You can start putting that “extra” money into guns & ammo now.
That’s awesome!
Congrats!
Thanks.
Agreed. The freedom of having no mortgage is great. Now is the time to check on homeowners, flood, and other insurances to make sure they are set at the right risk level. You will have and should put away an extra savings per month for repairs and catastrophic issues. With more savings a higher deductible could save you quite a bit per month.
THIS.
My wife and brother-in-law visited Dawson Springs while we were in KY last week. Their parents grew up there. It was about 80% leveled by the Tornado last year.
What he told me is that a lot of the homes were third generation. Grandparents to parents to them. If there was ever a mortgage it was gone a long time ago. Most of the people had nowhere near enough insurance to rebuild. So they took the insurance check, bought a trailer and stuck it on the lot.
My BIL says they expect FEMA to buy them a new house. That isn’t going to happen, of course.
I’m into year two of renting. I’m not totally convinced I’m ‘throwing money away’ at all. No 15K on a new deck, 20K on a kitchen, etc.
I was never brave enough to sit down and calculate how much I actually spent on the house we sold last year and supposedly made money on.
A-fucking-men.
/salty
I was never brave enough to sit down and calculate how much I actually spent on the house we sold last year and supposedly made money on.
By the time you add interest, taxes, insurance, and repairs, the whole “but your home is an investment” thing starts looking like a real scam.
My home is someplace to live.
If it costs less than renting, I’ve come out ahead.
housing is an expense
All costs that are priced into a rent payment.
Property taxes and interest are money down the hole. Most maintenance is money down the hole.
The principal might or might not be money down the hole or savings depending on the market and inflation.
People who say buying is always the best thing to do are a) stuck in 70s where buying was almost always a good idea, b) stupid, or c) both.
My dad was on the “work 30 years for one place and get a watch at retirement is the smartest thing you can do and shows companies you’re loyal” train till the day he died (1994). It was all I heard in the late 70s and early 80s. Get a good job, stay there, don’t job hop because that shows you can’t be trusted to stay in a place.
There’s that nasty word “loyal” again. Some day I’m going to write an article on that.
Yeah. That and “always go to college or you are doomed” are the two big lies. Definitely write that up.
I’ve heard it explained that we’ve gone from an old heaven style job market (stay in one place, don’t speak up, you’ll be rewarded eventually) to a reincarnation job market (change brings growth, speak up and make a name for yourself, get your rewards when you can). I’m still probably sticking around at jobs too long (well over the 3-4 year mark for the last two positions).
Thanks for all the tips, Richard.
Just the tip
I was going to ask him if he’s had that magazine in his cabin all this time. I lost my chance.
WHITBECK: It’s Time To Bring Down The Church Of Climate Change Once And For All
I would have said ‘death cult’, but yeah.
Malthusians.
Yup.
Richard, I wonder if the screw-up with your article last night was partly my fault. TPTB were going to run my article last night, but because I was going to be gone all day and night, they generously offered to switch with you, moving yours to last night. Something in the change must have gone awry.