Here’s the final installment of my concrete counter top build. In Part 1, we gave some background and prep. In Part 2, preparing the forms and the pour was covered. Here, we grind, polish, and seal, yielding the final product.
Grinding and Polishing
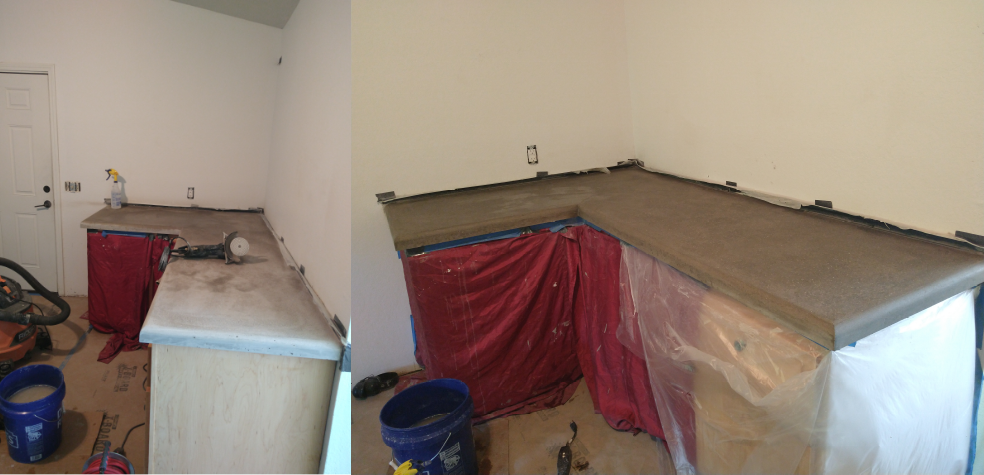
After the concrete sets up – give it at least 24 hours, 48 is good, the first step is to remove the forms. Before doing that, it’s a good idea to clean up the edges where the concrete surface meets the top of the form. This minimizes the chance that you’ll break any chunks off the edge of the concrete when you separate the form. I just use a 50 grit diamond pad or a concrete “rub brick“. To remove the form, simply grip the top edge and pull out and downward. It’s a good idea to create a gap in one section and then work knife or thin piece of wood over the full length of the form; this will start the separation of the form from the concrete and ease the removal. When the upper edge is loosened, simply pry down and out along the full length. The form will separate and snap at the weak point. Obviously, if you’ve built your own form, proceed as necessary – exact procedure will depend on how you built your forms.
Depending on how smooth/polished a surface you are aiming for – and how careful/successful you were with troweling and vibrating the previous step – you can potentially get off easy here. Since I like very smooth/shiny tops and I screwed up the pour with the over-watered concrete, I had a lot of work to do at this stage. Regardless, this will be a messy step, no matter how much polishing you are going for. This is true for both wet polishing and dry polishing; in the former case lots of “mud” spatter, in the later lots of dust. I did both wet and dry grinding, so ended up with the best mess of both worlds. Since I had a very poor/soft surface from the high water content in my pour, I started with a 50 grit diamond pad alternating with wet and dry grinding using a powered polisher. The polisher has a hose attachment, but I didn’t want to hook that up in the house, so I used a sponge and spray bottle and worked in small sections. I replaced all the ram board on the floor and all the plastic protecting the cabinets for this operation. To try an minimize the dust (dry) and splatter (wet) during this process, I built a little hood covered in plastic. I drilled a hole in the side that would accept a shop vac nozzle and sealed the nozzle in with plumbers putty (easily removable when done). I placed that hood over the section I was working on, stuck my head it and started grinding – actually worked pretty well to keep the mess manageable. Definitely put ear protection on and wear a mask under that hood – the mask actually has a valid function in this situation!

On the left, the powered grinder with its circular pads (50-3000 grit – I only went up to 400) along with the hand sanding block – same set of grits, rectangular pads that attach via velcro. On the right, my makeshift mess reducer; you can also see my test pour bench – note all the air pockets on the edge; I did a better job on the pour with respect to air pockets – largely because of the test pour – but some remained. We’ll fix those later.
Once I ground everything down to 50 grit, removing the weak watered concrete and establishing a solid base surface, I just proceeded up the grits to the desired smoothness. I’ll note that even with the 50 grit, there were sections that were rougher than I would like; it wasn’t possible to grind out all the problems with the pour – we’ll fix that a bit later when we fix some of the air pocket holes.
I took it down to 400 grit polish at this stage, proceeding from 50-100-200-400. With each subsequent grit, the mess diminishes as you are removing lest material. After 100, I just kept the surface damp and ditched the make-shift hood. Also at each grit step, I used the hand sander with the same grit to work on areas that weren’t easily reached with power grinder.
One subtely with the Z-form edges – the flat surfaces of the form result in a glass like finish when you pull the forms off. From experience, this will not take a stain the same way the rest of the surface will. If you are staining, you must grind the edge finish down a bit. So I polished the form edges with the same grit (except the 50) as the rest of the surface, even though on the edge it was actually ‘degrading’ the finish.
After getting down to 400 grit, it’s time to ‘fix’ the problem sections of the top as well as the holes on the edge from the un-vibrated-out air pockets. To do this, I mixed up a slurry specific for this purpose. Since I was not using colorant in the concrete, I used the ‘base’ color. It’s applied by hand and you can feel where you need it on the surface. So I spent about an hour just rubbing the counter top with the slurry. It’s not as fun as you might expect. I used a small grout float to smooth it over and hopefully fill over the defects in the counter top and fill in the air pockets. After the slurry set up, I went back under the hood with the spray bottle and a 200 grit pad on the power sander to clean up the slurry. Repeated with a 400 grit pad to get back to where I started, but now with the defects covered up a bit and the air pockets filled. The slurry will stain differently than the rest of the concrete, but the defects were random enough that it should appear like natural stone variation with all is said and done.
On the left, the first pass at 50 grit. Gotten rid of most of the pour defects with this set of passes. Note the air pockets on the edge – less than the test piece but still significant. On the right is the final polishing product – down to a 400 grit, slurried to fill air pockets and larger imperfections on the top, and re-polished.
Staining and Sealing
There are lots of concrete stain products our there. I had some stain from Concrete Countertop Solutions left over, so I just used that – this was the Aqua-Tint stain. They have something like 15 colors to choose from; I restricted myself to “Garden” and “Wheat”. It is actually remarkable how much color variation you can get with just these two colors by changing the dilution. For this counter top I used 4 mixes – undiluted wheat for darkest bits, undiluted garden for medium, 3-1 garden and 3-1 wheat for lighter colors. The color will also depend very strongly on the concrete surface and how long you let it sit on the surface and how damp the surface is when you apply it. But you definitely want a pretty damp surface before you apply any stain to allow the stain to flow somewhat naturally rather than sit and absorb deeply – I’d even say I like the results when the water is a bit puddled on the surface, at least away from the sections you want the darker viens to be. This is the artistic portion of the program and I can’t give exact specifics. My approach was to ‘hand paint’ dark veins using the straight wheat; on the edges of the dark veins, I’d add some straight garden and let it sit; it will soak in and make natural looking veins. In between, I’d add the diluted wheat and garden to fill in space; owing to the underlying variation in the concrete, it won’t absorb evenly and you’ll get a mottled appearance. On thing to be sure of is to try and follow your dark veins over the edge, other wise it doesn’t look natural. You also have to take care to work the edges – if you just put the stain on, it will tend to run straight down and look like drips rather than stone structure. So you need to stain at an angle and expand ‘fan like’ to avoid vertical lines. Connect it back to where your dark veins on the surface hit edge and you can a close approximation to natural stone look. Another technique I found to work well is to use a spray bottle with water to spray across the surface at a steep angle, both with a tight stream and more of a ‘mist’. If you maintain a fair amount of water on the surface, this creates a natural flow with color variation owing to the different levels of water dilution. As the water absorbs and evaporates a bit you can also come back with a big sponge and sort of dab here and there to remove dark spots and create a more natural contrast. I strongly recommend you take your test pour and experiment as it’s the only real way to see what techniques work for you to produce the look you are going for. Also note that, during the process, it might not look great, too blended, not enough contrast – you just have to go with it and when it fully absorbs and dries, some of the colors darken, some get a bit ‘brighter’, and you get a good contrast. Unfortunately, I didn’t get any pictures of the staining process, just the end result.
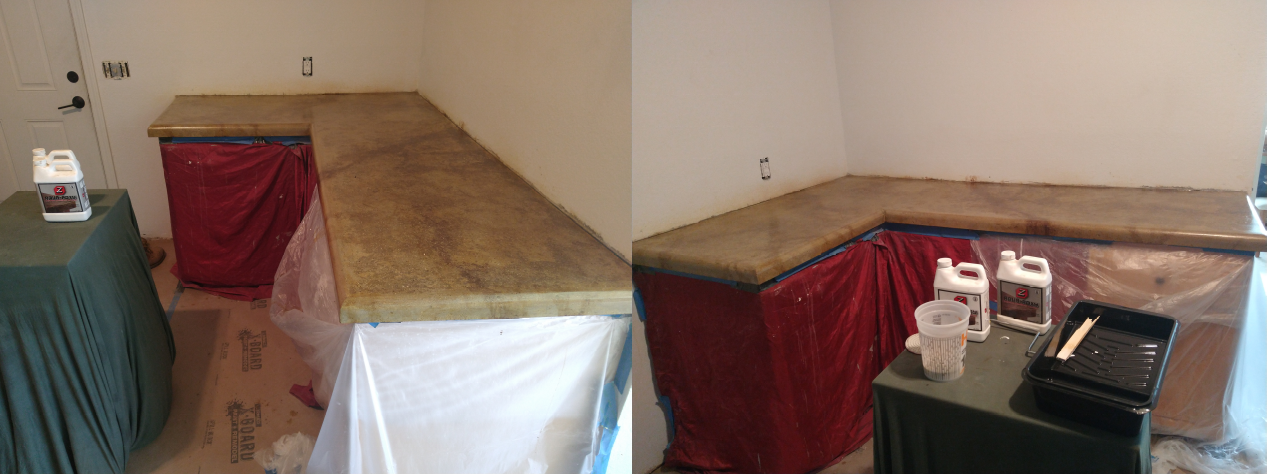
Two different views of the final stain. On the right, I’ve set up the epoxy sealer and am ready to put on the first coat.
The only thing that remains is to seal the counter top. Concrete is porous, even polished and stained, so you need to seal it. Sticking with a theme, I used Concrete Countertop Solutions Aqua-Poxy; it’s a simple 1-1 mix of part A and part B, will fill in any remaining imperfections on the surface, dry smooth and is food-safe once cured. So there’s not much to say here – I plan on 3 coats, so just mix up enough for a single coat and apply. There’s plenty of working time, so not need to hurry terribly. Prior to putting the first coat down, I hand sanded with 400 grit diamond pad – I used the circular one in the palm of my hand as I found that the sanding pad made it easy to go in a single direction and leave ‘sanding marks’ and the power sander was too aggressive for this stage. Very lightly sand and wipe down with a tack cloth to remove residue. I used to ‘tight’ 6 inch roller; depending on the complexity of your edge, you may need a brush, but for the quarter bull-nose, a roller was just fine. This stuff will go on milky white and looks streaky and puddled – the ‘puddling’ is less with additional coats – I think you are largely seeing it pool in residual little holes/imperfections. In and case, there doesn’t seem to be an issue with roller lines; it’s a good idea to back roll as well as come back perpendicular to the first pass using pressure on one side of the roller to avoid leaving lines (much like a dry wall knife when finishing a tape joint or skim coating), but the stuff pretty much self levels and dries smooth. Just lightly sand and clean between coats (roughly 10-12 hours between coats) and you’ll be good to go.
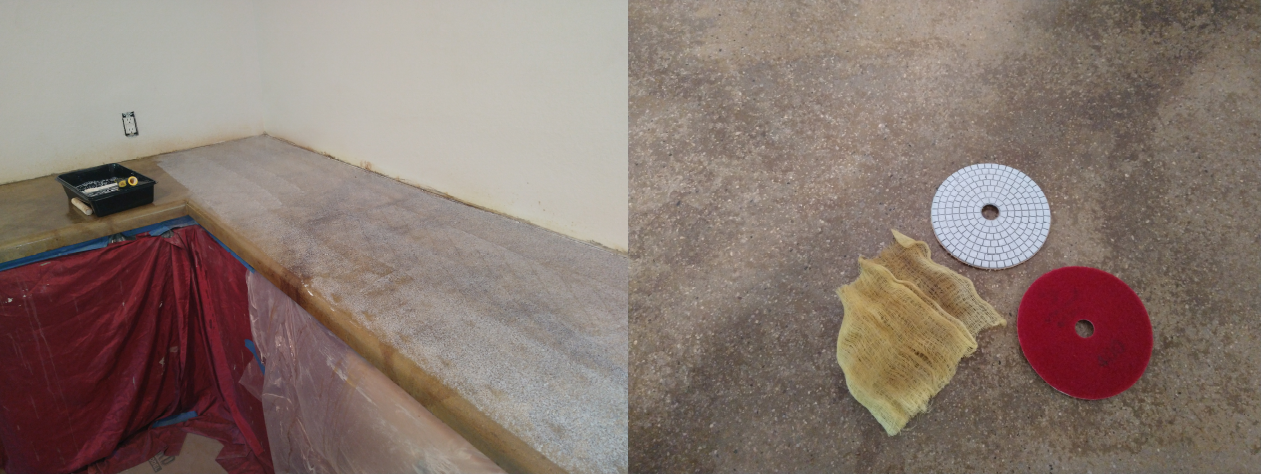
On the left, the sealer is being applied. Note the milky white appearance and streaking. I did come back over perpendicular and back-rolled, but there were still some roller marks but they disappear when dry. On the right, close up of the sanding pad (400 grit) and tack cloth used between coats. It knocks down little nubs of dust and smooths over any residual roller lines, though honestly I didn’t really notice any of those.

And finally, few shots of the final product. You can see the stain on the wall since I was too lazy to put plastic back up – I’ll have to touch up the paint as the stain really doesn’t wash out; there was some concrete staining as well, so I would have had to repaint anyway. In the upper right is shot over the in-progress kitchen island – which will be the next pour.

And finally, few shots of the final product.
Looks good.
Nice alt-txt.
LOL
Neat!
Really cool project, Mr. Meat. Thanks for the series. I’m gonna bookmark it for the future.
Wow. Finished product looks great.
You don’t have any messes. Whenever I finish a project, even small ones, there’s always a horrible mess.
Damn fine! I wouldn’t bother with repainting behind, but would do a backsplash.
But very nice work, indeed.
Is that Gibson with a whammy bar?
+Joe’s Garage
“Don’t you boys know and nice songs?”
“any”
Way to blow the joke, Hobbit.
Nope, PRS SE-24 in the foreground, Schecter Omen EXTREEEEMEMEMMEMEMEM in the background.
OK 🙂
Looks great, PM. I wouldn’t have the patience to try a project like that. So much work. I would want to do it fast and would look like it was done fast.
Sounds like you I went to the same home improvement school.
When I do projects around the house, my motto is “good enough for who it’s for”.
If I do projects at my on speed, they either never get done, or get done too quickly. Hence the Whip Driver, also known as The Wife.
Doing projects on speed is the easiest way to get them done.
(points to Sean’s avatard)
Retarded avatar? :-p
Avatard is about artificial intelligence trying get the mother of its enemy to board a doomed ocean liner by sending a giant retard from the future.
OT: What on earth is a “mild-hybrid” SUV?
https://motorlease.com/article/hybrid-vehicle-types/
Build in Mini-Soda? With no spices?
Probably has a 48 Volt charging system, no plug in ability and some sort of electric assist to get it rolling before the gas engine is needed or at least takes the load off the gas engine from a stop. Instead of a large storage battery, likely utilizes capacitors. In other words, what’s the most you’ve ever paid to replace an alternator? Multiply by 10 and that’s what this alternator will cost to replace.
Normally still some lithium ion battery variety. Likely with iron.
So, the Centrum Silver (“One a Day, plus Iron!”) of cars.
Gaia friendly and cadmium free!
Make it -48VDC and plug it into your phone line. 20ma will charge in no time at all.
https://www.volvocars.com/us/l/mild-hybrids/
Also OT: If you’ve got relapsing MS, should you really be getting yourself knocked up?
That’s so OT (and non sequitur, even for you!) , I don’t know where to start…
There was a commercial for a drug to treat relapsing MS that had fine print to the effect of, “It is not known if [insert drug name here] is harmful to unborn babies”.
That’s sufficiently off topic that I feel safe to paste Andrew Siciliano’s tweet:
“ Packers receive a 2024 1st-round pick from the trade only if Aaron Rodgers plays at least 65% of the Jets snaps in 2023.
If not, the Jets send the Packers a 2024 2nd-round pick.”
As someone with RRMS, sure. Don’t let the bullshit let your life down.
The euphemisms in this series are so weird.
Each lovingly crafted just for you. I think you missed one or two.
I think one of those was from Prince’s “Darling Nikki”.
There don’t appear to be any knobs to polish on that countertop.
Truly a coarse comment.
It was an unexpected twist.
Nice work. I know how much effort these things can be.
In the future, if you want to polish another one with minimal PITA factor, I have the diamond pads for the job. I recommend them all the time for jobs in the tens of thousands of square feet, like a Kroger.
Definitely interested in hints/suggestions, as I’m often – always – flying by the seat of my pants.
That island in the last picture has already grown by about 6 sq ft. So that’s going to be a ~36 sq ft pour (6×6-ish) and though I hope that the grinding will be less as I’ll do a better job with the concrete mix, anything to minimize the time and maximize the outcome is welcome.
Hit me up at scruffyglib at protonmail dot com
In the meantime check this page. They have edging pads in five and seven inch which work well. The guy who designed the abrasive bond is a PhD who worked for 3M for decades. The product just works (so long as the concrete isn’t too soft).
https://www.ameripolish.com/products/SmartFloor-Refinement-System-38
I also have a metal bond dot pad for an initial cut that takes most of the work out of removing trowel marks and flattening the surface.
Interesting piece on an “issue” I hadn’t given much thought to. Property rights, public use, and property tax angles involved.
Free Riders on the Sidewalk
Here in NYC we still have the ugly sheds in the street. It happened that way largely because the sidewalks got progressively taken over by street widening over the decades – most sidewalks don’t have room for “al fresco dining”. I’m OK with some sort of market solution to the issue.
I found out something interesting about my sister today.
She was a pilot for United and her last assignment was United 175 from Boston to LA. I had thought that her ear problems took her off of flight status in spring 2001 but it gets weirder than that. She was flying the route up until Sep 1st but got called to *jury duty*. Only time in her life that she was pulled off-duty and only time that she was ever called for jury duty.
Saved her life.
She was good friends with the flight crew on that fateful day.
That is weird
I kind of wish ESPN had just blocked this fucking game instead of letting me watch it. WTF.
It’s, uh, something.
The people who think the Jets will miss the playoffs are severely underestimating how good that defense is.
The Jets defense is what people think the Steelers defense under Mediocre Mike Tomlin is.
I agree the D looks legit
Bills are playing with fire here. Play for OT the way this game has gone. Taking a shot at the endzone on fringe filed goal range is stupid.
On it.
zOMG
Clenched sphincter moment for Bills fans
Are you fucking kidding me?!
I can’t even with any of the last three hours plus.
/Immediately flips to another channel and pretends none of that just happened
You’re missing the slow-mo replays of the uncalled leg-whip that allowed that.
Terrible missed call.
I don’t need to be any more disappoint.
Also, for a guy who is willing to take off and take a hit, that was a pathetic attempted tackle by Allen.
He was shit all night.
He better have like the flu or something.
I only turned on the Jets/Bills game to see the final Bills drive that forced OT. Didn’t realize Rodgers was already likely lost for the season.
That one sucks.
It’ll be a terrible, ignominious end to his career ( if he’s done)
Offensive pass inference is such bullshit.
Woah
I must have missed the step where you add some Preet to the cement mix.
Note to the minders: unclench your sphincter. That was intended as a joke and not a threat you imbiciles.
Obviously it was a joke – that’d never work with countertops.
You’re looking for a much bigger pour, such as footings for a commercial building. Theoretically.
Paging gay Glibs for judgment. Fair, foul, strike, or home run?
Not of that cohort, but I imagine surprise vag is no more welcome than expected penis.
“unexpected”, rather.
BONUS HOLE!!!
Who can turn down a bonus hole?!
I’m a fan (albeit, not of that particular one), but our gay brethren not so much, definitionally.
So…no anal? Someone’s gonna be disappointed.
Forfeit.
At the very least. Or ejecting from game for improper equipment; banned from the sport.
I remember a long time ago a webcomic about how trans dudes were totes the greatest gay dudes because they could strap on a dick of the correct size and shape for any occasion.
Barf. The greatest gay dudes are XY dudes.
Very nice work. Looks like stone.
I guess I missed it, but did you need to cut control joints in the countertop?
I thought this was a response to Mojeax’ bonus hole question.
Mojeaux has a bonus hole made of stone?
What kind of monster are you?
Looks like stone.
I don’t (openly) question people’s aesthetic choices.
Good morning all!
Switching gears for a moment, I have these bits of fluff from Julie Brown:
I Like ‘Em Big and Stupid.
Homecoming Queen’s Got A Gun.
Share and enjoy!
Good morning, Beau & Sean!
That first one is cute…but I’ve always been a sucker for the smart boys. 🥰
Morning.
Good morning, U! How are you today?
Meh.
Have to drag the car in for routine maintenance, but I’ve forgotten what time my appointment was.
In that case, better to get there as early as possible and wait if necessary. Beats working.
I was just going to call them when they opened.
You’re just too darn conscientious.
I’ve got a car appointment scheduled Friday. I took the day off so I can go check out the Ruger demo booth beforehand.
Well, that was different. Mass shooting at the HS, 80’s style. Wide awake, I am.
“Stop it, Debbie! You’re embarrassing me!” 😄
I know, right? Val girl culture + mean girls + high schools.
Good morning! Downtown Julie Brown always improves waking up in the dark.
https://www.cbsnews.com/philadelphia/news/danelo-cavalcante-update-chester-county-prison-escape-22-rifle-south-coventry/
Dude is leveling up. 😒
“reverse 911 calls” ? What?
Robocalls like they do with Amber Alerts and weather warnings, I guess. ::shrugs::
Residents in the area will be subject to car searches.
Why?
Because fuck you, that’s why.
Because the constitution gets suspended in an ’emergency’. Also FYTW.
JFC is this guy some kind of comic book supervillain or something?
I’m gonna go with police ineptitude.
Mornin’, rhy. Nice job by the Bills last night. Knocked out Rodgers in the first series and still managed to lose.
Ugh.
Time to wake up. Hope y’all have a great day. 🌞😉
https://m.youtube.com/watch?v=QPWZZ4QaSQ0
🎶🎶
Mornin’, reprobates!
Good morning, ‘patzie! How are you holding up today?
Meh.
Should be getting a call today to schedule the next surgical procedure. Will be receiving two cable boxes today to replace the paperweights I currently own. Work is fun, working on an analysis to assess the impact of the bug I found last week. Preliminary assessment: they are not going to like this.
If the stone comes out with a top hat and monocle, it will be a sign of the Glibbening…