As you can see in my last post, I didn’t get very far in my first project until now.
I do love the Telecaster shape and playability, so let’s burn one.

A fine start


I left the stock finish on the side of the guitar, in this way it stops the burn from traveling any further and we get a nice border. The headstock is paint over stock finish then clear lacquer to seal the deal.
Speaking of headstocks, let’s start there

Simple
Next comes the magic, let’s install some electronics, starting with the neck pick up and cover,

No, just No
All of the fine details covered up forever? Just look at it all. I needed a solution, but where? Could I fabricate my own?


It turns out the answer was clear. I went on Amazon and after a bit of searching found what I needed, a clear pick guard.
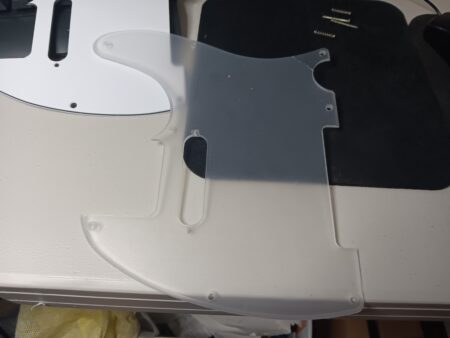
Hazy it isnt

Applying lipstick

Love it already
Now it’s time for the electronics and finishing the body. The first thing is to ground the bridge to the electronics via the green wire. I chose to connect at the pickup spring, hoping the tension will keep it tight. It ohms out perfect so I’m not concerned. Note the plug and play layout of the wiring. It seems like cheating however I have used the same connectors for my 3D R/C airplanes and I can say they are bombproof.

The green wire

Plug, and play
After that it was time for the unveiling,

What pick guard?
I was very pleased with the way it turned out, now you can see the burn in all it’s glory.IRL it looks like the pickup is floating in the guitar, it’s very cool looking.

A better view of the pick guard
let’s finish it, install the neck and finish the electronics

Next is set up


not much more except setup which is smple enough now. My next project is a bass guitar, kind of special. Until then Rock on!
⬅
Neat
That’s a beauty. We have great hobbies around here. *clinks glass*
Cheers!
Very nice, Yusef, one of a kind
Some people around here have great hobbies. *sips coffee*
At this time of night?
*sips really gin heavy g&t*
Tall tumblers of vodka and random pop!
Mithter Boston: how many drinkth does it take to get to the bottom?
I don’t play tootsies.
I do love the Telecaster shape
clear pick guard
That’s a fair compromise and makes the most sense to show the burn. To me that’s a great choice and you get comfy without the old lines.
But I love the classic lines so much, and the pick guard is such an important part of those lines. And I’m addicted to the old head stock as well. Was Leo a genius designer, is the design objectively beautiful, or am I just a dinosaur addicted to the smell of my own farts?
Tele greatness: Steve Cropper on Green Onions
official history page
I have one of those, this is my art stage, it was a pleasant surprise
That is something truly beautiful, sir. You should be very proud.
*maple neck*
Ahem. Did I say that???
I do declare.
Great job, Bob.
Waaay beyond my skills.
Nicely done, sir! Good to see that you’re still burning wood and now combining it with music.
👍
Now you’ve just got to connect with the right customer base…
I’m sure there someone that really, really wants that. Insure it well.
Springtime, La Jolla art studios for rich middle aged ladies, I got the idea from a friend.
Very nice work Yusef. You should be proud.
OT: I found this link on Mark Steyn’s website. Don’t remember seeing it shared here.
https://www.lifesitenews.com/news/israeli-boy-featured-in-covid-vaccine-campaign-dies-of-heart-attack-at-age-8/
Yeesh. That is rough reading. And triggering.
Giving up with the server errors.
Trying to ask Yusef if he’s in Cali again. Expressing surprise at how often some of y’all move around. Noting that I moved after 25 years. I wish I knew what triggers the squirrels.
I’m in San Diego now, but I have done some traveling in the last 5 years. Hopefully I can stay here and retire.
👍🏻
I am happy out of NYC. Don’t know if I will stay here in Ithaca but it’s a nice way-station for now.
Looks neat!
objectively beautiful
fun pictures, easy scrolling: greatest designs of the 20th century
there are a lot of good calls on the list, but it’s interesting what wasn’t on the list
1957 Chevy was too new then to be timeless, but I’d rather have it than almost any car that did make the list
1952 Gibson Les Paul is the prettiest of the high volume guitars to me
1937 Golden Gate Bridge
1954 Rolex Submariner
1928 Sunbeam Mixmaster
1924 Montblanc Meisterstück
1906 .30-06 Springfield cartridge
*dives in*
Heh I have one of #26
I have 85, 100 and 25,
But, a jeep? Kinda pushes the boundaries of “good design”
+1 99
/font geek
/font geek
#MeToo
I’m a Verdana guy, but I’m open to another font so long as
it’s free and preferably native to MS applications
1, l, I, 0, and O are all significantly discreet
I’m a programmer so yes those distinctions are very important and there are now fonts with ligatures that are so pretty.
Microsoft is actually very good and generous with their font-work.
That is true, but Apple has the prettiest fonts. They are priggish assholes, so there is that.
MS Times New Roman, a happy exception on the Microsoft side. A very clean font that I really have always liked.
I was primarily an Apple for 16 years (2006 – 2022). They’re more elegant than MS in some ways but IMHO fonts are not one of them.
The problem with MS is the shit support for high-definition. So good fonts look like shit on the computers that most MS users operate.
And that is why I am not an informative expert on fonts.
I do remember that MS fonts did not look good on the cheaper monitors I had all those years. They did the ClearType font thing. It helped a little.
I’ll give them some credit. They didn’t control the video drivers or the hardware back then.
What’s the best font now?
I say Bookerly by Amazon. It’s easy on the eyes.
Yeah, Bookerly is nice on Kindles.
And yeah, the vertical whatchamacallit that Apple employs has some advantages.
MS has gotten much better but still way behind Apple when it comes to “pretty” and “it just works”.
OTOH, games.
Apple is complete shit with gaming that is a major reason I went back to Windows.
FWIW my Glibs is CSS-customized and the font I’ve been using for a surprisingly long time now is called “Kreon“.
It’s very easy on the eyes when you’re spending long hours reading you dopes.
Futura is my favorite even if reminds me of filling out government forms.
1962 Corvette for me. In dark blue with white coves.
no objections: that’s a pretty generaton
like the 1963 for the split window
I didn’t put sports cars on my list because it’s easy for them to be pretty: they are platforms for design; the Calvinist in me loves a good tradeoff, so the idea of a beautiful sedan seems to prove more thought
E-Type Jaguar. Why are we arguing again?
Kidding. It is one of those goofy-looking cars that I love.
Oblig: https://www.youtube.com/watch?v=DPqxNzhyp7w
Sorry. The 1958-1959 Les Paul was the prettiest and best sounding after ten years or so. Those guitars were one of the apexes of guitar design and build.
I’ll defer to your opinion on the rest.
And honestly, the 1960 Les Paul with the C-Neck wasn’t that bad either.
’58 Flying Vee
’59 Telecaster
’67 Stratocaster
Any 60’s SG
Gotta agree with you there. Those guitars were the background music to our youth.
Doesn’t mean that anything newer is better at that moment.
80’s…Jackson. 90’s…I don’t remember what…Shecter? Ibanez?
PRS came into play at that point. IMO, it was Les Paul all over again.
oh, I’m not picking years; the general concept is all that matters to me
I just got the kickoff year wrong
You really didn’t. It’s just a matter of opinion.
Joe Bonamassa agrees with you and he is a multi-platinum guitarist-singer-songwriter.
I’m sure as Glibs we can learn to agree about how wrong he is.
Poor bastard.
Does it sound good?
Does it stay in tune?
Is it comfortable?
It is good….
Spoken like a true master.
Les Pauls’ and the g-string. They survived that.
Takes a bow….
Ha! That g-string crap drove me crazy.
I knew you were familiar with it.
Yeah, well, there’s a 1970s hair dryer in the Museum of Modern Art.
Nice! MoMA was one of my first visits to NYC (before I moved there – and of course never visited again). I flurve modern designs like this.
Helene Curtis
LOL that thing looks like a torture device.
Speaking of cool designs, this beats the hell out of a hood.
I think I got a CAT scan from one of those a couple years ago.
10, 22, 52.
Pretty sure I was in 49 at least once. Up through high school, it was those or it’s descendants.
Spent three weeks going through all the damn trouble with my PC not turning on, it turned out to be the PC case button, not any internal components.
So, now that my PC is working, I hade extra components I bought and didn’t need. Thought I’d be a super awesome uncle and slap that together into a PC for my niece. Just needed a disk, some ram, peripherals and a case. Case came today, got it all put together and push the power button and….nothing. Not this shit again. I don’t have an extra power button on hand to test this time, so now I have to wait for that to arrive. Fucksake.
In my trade we use the hopscotch method for trouble shooting. Turns out it works for PCs too,
/Derp
You know there are companies who do all that shit like “making it work” for you. Just a thought.
I am the guy who makes shit work, ask my people
You’re the guy whom I pay to make shit work for me.
/do not tinker
Call me first, it might save time and money
/seriously
Bruh… how do you not have a multimeter? Just check the switch continuity. Failing that, you can just jumper the power switch pins on the motherboard header.
Makes me wonder why NHL/ESPN isn’t doing this more often. Could improve the viewership. It’s not like there isn’t up to ten or so games playing every night.
Things develop so fast in hockey vs. football that this has to be a ton of work but I agree I’d like to see this more often.
Looks like Cinderella is heading to the Series again this year.
KREON is my new font. That is really a good mix of readability and originality.
I’m still figuring out how to get it on the Kindle.
Good for you. That might be your next career?
I’m sure there are many people making a living creating fonts?
I wouldn’t bother. “Bookerly” is perfectly acceptable on the Kindle – and I doubt there is any way to get another font on to it.
I’ve thought about creating fonts. It’s a wizard skill, not easy to get into.
Waitaminnit. I just reread your entry above.
You..didn’t come up with…KREON?
Don’t care! It’s a damn great font.
Thanks for putting it out there!
I have done exactly jack and shit as far as anything in this life goes.
You are a programmer with a great job.
I’m a high school graduate with no marketable skills…that’s what my last supervisor said.
LOL yup, Kreon is a Google font.
My job is in the insurance industry. Not something I would have chosen but rich in possibilities for learning new shit programmer-wise.
LOL doesn’t matter. I am about to rant…again.
I’m a dumb redneck for sure.
You are still the programmer. Keep that up as long as it goes, sir.
Be prepared to move even further out of the city, if and when it goes bad.
Don’t hesitate. As a matter of fact, don’t unpack.
My Grandfather was a blacksmith. Ask me how much I learned from him…
Nothing. Never really had the opportunity. I regret that.
He cut down huge trees for people…plowed behind a mule to grow crops…
He was a man. In the purest sense of the word.
His son is in a rest home.
His son is a former Marine…my father.
I spent yesterday, collecting that man from the hospital and escorting him back to the home.
My fat, useless ass is exhausted.
Sleep deficit is what it is called. I wake up after any slight noise.
He is shouting gibberish. Have no idea why. May be dementia or it may be a stroke.
Either way…I’m about at the end of my rope.
I know that many people have been through this. I knew this intellectually.
It’s sure harder in real life.
Oof, sorry.
Was mostly spared that stuff but I know it’s rough.
My condolences.
You might try what VA resources there might be to help. My dad spent his final years in VA memory care (Alzheimer’s) and he was happy there; they surprised me greatly by being a well-run government facility.
They might be able to help with some in-home stuff a couple of times a week.
Commiserations. I helped both my parents off this mortal coil. It’s terrible. Regardless of whatever else you think of yourself, you’re a good son.
Typefaces might be a good topic sometime.
+1 comic sans
🤬
I still have yet to watch Helvetica.
Thanks for volunteering, TOG. I agree and look forward to your article.
“Fonts of Wisdom”
Excellent.
We will we will First you…
Oof, Bruins player just took a skate blade to the face.
A particularly good piece at NRO. I’m not sure why I didn’t think of this comparison sooner.
https://www.nationalreview.com/2023/10/your-turn-democrats/
Never change NR. At least Biden isn’t that icky Trump who thought racists were good people. All hail the principled RepE that gave up their careers and futures to oppose the hair. OMB Uber Alles!
Or Trumpo delenda est.
Joe Biden and his administration have given no comfort to the elements in their party who share the toxic outlook bubbling up from the streets. But while the president’s effort to keep these elements at arm’s length is a salutary departure from Donald Trump’s approach,
Many who maintain only a hazy recollection of the Trump years subscribe to the myth that elected Republicans never broke with Trump — especially when he provided psychological comfort to America’s troglodytic bigots.
Many of the Republican Party’s leading lights and household names unequivocally condemned Trump for wrestling publicly with himself over how forcefully he should distance himself from the racist demonstrators who descended on UVA — a group whose protests culminated in violence in Charlottesville.
Those same voices were joined by more Republicans in denouncing the head of their party when Trump reportedly advocated curtailing the in-migration of “people from ‘sh**hole countries.’” Many — perhaps most — of those Republicans who stuck their necks out to reprimand Trump are now gone from the political scene. They paid for their dissent with their careers.
It appears that NR’s Noah Rothman swallowed the “very fine people on both sides” myth hook, line, and sinker.
I haven’t checked the numbers, but I’m guessing that the Stormfront types in the US are vastly outnumbered by the lefties who hate “colonialist Zionists” (and if you scratch an “anti-Zionist,” you’ll find an anti-Semite right under the surface). But I guess it’s de rigueur to take a few jabs at OMB when you’re writing for NR.
Also “please don’t hate us, we’re the good republicans”.
*barf* at all of that.
Are you fucking kidding me?
Anti-Israel sentiment is embedded into every major left wing institution.
Joe Biden was on record saying that Israel would have to accept the one state solution at some point. The cunt just released billions to Hamas’s number one funder.
If it weren’t for the fact that there are a lot of rich and powerful Jews, the Democratic party would be 100% pro-Hamas.
NR is crazy. Team Blue doesn’t have to distance themselves from shit. The media will run cover as usual, the Jews will still vote lockstep Dem as usual and life goes on. It’s the Dems. The group that doesn’t have to distance themselves from Al Sharpton. The group whose President was pals with Strom fucking Thurmond. The group who ran a candidate that bragged about beating a Black Man with a chain…during 2020 while BLM infected the country with race essentialism.
They will never have to explain shit.
I remember when a Republican presidential candidates referred to “hymietown”. No wait!
I remember when one of candidate Obama’s rival for the Dem nomination said “I mean, you got the first mainstream African-American who is articulate and bright and clean and a nice-looking guy,” he said. “I mean, that’s a storybook, man.”
That racist condescension ended the old white duffer’s career!
I mean, where did that guy end up, anyhow?
NR is full of shit and Trump did unequivocally condemn the neonazis with the torches but not the preservationists that didn’t want statues and other monuments removed. They’re a bunch of country club Republican war-monger scum.
I am getting pretty tired of this shit, but the radical left lives for it. The rest of us have better things to do than shit all over our nest.
Well shit. Rip
https://en.m.wikipedia.org/wiki/Richard_Roundtree
Today, in a shocking development that absolutely everybody who has worked in the criminal justice system could see coming…
Nearly 70% of all inmates released by Kentucky Governor Andy Beshear (D) through commutations during the coronavirus pandemic went on to re-offend, with some committing violent felonies like assault and homicide, according to a report ordered by Kentucky’s state legislature.
The report, produced by Kentucky’s Department of Information and Technology Services, found that of the 1,702 individuals whose sentences were commuted by Beshear in 2020, a majority of them, 882, went on to commit felonies. An additional 252 committed misdemeanors, leaving just over 500 who committed no crimes.
How did the land of Rand Paul and Thomas Massie manage to put this braniac in the Governor’s mansion?
Or 500 who committed crimes but weren’t caught yet.
‘How did the land of Rand Paul and Thomas Massie manage to put this braniac in the Governor’s mansion?’
Too much bourbon on election night?
Keeping violent criminals off the street is racist.
/they were quite open about this
These Firsts are making me thirsty…
For more Firsts.
Good morning all!
Today, Steeleye Span.
Seven Hundred Elves.
The first thing of theirs I ever heard, it started a life-long love of the band.
Continuing the elf theme:
Elf Call.
Share and enjoy!
Good morning, Beau, Sean, Stinky, and hayek!
Not as worried about work stuff today – found out yesterday that the widow of our just-deceased employee is the presumptive beneficiary of his 401(k) in the absence of a completed beneficiary designation form. Now it’s just paperwork – and trying to make the process as painless as possible.
Morning.
The store was out of cheese curds 😧
OH NO!!! 😱
What kind of cheese did you get instead?
I didn’t. I had to keep loving to make it to the office in a sane timetable.
I hope you have something reasonably satisfying for breakfast!
I have my 6oz of grapes, prepackaged salad, salad dressing, supplemental chicken and bacon bits.
Next meal will be just after work when we’re having a going away meal for a former coworker/consultant who’s returning to India for an expended period.
😋👍
We had one of those. I never expected to see him again but he returned six months later with a wife.
That has happened with a few of them. But this guy is already married with grown children. Don’t think he’s quite to retirement age though.
I had to keep loving to make it to the office in a sane timetable.
Love is a many-splendored thing.
You’re off your rocker.
Quite the contrary, I am firmly seated on the wooden rocking chair I bought from one of the Amish stands on US 30 many years go.
It is impossible to be firmly seated on a rocking chair. You must be on a mere rock.
Hey people! Time to get up.
😃🌄☕
https://m.youtube.com/watch?v=TvK0zgvX1uE
Love song Wednesday is here again. R&B style.
🎶🎶
Mornin’, reprobates!
Good morning, ‘patzie! How’s tricks?
No tricks, only treats!
Today I begin preparations for the takedown of the legacy system I have been maintaining. Need to make sure there are no external dependencies before scuttling the whole thing. Blecch.
Shut it off and see who squeals.
That was my initial proposal. I may have received a narrowed gaze from management in response.
There’s a little guy in the basement who turns a crank once an hour to keep your legacy system connected to the servers. Don’t forget to tell him he can stop. You may just have to cut off his paycheck to make him go away.
suh’ fam
whats goody
Tall Covfefe!
How are things in Georgia?
Good morning, homey! How high are you climbing today?
Good Mornin’ to all
Me and Jimmy
https://www.youtube.com/watch?v=U5TqIdff_DQ
Oh, please.
https://m.youtube.com/watch?v=vruy2GRUsV8
Im not- I have guys for that.
The pic I sent you yesterday wasnt too high- 90′ maybe
Would Honey Harvest 2024 be Sunday the 15th?
I’m thinking I might try to visit some West coast states and reach the event on my return leg, but to plan the route, I’d need to not miss it by a week.
Not looking at a calendar but it would seem that is correct, third Sunday of Sep
Hope you can make it
I’ll try to get everything sorted.