One of my favorite types of articles to create it where I leap into something new and share the results of this endeavor with the rest of the community. Recently, I found out that it was entirely possible to run some of the “AI” image manipulation tools locally and not have to deal with the vagarities of a web-hosted service. More interestingly, I could make adjustments to the interior to suit the type of output I was looking for.
Knowing absolutely nothing, I immediately asked the internet for instructions. The internet, being the internet, gave me guides full of lies. Well, that’s uncharitable. The fact of the matter is the technology is changing rapidly, being in its formative years. So the guides I first worked from had been accurate – but were so out of date that they referenced files and sites that were already gone, replaced by the new. This still resulted in hours of frustration and annoyance as I tried to salvage the garbled setup that had been birthed by these outdated guides. This is why I won’t link to the exact guide I ultimately used, as it may soon be out of date, and totally not because I forgot to record which one it was, no siree.
All of the iterations I tried to get working were some variant of the Stable Diffusion setup? Engine? Application? I can’t call it a model, because models have a very specific meaning within the software, and none of the sites really cared to be as precise as I’d have liked. So for a lot of things, I started my internet journey anew, looking for specific answers to questions.
The first version? Distro? I’ll call it a distro. The first Distro of Stable Diffusion I got running was Automatic1111, which was recommended for beginners. I was a beginner, so I thought it might be good for me. I was wrong, as I disliked the interface. I felt like I kept breaking it, or causing things to happen when I was just trying to get a tooltip. So, I moved on and instead installed the other web frontend for Stable Diffusion most commonly referenced – ComfyUI. ComfyUI has the distinction of a much steeper learning curve at the frontend, but once you get used to it, it is easier to see and control the flow of logic for the image processing. Instead of the form style interface of Automatic1111, ComfyUI uses a field of nodes, which you plug together to set up a workflow. These nodes each do one specific thing, which helped me get at some of the concepts easier than arguing with a static-looking web page.

Click for fuller image
I don’t have a picture of the default workflow as it comes out of the box, so I cleaned up my workflow to a more basic state. I left in nodes that are not currently connected in the lower left, which can be freely ignored for the time being. If you can’t trace a route that ends up at the “Save Image” node on the far right, it’s not in the logic for the active workflow. This is set up to generate an image from the loaded model using prompts. Nothing fancy, just spit out a new image. Since we’re talking concepts, I’ll at least go over the connected nodes, and why they’re there.
The workflow starts always at the checkpoint loader. That is the node at the far left. A checkpoint is a set of tagged data that associates visual elements to English keywords. You can only have one checkpoint in a workflow. You can’t start from more than one place. Of course, a checkpoint alone might not give you exactly what you’re looking for, and being able to supplement it is useful. So, the idea of LoRAs were added. LoRA stands for “Low Rank Adaptation”, it is a set of data that adjusts the checkpoint, skewing it towards a particular visual style, or giving more weight to matching certain keywords with features, or adding new keywords all together. It is fine-tuning for the checkpoint. If you add too many LoRAs, you will end up with poorer quality images as the additional skewing of weights pulls the results hither and yon. The combined checkpoint as LoRAs is the model. The model is used as a database of image elements for later processing. I most often have a LoRA called Dreamshaper in my workflow because it skews towards a digital painting style rather than photoreal. The photoreal images are too uncanny valley for me, so the quirks of the computer generated remix stand out more than if it looks like a piece of artwork where errors are easier to gloss over mentally.
After the “Load LoRA” node, our simple workflow splits between two “Text Encode” nodes and a “KSampler”. Since everything feeds back into the Sampler node, we’ll start with the Text Encode boxes. These are where you enter the Prompts for the image processing engine to pull data out of the model. For the most part these are English words or phrases to be interpreted by the machine, hopefully making something that doesn’t look like nightmare fuel. There are two boxes, corresponding to the prompt and the negative prompt. The software tries to match elements from the prompt and tries to avoid elements from the negative prompt. Because it isn’t actually intelligent, it doesn’t always succeed. You can give an element more or less weight by adding a : with a number after it at the end of a keyword. With one being normal, these values are usually one point something or zero point something.
The sampler box has a whole bunch of connections and configuration options. That’s because the sampler is where the work gets done. It takes in our model and the prompts we just discussed, but it also takes in this new input called “latent_image”. At the moment, we won’t be messing around with the latent image, but it does come into play for the logic. In this setup we’re using an Empty Latent Image node to feed the sampler, because we’re not using an existing image as an input for processing. If I take the output from the empty latent image node, skip the sampler and just decode it, you get a brown field of nothing.

A blank latent image.
This really doesn’t matter unless you have the value of the last option in the sampler set wrong. “Denoise” is very poorly named as a configuration element. It tells the sampler how much of the latent image feed it is allowed to ignore. At a value of one, the latent image is ignored and the sampler is free to assemble whatever image it likes. We only adjust the denoise setting when we’re making changes to an existing image to adjust how faithful it is to the source image. So we’ll come back to that later.
The output from the sampler feeds into this “VAE Decode” node that takes an input from a “VAE Loader”. So what is a VAE? According to the internet it is a “Variational Autoencoder” and has something to do with filtering out junk and improving the image quality. To be honest, I don’t really understand what the VAE does. I found this orangemix one referenced in a good looking image online, and after I switched the default to it, things looked less bad, so I kept it and haven’t explored why it works.
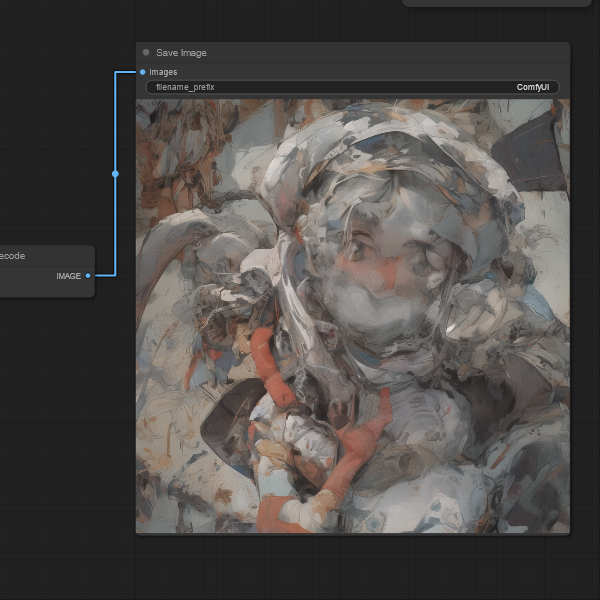
Lastly, the “Save Image” box gives us a preview of the output and writes a copy to disk in the “outputs” folder of your ComfyUI installation. So, we’ve reviewed everything we’ve gone and set up for basic image generation.
As it stands if we hit the “Queue Prompt” button…
There are no prompts and it produces something very random.
I suppose this might be called “artistic” by modern schools.
We have to ask it to make something. Lets make a blond fantasy knight on foot somewhere rural. The software is, well, software, so it’s dumb as a box of rocks, and will do exactly what it is told, even if that’s not what you meant to tell it to do. Combined with my own inexperience, some of these elements are cargo cult engineering level of “do this and get that”. I’m going to start with an unrefined prompt of “knight in fantasy armor, sleek, highly detailed, digital painting, realistic digital painting, outdoors, rural, bright, day, looking at viewer, caucasian, blond, green eyes, male, masculine, 1man”.
The negative prompts are also important to the equation. These are things we don’t want the software to draw for us. And to be honest, I don’t know what some of these notations do. But we’ll use “low contrast, sketch, watercolor, bad hands, photo, deformed, black and white, disfigured, modern,((blurry)), animated, cartoon, duplicate, child, childish, (worst quality:2), (low quality:2), (normal quality:2), lowres, bad anatomy, normal quality, ((monochrome)), ((grayscale)), ((text, font, logo, copyright, watermark:1)), easynegative, badhandv4, missing limb, wrong number of limbs, bad proportions”
Lets hit “Queue Prompt”.

With my hardware and the settings currently in use, it’s rather quick.
It’s doing something…

First attempt.
Eh… it’s okay.
Lets refine some prompts. The colors are too bright, so lets move bright down to the negative prompt and replace it with “soft outdoor lighting”. I’m also going to add some prompts “masterpiece, best quality, smooth gradients, detailed face, realistic skin tone, youthful, strong”. Just telling the sampler you want a masterpiece won’t make it so, but it will skew towards pulling elements that humans training the model tagged as such. Same thing with the “Best quality” and “worst quality” sort of tags. While it may feel silly to me to have to tell it that, I remind myself that it’s not intelligent, it’s got chips for brains and just follows orders.
So we kick it again with new prompts… and it doesn’t improve.

Second attempt
What is bugging me is the way it’s drawing skin tones, and with the checkpoint I picked for this example, we’re not going to get it to go away with just generic prompts. You see, the checkpoint I chose was optimized for use with a particular sampler. The sampler node has been set to uni_pc this whole time. I don’t recall if that is a default or if I’d been messing around and switched to that. However, the creator of the checkpoint noted that it worked best with DPM++ 2M. In ComfyUI, that shows up as dpmpp_2m. So when I rerun the last set of prompts with the sampler changed to match the checkpoint documentation, I get something with less exaggerated rouge.

With different sampler
The art style still makes him look too young for the battlefield, but that’s baked into the checkpoint in question. You can only get out of the machine remixer what you put in. There’s a pile of checkpoints and LoRAs out there, some with very narrow data sets. You only get out what you put in. And that’s actually where the ethical quandary comes in. There’s no way for me, as the end user, to be sure that whoever trained these models only used images they had the right to use. Human artists are rightfully upset that their hard work is getting fed into some of these remix machines without their knowledge or permission. Morally, I’m on the side of the artists, and for book covers, I’m going to go pay someone to draw something new. This dalliance is just as a toy and a learning experience.
As this article is getting a bit long, we’ll look at reprocessing an existing image in another installment.
PostScript – After some more futzing about, I managed to create This image, ironically by adding in a LoRA intended to create Anime characters. ¯\_(ツ)_/¯
PostPostScript – As a show of my own ignorance, I’ve recently realized that DreamShaper was not a LoRA, but a checkpoint, so trying to load it as a LoRA does nothing. It’s effect was entirely placebo. I’m a tad embarassed, but will admit that I am far from an expert. Though I have decoded some of the magic words in the prompts. I’ll cover them in a future installment.
I have grown less ignorant since I wrote this article…
These days I would have included a Google Gemini Joke in there
The armor nipples on the linked image are a nice choice by the AI. Reminds me of the worst Batman costume.
I gave you the prompts, I definately did not ask for them.
It knows what you really wanted.
The nipples and the twink boy features make that the gayest armor since Gay Came to Gaytown.
It’d be kinda hot if the pic was of a woman.
Future Articles get better.
And he’s wearing his armor over a zip-up hoodie?
… with short sleeves.
That portion of the prompt would no doubt have prompted a stern lecture from Gemini.
localhost does not judge me, or lecture on my privilege.
In other words, magic.
I wish I had time and or patience to try these things out. It would be much easier to take a picture of an image and say make this in X cartoon style to make backgrounds and such instead of having to photoshop something from tons of other somethings that kind of fit the style I want. Or I could just become good at art, but that ain’t happening.
I’ve done a lot more and I’m still in the “invoke incantations at the black box” stage of understanding.
I had no idea you were such an Anduin Wrynn fanboi.
Who?
I thought you said “masculine”.
I blame whoever trained the checkpoints.
You needed the modifier “toxic”.
I don’t want to introduce the poor silicon mind to that misandric concept.
You can bet it has been trained on it.
Depends on the checkpoint.
It’s an open source product, so any internet rando can make one.
Why does his armor have nipples?
Ask the computer.
I don’t know, why does this armor have a wang?
It’s either for intimidation or because of syphilis.
How else to impress the fair maidens?
Henry VIII didn’t have much trouble in that regard until he got fat. Even then, being King made up for the obesity.
He got fat after he hurt his leg in a jousting match I think.
You are correct, sir.
He continued to eat like an athlete while not moving much.
So he has something to lean his lance against?
I believe that was a real thing in Roman and Italian armor.
And Batman.
Yeah, but, Italians are odd folk.
Italian Batman.
Wasn’t that one of your movies?
Wasn’t that the Mexican Batgirl?
Yes. Mexican Batgirl is one I played. Italian Spiderman is one I would like to play.
Serious note: Ask it to paint one of Louis Wain’s cats and see what happens.
https://en.m.wikipedia.org/wiki/Louis_Wain
If it’s not in the checkpoint or added by one of the LoRA’s you’ll be disappointed.
But I’ll see what comes out the other side.
I got This Trio and This collection
Yes, clearly it focused in on “cat” and not the specific anthropomorphic and later psychedelic cat paintings of Louis Wain.
I don’t think it was trained on any of his work.
“One of my favorite types of articles to create it where I leap into something new and share the results of this endeavor with the rest of the community.”
I like these too. It’s nice to see someone checking things out that I don’t always have the time or inclination to try on my own.
This series has six articles. I’ve got six more on the process of building a clock from components using my own code on a Texas Instuments Microcontroller.
I’ve started writing some on painting, but that’s more of “Here’s something I’ve been doing for years”
When Letitia James saw Robin Hood, she thought the Sheriff of Nottingham was the hero. Ask the AI artist to draw her as the sheriff.
I’d prefer not to.
And on Glib’s today, UCS draws twinks.
That was uncalled for.
That’s half our comment section.
*shrugs*
I thought the commentariat was mostly neckbeards and animals.
50/50 twinks and neckbeards.
You want neckbeard – I’ll give you some neckbeard. I doubt you can find a Glib that can match that!
*makes note to shave neck tomorrow morning*
Hey now! 😒
RJ is known to have a margin of error of plus or minus 90%
That seems to be the “in” look.
I told my wife after we watched Dune 2 that they were a perfect couple because he is feminine and she is masculine.
Speaking of Letitia
On Sunday, an FDNY spokesperson pushed back on the idea of a witch-hunt.
“Nobody is hunting anyone down. We’re looking into those who clearly broke department regulations. It has nothing to do with politics. It’s about professionalism at an official event held in a house of worship,” the statement said.
But the internal memo says otherwise. A note sources familiar said was sent to chief, says “members have a right to political beliefs but you don’t have a right to make a job-related ceremony political in nature.” And under next steps, deputy chiefs will be visiting fire houses that had a member promoted.
By the power of doublespeak, I command thee.
We invited her to this ceremony as a political statement. How dare you make things political?
Political? Who said it was political? Now, bend the knee.
The previous article on this had a pic where the fire chief standing next to her turned his back to the camera. Which seems like a stronger statement of disapproval than boos.
UCS draws twinks.
That’s not fair. UCS didn’t do the drawing. He just placed an order. The product is a bit unrefined.
The AI art databank just needs less Dragonball and more Prince Valiant
I remember those comics. Should have been called Prince Violent. I really liked them as a kid.
#metoo
PV still running on my local ‘s Sunday comics. Loved it as a kid; just about unreadable today.
He got fat after he hurt his leg in a jousting match I think.
Such euphemism.
Clickbait for Mr. Brooks.
https://www.reddit.com/r/IdiotsInCars/comments/1bcljjo/one_crash_leads_to_another_oc/
Wheeee!
One Thing Leads To Another – The Fixx
https://www.youtube.com/watch?v=JHYIGy1dyd8
This is great, UCS. I look forward to your future efforts.
Thanks. I have a bunch queued up.
If I get a cover for Prince of the North Tower, there will be over fifty. I should probably call my cover artist and throw some money his way.
Clickbait for Mr. Brooks.
I was on the lookout for an MG Midget. Disappoint.
On topic- more victims of those stupid “move over” laws. I swear I have seen Idaho State Patrol cars sitting on the shoulder waiting to nab anybody who doesn’t change lanes.
The previous article on this had a pic where the fire chief standing next to her turned his back to the camera.
To hide his laughter?
More “expectation management accounting”?
Global grains merchant Archer-Daniels-Midland (ADM.N), opens new tab announced a plan to fix accounting issues that caused it to correct certain transactions in six years of financial results on Tuesday, though the plan will take time to implement.
ADM confirmed some employees have received grand jury subpoenas from the Department of Justice which is investigating its accounting practices, after Reuters reported FBI agents delivered subpoenas in Illinois last week.
The subpoenas show that a criminal probe into ADM’s accounting, first reported by Reuters last month, is escalating fast and directly relates to accounting issues that the company said in January were the subject of an internal probe.
ADM said some sales between business units within the company were not recorded at amounts approximating market value and corrected certain segment-specific financial information for previous financial statements from 2018 to 2023. The filing showed that ADM had overstated the Nutrition segment’s annual operating profit by as much as 9.2% in that time.
Letitia James should be all over this. They’re traded on the NYSE.
Right now, AI is just a tool that can produce deep fakes. While this will be highly disruptive and put a lot of white collar workers out of work, it will also open the floodgates for more creatives who lack the resources to put together ambitious projects. It’s a democratizing force like most tech improvements have been.
It is still very, very far from being anything close to sentient let alone self-aware.
Like any technology, once people figure out how to use AI, it will do some amazing things. When it’s plugged in to the wider Internet (like the Google version), it’s terrible, and I don’t think that’s going to change. Which to me will prevent it from being some kind of all-powerful thing.
Was does scare me is that intelligence agencies are most likely already using AI to sort through emails, texts, and social media to find undesirables. Sadly I think AI will be very effective at that.
Our government is currently doing all kinds of things that the Nazis or Soviets could have only dreamt about in their wildest wet dreams.
Nothing else will happen.
Even when it’s been exposed that they’re doing it, only a fringe minority really caress. The rest want to see the guy who exposed it locked up for the rest of his life and blather on how the guy is a coward for not staying to be prosecuted.
I know I shouldn’t have been, but I was shocked at how little anyone cared about the Twitter files.
My Mom had no problem with it, because the government was trying to save lives.
No amount of data could convince her otherwise.
If Trump was president, she would have a problem with it, but it was OK this time because it wasn’t Trump.
My brain hurts.
All the people who cared already knew about it, so none of it was a revelation. We were living it. There is no changing minds for some.
I work with a bunch of youngsters who are convinced that AI is going to change everything. Having been around for a couple other IT gold rushes, I try to reassure them that there will be some changes, but it probably won’t be earth shaking.
My analogy is a gold rush. The first people there find a lot of big gold nuggets just sitting there on the ground. They scoop them up and go around telling everyone how great this place is. Everyone floods in and the easy gold is picked clean. The next wave of prospectors really has to work to get gold now, but it is still profitable. The last wave comes on site and all the good spots are taken so they are reduced to digging in silly places.
IoT was this way. The first people who were hooking up sensors to the internet and collecting that data found a lot of valuable things to do with that data. Then as everyone started putting sensors into things, it got harder to find applications where collecting that data made sense. The last wave were the yahoos who were trying to “internet enable” washing machines and other silly things.
AI will be the same way. The first wave is generating pictures easily or trivial code templates. Quick, easy and pretty valuable. After this people will find ways to use AI, but it won’t be splashy or super profitable. The last stage will put AI into washing machines (which you can connect to using your IoT app).
It really depends on how fast the technology progresses. If what we see is what we are going to get, I’d agree with you. But if it rapidly starts entering the areas of science fiction, I think we’re talking about something a lot more disruptive. It will be a keystone moment in the history of humanity.
Surprise
The Insurance Institute for Highway Safety, which rates cars and SUVs for safety, examined so-called advanced driver assistance systems such as Tesla Autopilot and found them wanting.
——-
“Some drivers may feel that partial automation makes long drives easier, but there is little evidence it makes driving safer,” Insurance Institute president David Harkey said in a statement. “As many high-profile crashes have illustrated, it can introduce new risks when systems lack appropriate safeguards.”
The federal government’s National Highway Traffic Safety Administration doesn’t currently regulate these sorts of systems. That’s one reason the IIHS instituted these ratings, Harkey said in an interview with CNN.
Will they put a premium surcharge on vehicles with “driver assist” systems? And, of course we need more government regulation.
Self-driving cars probably would be safer if everyone was in a self-driving vehicle. But you will never get that buy in. A lot of people will never give up their power over the wheel. Most are convinced they are great drivers and that it’s everyone else who sucks. Then there’s nuts like those who inhabit this place who are worried about hackable cars and government monitoring.
I’m told we’re just supposed to bend over and accept it, I mean, be stoic.
I rented a Nissan Rouge for my work trip, and it had the automatic cruise control.
I used it for a while, but I found it made me very sleepy, whereas actually driving did not.
I suspect that is one of the major reasons self-driving isn’t necessarily safer. The driver is lulled to sleep and isn’t available for that random case that the car can’t handle.
A buddy of mine is working on self driving cars for Google and in his opinion they will really only work in closed environments like a certain part of a city.
“Nissan Rouge”
The window tint gave you a rosy hue?
I use the radar-controlled cruise control on long trips. I can use if for an hour or two before traffic picks up and I need to control the car myself. All it does is set my speed to the car in front of me, which is great on some stretches between TX and Florida. I end up getting to my location more rested and comfortable instead of tired from constantly tapping the brakes and adjusting speed.
We hates it, precious!
Probably because I tend to be on the faster end of the distribution, so constantly approaching vehicles in the right lane. And it will imperceptibly match speed like a quarter of mile out. So while my driving brain is anticipating changing lanes, passing and re-inserting on timescale X, measured against any other traffic in the left lane, I would often find the whole smooth flow completely disrupted by the unannounced and unnoticed slowing, completely disrupting my flow. I eventually acclimated to it and would take over the pedal when I saw any vehicle in the right lane. But I’d rather have the option for cruise control with the ability to disable the adaptive portion; but it seems that with most modern cars, it’s all or nothing, though my experience is in a limited number of rentals. I’m hoping my 2008 4runner outlasts me and I won’t have buy one of the newer cars before I shuffle off.
The LoRa Alliance is gonna be all over you for using LoRa incorrectly.
What is that nonsense link?
Good on the kid for sticking up for himself. Boat owner seems to be living up to expectations. I’m assuming he was trying to pick up the woman in the yellow skirt as she’s just standing there.
https://www.sandiegoville.com/2024/03/owner-of-san-diegos-famed-lamborghini.html
Classy guy in the boat.
Speaking of cruise control- I would be willing to bet the guy in the truck who slams into the back of those other cars in Sensei’s link had the cruise control on until he suddenly noticed what was happening ahead of him and locked up the brakes. Fuck cruise control. Drive the goddam car.
Lamborghini “yacht”? WTF?